Bank the Farm: Let it Snow!

Originally posted at Mother Earth News

Bank The Farm: Let it Snow!

winter sceneNorthern New York has finally been enjoying a “real winter” of snowfalls up to three feet at a clip. It's made for great shoveling adventures: driveways, decks, igloo and snowman construction. But actually packing that snow against your house (called “banking”) can help to insulate it all winter long (or, at least until it thaws!).

Unless you live in a real wintry tundra where there's no thaw until March, banking your home will probably have to be done after every heavy snowfall. But even if you pick just one wall of your house, the benefits are great — especially if your home is prone to winter drafts. Before home insulation was a widespread practice, many farmers lined their foundations with hay or straw bales to accomplished the same thing as snow-banking.

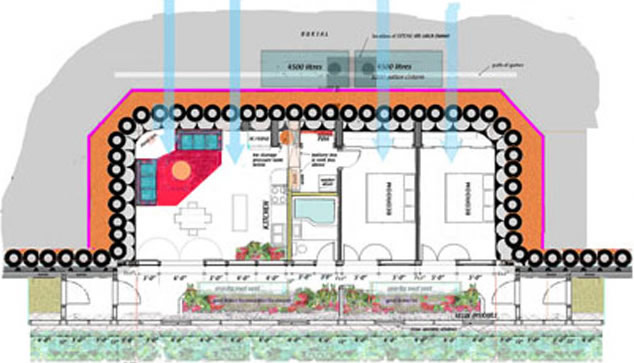
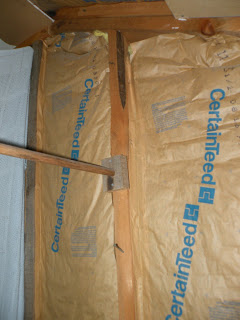
Understanding the key principles of home insulation is a must for anyone trying to do a better job of keeping the heat inside. Insulation works by slowing down heat movement through building materials. Heat will always move to a colder source. In the winter, insulation keeps heat in. In summer, insulation keeps heat out. The result in both climates is energy saved by keeping the air conditioner or heat source from operating as often.

Insulation is measured by its R-value, which allows you to calculate how much heat will move through a certain wall area depending on the temperature difference between the indoor and the outdoor air. The R-value of insulation is a measure of thermal resistance, expressed as the thickness of the material divided by the thermal conductivity. The higher the number, the better the insulation's effectiveness.

To bank your house, you'll want to have enough snow to make at least two-foot mounds along the outside walls. For every inch of snow, you gain an R-value of 1 or more. Most older homes are still outfitted with R-11 insulation on their walls; newer homes often have wall insulation with R-13 or higher. Banking your house will provide you with several additional R-value degrees on the walls — saving you significant dollars on energy costs or insulation-replacement costs).

Grab a snow shovel (or several—many hands make light work), and mound up snow two feet or higher along the sides of the building. Some people find it's easier to pack snow against their house by using a sheet of plywood (4x6 or 4x8) held vertically two feet away from the outside wall of the house and a pole that is strong enough to support the wooden sheet. Start at the corner of the house and pack snow between the plywood and house, moving the plywood and pole along as you fill in the gap.

This is especially effective when you can bury the foundation—stone being a conductor of heat—in snow. It also seals whatever tiny cracks allow cold to enter.

Decking or stairs may prevent banking at certain locations of your house; but wherever you can, bank. You are guaranteed to feel the difference. 
1 Comment

Nicole Caldwell

Nicole Caldwell is a self-taught environmentalist, green-living savant and sustainability educator with more than a decade of professional writing experience. She is also the co-founder of Better Farm and president of betterArts. Nicole’s work has been featured in Mother Earth News, Reader’s Digest, Time Out New York, and many other publications. Her first book, Better: The Everyday Art of Sustainable Living, is due out this July through New Society Publishers.

Winterization Station

In the endless journey to green our homes, wintertime is often one of the most wasteful. We produce hot air through baseboard heat, wood stoves, furnaces, monitors or space heaters, then lose it through poorly insulated walls and roofs, outdated windows, and drafty doors. Toeing the line between frugality and sustainability, we're all faced with countless choices of how to hold desirable temperatures in and keep extreme temperatures out.

Changing windows is expensive and costs $133.88 per ton of carbon saved; changing to a programmable thermostat is cheap and comes in at $ 9.34 per ton of carbon saved. So before the vinyl window salesman tells you to fix your windows, do all of the cheap and effective stuff second—do all the

free

and effective stuff first

.

Free Stuff

  1. Lower water heater temperature to 120°F

  2. Increase AC thermostat by 3°F

  3. Wash clothes in cold water

  4. Air dry clothes during summer

  5. Turn off unneeded lights

Just doing that will save 1600 tons of carbon and $250 per year.

Below is a winter checklist we can all follow to ensure we have a snuggly warm, green winter.

Windows

  • Keep them in the locked position (this seals them from the weather and makes them airtight in most cases)

  • Cover your windows with thermal curtains and/or blinds (this can block up to 80 percent of heat loss)

  • Use of window insulation: brand-name items from a store or cellophane or plastic bags

  • Stop the Air Leaks (with a savings of $10.77 per ton CO2 saved): In an old, pre-1945 house, the air leaks can add up to the equivalent of a hole in your wall 21 inches in diameter! Natural Resources Canada (NRC) says that in a house vintage 1946-80 the hole is 16 inches, and in a modern conventional home, 14 inches. When you think about it that way it becomes obvious that there is a lot of heat loss, it is like leaving a window open all winter. 

  • Heat-shrinking film(save 25.02 per ton of CO2 saved). The window salesman may tell you to replace those old wood windows, but they are often part of the character and charm of the house, the replacements are usually vinyl, and it costs a lot of money. Instead, look into a seal-and-peel caulk (wonderful stuff; no matter how bad you are at caulking it just peels off in the spring) and heat-shrinking film. There are also magnetic, interior storm windows but they cost much more money. Click here for application instructions.

Programmable

Thermostat

Savings: $9.34 per ton CO2 saved

A setback, or programmable thermostat has the biggest bang for the buck of any single thing you can do; it costs only $9.34 per ton of carbon saved, and is getting better all the time as the price of the electronics drop. A setback thermostat can save up to 15 percent on your heating bill. For houses with radiant floors or old hot water radiator systems, there is a really slow response time because of the thermal inertia in the systems. I used to say that setbacks wouldn't work for these, but new thermostats track the performance of your heating system, figure out when to turn it on, and basically plan ahead. After all, nothing makes you want to jump under the covers than a cool house before you go to bed!

Insulation

  • Insulate your water heater(save $12.66 per ton CO2 saved): You can buy kits at hardware stores that come with straightforward instructions; but basically you just wrap the insulating sleeve around your water heater.

  • Add attic insulation (save $15.56 per ton CO2 saved): Many houses have attics that are accessible via a hatch in the hall or a cupboard; if you have this, insulating your attic is not that hard, and delivers a good bang for the buck. You want about R-50 up there to prevent heat loss.

  • Install efficient showerheads (save $18.02 per ton of CO2 saved): Okay, this isn't exactly insulation. But it functions just like wrapping your water heater or insulating your hot water pipes in the basement. The U.S. Environmental Protection Agency (EPA) notes that showers use about 17 percent of residential water use, totaling 1.2 trillion gallons per year. If you like long, hot showers, this is a great way to use less energy to heat the water, and less water in general. We have the Evolve shower head at Better Farm, which automatically shuts off when it reaches 98 degrees while you're getting ready to hop in the shower. 

  • Fill drafts and holes throughout your house. Look for light shining through the walls inside during the day or light shining outside during the night. On cold winter nights walk around in shorts and a tee shirt (or naked, we won't tell) and you'll certainly find cold drafts. Find these areas and insulate them however you can. Areas under doors can be controlled with a rolled up towel or rug over the opening. If the drafts around doors are especially bad consider purchasing foam insulation made to stop the draft in this area. An easy way to deal with this is to place masking tape over the cracks around the door each night, but this can be a pain.

  • Insulate your body! Wear sweaters, sweat pants, socks and slippers in your home and just let it be cold.

Comment

Nicole Caldwell

Nicole Caldwell is a self-taught environmentalist, green-living savant and sustainability educator with more than a decade of professional writing experience. She is also the co-founder of Better Farm and president of betterArts. Nicole’s work has been featured in Mother Earth News, Reader’s Digest, Time Out New York, and many other publications. Her first book, Better: The Everyday Art of Sustainable Living, is due out this July through New Society Publishers.

Cold-Weather Prep For House, Grounds

As the nights in the North Country see colder and colder nights, we've begun prep work on Better Farm's main house and grounds to better insulate our people and plants.

There's opportunity in every planting zone for year-round harvesting.

We're doing kale and garlic as our bumper crop this fall, while adding lots of hay, compost, and cardboard to existing plants in the garden to encourage growth throughout the fall (our broccoli, swiss chard, kale, cauliflower, tomato, squash, eggplant, potato, and celery plants are all still growing strong!). For fresh rounds of plants like kale, we

built cold frames

to protect the immature plants and, later when the weather really dips, to protect mature plants from the elements:

Here are some baby kale plants waking up in a cold frame:

It's also time for upping our

levels of mulch on garden rows

and around plants and small trees. Our

baby peach

and willow trees are additionally being

wrapped this week for added insulation

(we're making our own insulation, or you can buy your own).

Inside, we've also rotated our crop in our

aquaponics setup

, starting some various salad sprouts as well as more lettuce.

Studies have found that by

saving even 1 degree of heat during the winter months can help cut your electricity bill by as much as 2 to 3 percent

. Insulating the ducts helps to maintain the desirable temperature without allowing any air to enter or escape and disturb the equilibrium being achieved. To that end, today we

wrapped foil tape around each heat duct

joint in the basement to prevent air leaks and ensure the forced air makes it upstairs all winter long. (You can also insulate your entire ducts; see how

here

).

Inside the main house, we'll be

swapping out summer curtains for insulated winter ones

; sealing leaks in windows and doors, and exploring new ways to increase the efficiency of our kitchen-dwelling wood stove.

Got a great winter-ready tip to share? E-mail us at info@betterfarm.org.

Comment

Nicole Caldwell

Nicole Caldwell is a self-taught environmentalist, green-living savant and sustainability educator with more than a decade of professional writing experience. She is also the co-founder of Better Farm and president of betterArts. Nicole’s work has been featured in Mother Earth News, Reader’s Digest, Time Out New York, and many other publications. Her first book, Better: The Everyday Art of Sustainable Living, is due out this July through New Society Publishers.

Upgrade Your Home's Insulation with Injection Foam

Using injection foam to insulate walls 
Editor's note: This article was originally written by Tim Snyder for Mother Earth News.

It’s not unusual for a household to consume twice as much energy as necessary. Of course, there are many “culprits” responsible for this high energy demand: an inefficient water heater, phantom loads from electronic devices, leaky ductwork and an outdated furnace, just for starters. But one of the most common denominators in energy-wasting houses is inadequate insulation – or more specifically, too many air leaks and too little insulation.

In earlier blogs, I talked about the importance of air-sealing and insulating the attic according to recommendations established by the U.S. Dept. of Energy. If you have access to your attic space through a hatch or drop-down stair, your attic is a good candidate for an insulation upgrade with blow-in cellulose or fiberglass insulation. You can rent an insulation blower yourself or have an insulation contractor do the job, after sealing leaks between the attic and the living space below.

Beefing up the insulation in your walls is a different matter. In many older homes, walls are framed with 2x4 studs and either have just R-13 fiberglass batt insulation or no insulation at all. Even when there is insulation in exterior walls, there are certain to be air leaks that allow frigid winter air to come into your living space around electrical outlets, window framing and through other air leaks. Flawed installation details can also hurt energy performance. A small void or area where insulation is missing can cut a wall’s overall insulation value by as much as 40%.

Improving wall insulation can be challenging. After all, who wants to go to the expense of removing interior wallboard or exterior siding and sheathing in order to access a wall’s stud cavities? Another alternative – removing exterior siding and then covering walls with rigid foam insulation—is also expensive and disruptive. So what can be done to solve this energy and comfort problem?

Injection foam is proving to be an excellent product for upgrading existing wall insulation quickly, affordably and with minimal disruption. Standard two-part foam can’t be sprayed into wall cavities because its expansive force will pop wallboard and sheathing off studs. But injection foam is non-expanding. It’s designed to flow and fill around electrical wires, outlet boxes and existing underperforming insulation. It seals air leaks, fills voids, and provides very high R-value: up to R-5.1 per in. when temperatures are close to freezing.

To upgrade wall insulation with injection foam, workers drill small (typically 2-in.-dia.) holes in each stud bay, from inside or outside the house. The stud cavity is then filled with injection foam from a flexible hose, and the access holes are plugged.

Another thing I like about injection foam is that it’s not hazardous to handle. Workers wear safety goggles and gloves rather than respirators and hazmat suits, which are required when installing standard two-part spray foam. Injection foam overspray cleans up with water rather than solvent. Recently I watched a crew from a Connecticut-based company called Dr. Energy Saver install injection foam in the walls of a ranch house. Workers removed a course of vinyl siding to access the wall sheathing. After drilling access holes, the injection foam was (there’s no better word) injected into each cavity. The foam looks like shaving cream and has a similar consistency. In just a couple of hours, the job was done. Small amounts of foam were evident inside the house, where the material filled gaps around electrical outlets. Cleanup was easy, and I came away with no doubts about the effectiveness of this technique for sealing leaks and upping wall insulation value.
1 Comment

Nicole Caldwell

Nicole Caldwell is a self-taught environmentalist, green-living savant and sustainability educator with more than a decade of professional writing experience. She is also the co-founder of Better Farm and president of betterArts. Nicole’s work has been featured in Mother Earth News, Reader’s Digest, Time Out New York, and many other publications. Her first book, Better: The Everyday Art of Sustainable Living, is due out this July through New Society Publishers.

Warming up to Soy Spray Insulation

Better Farm is up to two totally off-grid structures, the Birdhouse (powered with a small DIY solar setup and built with locally mined wood) and the Greenhouse (built with donated old windows and locally mined lumber, and utilizing passive solar).

But our biggest project to date, the Art Barn, is a task totally unlike the other two in that it involves a complete overhaul of an existing, on-grid structure: taking a 1,400 square-foot hay barn and transforming it into a totally green, state-of-the-line artspace, studio, and gallery. We've utilized found materials, upcycled items like overstock and/or discarded windows from a local hardware store and storage lockers marked for the dump over at Fort Drum, done much of the work ourselves, sought out energy efficient means to power the space, and scheduled our first on-site visit next week with

One Block of the Grid for our upcoming 10-panel solar system.

All of this is very well and good, but left out a major player in any renovation project: Insulation.

For smaller projects in and around the house, we've utilized 100% recycled cotton batting insulation, which is so eco-friendly and nontoxic you can actually rub your face in it. Makes for a very pleasant change from the days of masks, gloves, and long sleeves and pants to avoid fiberglass fill and other nasties.

Disadvantages to the recycled batting insulation are cost and effectiveness—the stuff we got from Lowe's was only R-19. So I began looking into other green options. Spray-in fiber fill is good and cheap, but continually settles over time

and doesn't add anything to the integrity of your walls. Then I discovered spray foam installation, which can strengthen walls but is often a toxic mix of chemicals you wouldn't want blown your way in a breeze let alone left to sit in the walls that literally surround you.

Then betterArts board member Scott Mueller tipped us off to Demilec.

These guys offer a Heatlok Soy 200 spray foam barrier that adds to the integrity of your walls, seals in all the gaps and cracks that might exist in your structure, is made from recycled plastic bottles and soybeans, and is in general just a totally amazing way to insulate your home or office. For each inch of sprayed soy insulation, you get an Aged R-Value of 7.4 (we're doing three inches on all the walls and the ceiling of the Art Barn's first floor). This insulation also offers five barriers: air barrier, insulation, water barrier, vapor barrier, and drain plane.

The company estimates that its Heatlok Soy 200 sprayfoam helped to keep 12 million plastic bottles out of landfills in the last year alone. It's not cheap, but adding to the barn's strength as a building, offering a great water barrier to the elements, and potentially (with wood stove installation) keeping the Art Barn at a sweet 75 degrees all winter long are all very attractive options.

Needless to say, we've decided to give them a try. Negotiations are underway for our Heatlok Soy 200 application to be completed in the next couple of weeks. We'll of course be documenting the process—and our thoughts—along the way. Stay tuned!

Want to find out more?

Demilec USA

1BOG Home Solar Power Discounts

Photos of Better Farm's Art Barn renovation so far

Inspiration Station: Sustainable housing ideas

Found a gem of a website the other day called The Independent Patriot; a kind of step-by-step living guide to worst-case-scenario preparedness. The site, while a bit conspiratorial and fatalistic, features everything from information on long-term survival to food production and storage. "Wow" factor of peering into a fallout-shelter mentality aside, this guy's take on sustainable housing is downright inspirational.

Straw bale houses, buildings made out of old tires, rainwater catchment and graywater systems: you name it, this guy has outlined it. Great food for thought.

Click here to get a peek at the new frontier of sustainable living

(information is also pasted below).

Energy Efficient Structures

Monolithic Dome

Monolithic Dome

Monolithic domes provide superior insulation and protection from the elements, while giving the owner greater flexibility with interior construction. They can also provide and increased level of security when properly designed. These homes are compatible with passive and active solar systems, natural lighting, and underground cooling tubes. This style of home should be a top choice for people interested in independent living and home security. A monolithic dome is not typical "dome home." These domes are constructed by forming a ring-shaped foundation and attaching a flexible PVC "airform" which is then inflated to make the shape of the house. Several inches of polyurethane foam are then sprayed onto the inside of the dome, followed by steel rebar and several inches of concrete. The outside can also be coated with chain link and stucco to make an impermeable, fire-proof, hurricane-proof, earthquake-proof dome structure that is extremely well-insulated and provides an interior space with no supporting beams.

The structures can come in several different shapes and sizes. each airform is custom designed and fabricated. The cost of construction is similar to conventional construction, but the energy and maintenance savings can be substantial - especially in extremely hot or cold climates. These structures can be earth-bermed or covered with vines. Monolithic domes with stucco on the outside and 3"-4" of shotcrete on the inside also provide increased protection from small-arms fire.

Earth-Sheltered

Earth -Sheltered Home

Earth-sheltered homes range from homes with earth pushed up against the walls to homes that are entirely underground. Typically, an earth-sheltered home is set into a hill with earth on three sides and on top. The front is usually exposed to the south. The main advantage of an earth-sheltered home is the insulation offered by the thick covering of earth. Earth-sheltered homes maintain a constant 60-degree temperature, year-round, in hot or cold climates. They can be easily heated, and will hold the heat, due to the thick insulation.

Earth-sheltered homes have comparable construction costs to conventional homes, but cost far less to maintain. With proper use of skylights and windows on the southern exposure, they can have the interior appearance of a conventional home.

Insulating Concrete Forms

Insulating Concrete Forms (ICF) allow you to build a conventional-looking home with reinforced, double-insulated concrete walls. The forms for the walls are made of insulation "blocks" that are stacked and bound together. The space between the foam insulation is where the concrete is poured. The forms are placed over steel rebar and all plumbing and electrical is run through the walls before the concrete is poured. ICF blocks offer several ways of attaching sheetrock or wood paneling. Almost any type of exterior surface can be applied. The walls are thicker than a typical home, but they also provide much better insulation and strength. Multiple-story homes can be built with ICF.

Straw Bale Home

Straw Bale

Straw-bale homes offer a unique twist on highly-insulated structures. The main building component is straw, and the walls are at least two feet thick. The straw makes the building extremely well-insulated, and gives a "soft" feel to the corners. Straw-bale homes can either have load-bearing straw walls, or they can be framed and filled in with straw bales. All utilities are run through the walls as the bales are stacked. Bales are impaled on steel rebar for stabilization. The walls are typically covered with plaster or stucco. If properly sealed and plastered, they will not have problems with water, but high humidity can be an issue, since the water vapor can work its way into the straw. There is no increased risk of fire with the use of straw bales. Straw bales are extremely dense and provide little oxygen for fires to feed on. They are actually a better fire barrier than convention wood-framed walls.

Earthship (Tire House

Earthship

The Earthship concept goes beyond just home construction. It is aimed at providing a complete off-grid system that handles everything from water collection to gray water and sewage treatment. These homes are typically built into the side of a hill and use old tires as the primary wall building material. The tires are stacked like bricks and filled with rammed earth as each layer is laid. The buildings are oriented to the south, with a greenhouse wall that allows in light and lets you grow plants that help filter gray water. The integrated power and water systems make these homes very interesting. Some of these concepts could be used in conjunction with other earth-sheltered homes.

Planning: Art Barn renovation begins

It all begins with a single sketch.

We've been kicking around lots of big ideas for the multi-level barn across the street. The space functioned in previous incarnations as a home for pigs, hay storage, and a catch-all for earthly possessions from tricycles to church altars. In the ensuing years discussions for future plans included recording studio, yoga center, workshop, radio station, and sleeping space.

We've settled on the following ideas for the Art Barn, which will largely be utilized by our new nonprofit venture betterArts:
  • Downstairs: studio and gallery space, wood stove heat, convert carport into space for welding, woodworking and the like
  • Second Floor: Yoga and dance studio, can also double as a practice space for musicians
The above-mentioned components will also include an exterior staircase to the second floor with deck; wiring that will be hooked into solar or wind (we need to bring in some experts for a good, old-fashioned consult for that); and rain collection bins to supply big sinks with water for cleanup. We've also discovered some amazing, ecologically responsible spray foam solutions for insulation.

Last spring we hauled in a dumpster and emptied most of the barn, leaving us room to begin our Doors Project in the summer. Then the hay was cleared from the second floor, and we took our measurements for sliding doors, windows, a wood stove, outside staircase, balcony, the works.

I sat down a couple of months ago and threw together some rough illustrations, for example this proposed idea for the barn's second floor:


Then I was told our town doesn't allow spiral stairs; and that for art space, indirect light is best (duh). So back to the drawing board I went, moving windows to the east wall and making a mental note that the best access to the second floor without sacrificing space involved an exterior staircase stretching along that same east wall.

Of course, I'm no architect. And seeing as I didn't even use a ruler for the above sketch, we brought in the big guns to draft a real concept. Here's the proposed back wall on the second floor of the new Art Barn:


If you're like us and willing to move ideas around based on what supplies are available, when shopping for windows and doors be sure to check with your local hardware store about their overstock, or ordered items that went unused in previous projects. You can find great deals this way on really good products.

We break proverbial ground this week, framing in windows and doors and completing the batten work on the outside of the space. Once we're weatherproofed and framed in, the barn will get wired for solar or wind, then insulated. Check back in regularly for updates!
1 Comment

Nicole Caldwell

Nicole Caldwell is a self-taught environmentalist, green-living savant and sustainability educator with more than a decade of professional writing experience. She is also the co-founder of Better Farm and president of betterArts. Nicole’s work has been featured in Mother Earth News, Reader’s Digest, Time Out New York, and many other publications. Her first book, Better: The Everyday Art of Sustainable Living, is due out this July through New Society Publishers.

Winterize Your Windows

Windows account for up to

30 percent

of all heat lost in the home. That adds up to lots of dollars you're paying for heat you're not getting.

Winterizing your windows is a simple process with lots of cost-effective options you can execute on your own. There are a few different methods we've employed at Better Farm that cost next-to-nothing but have made a big difference.

  • The Wonderful World of Caulk Wander around your house and look for any space between your window moulding and wall (especially gaps behind the moulding itself). Carefully apply caulk to the gaps you find, then sit back and revel in the end of drafts.

  • Insulation Around Windows  In renovations last year, we removed the edging around some windows upstairs and discovered there was no insulation between window and wall. It only took about 10 minutes to wedge insulation into the cracks (caulk for particularly small cracks), and another 20 to reattach the moulding.

  • Thermal Curtains JC Penney's Linden Street line has a bunch of thermal curtains to choose from that work wonders to stop drafts. The craftier among you might be interested in Jo Ann Fabrics' insulated window treatment liner that you can stitch into your own custom drapes.

  • Locking all Windows With many newer windows, locking them makes a tight, closed seal. This is an easy and free way to reduce air leaks.

  • Plants as Cold Barrier With vertical gardens all the rage, why not capitalize on the added insular effect of a wall of plants? Beautiful, good for the air, and an additional weather barrier? Yes, please.

Follow any or all of these tips and we promise you'll feel a dramatic difference. And let's spread the warmth! Please let us know about any other cold-weather strategies you're employing this season. Happy heating!

1 Comment

Nicole Caldwell

Nicole Caldwell is a self-taught environmentalist, green-living savant and sustainability educator with more than a decade of professional writing experience. She is also the co-founder of Better Farm and president of betterArts. Nicole’s work has been featured in Mother Earth News, Reader’s Digest, Time Out New York, and many other publications. Her first book, Better: The Everyday Art of Sustainable Living, is due out this July through New Society Publishers.

New Bathroom is Green in More Ways Than One

When it became clear there would be enough people coming through Better Farm to warrant a third bathroom, imaginings began as to how we could create a state-of-the-art space with as small a carbon footprint as humanly possible. I opted to retool what used to be Skyler's room on the second floor; which meant a lot of new pipes, some extremely creative spirits on the part of the workers who would do the dirty work, and a ton of patience.

I did extensive research on how to "green" a bathroom, and came up with a few key points to pay attention to from my handy-dandy "Green Remodeling" book. Here are some options to consider when renovating an existing bathroom or putting in a new one:
  • High-performance, low-flow shower head with chlorine filter
  • Compact fluorescent bulbs
  • Lighting controls
  • Windows that open
  • Landscaping for shade
  • Greater natural daylight
  • Upgraded single pane windows
  • Water filters
  • Low-flow faucets
  • Insulated plumbing and pipes
  • Solvent-free adhesives
  • Low-flow or greywater flushing toilet
With these ideas in mind, I made a few sketches of the perceived space:


From there, Fred Ciliberti got to work gutting the room and laying out the pipework. Bobby Rockerman showed up for a while to help get the piping from the basement to the soon-to-be bathroom. In the meantime, I scooped up several eco-friendly components:
  • Dual-flush toilet    Kohler makes a dual-flush toilet that can save the average homeowner more than 6,000 gallons of water annually by utilizing 20% less water-per-flush than your average toilet. In addition, there are two flush buttons instead of one so you can control how much water you need to wash away waste.
  • Reclaimed claw-footed tub    The United Methodist Church in Alexandria Bay held a tag-sale fundraiser for which people in the area donated items. Among them was a claw-footed tub, in pristine shape—we were even able to use most of the original hardware, including wonderful old stainless steel faucets. All we did to update the tub was slap a fresh coat of primer and paint on the outside, soak the hardward in CLR, buff them up with some Bar Keepers Friend, and call in carpenter extraordinaire Gary Stevenson to hook it up.
  • Evolve showerhead    The Evolve showerhead utilizes ShowerStart technology, which stops water flow to a trickle when it reaches 95 degrees. When you're ready to hop in the shower, simply pull the cord next to the showerhead and the water pressure is restored. So what does it save? A whopping 2,700 gallons of water annually, all the fossil-fueled energy it requires to heat that much water, and up to $75 off our annual utility bill.
  • Reclaimed bathroom sink pedestal    Vessel sinks are all the rage in bathroom design these days, but we wanted to revisit some old-fashioned roots with this modern-day fad. Armed with a white vessel sink from Lowe's, we tracked down a pre-Civil War washing table at Liberated Sole Shoe Repair & Antique Shop in Watertown that once held—you guessed it—a wash basin. Using some minor wizardry by the wonderful Gary Scholes, the sink hooked into and through the table.
  • American Olean tiles    American Olean spearheaded a Greenworks initiative, which offers information and support on LEED-certification, eco-friendly construction, and sustainability issues as they relate to construction. And by their very nature, ceramic tiles last far longer than other surface types. Less replacing means less waste and wear and tear on the environment. 
  • Controlled lighting     There are three sets of lights in the bathroom, all utilizing high-efficiency bulbs. This way, during the day you can use no lights (east-facing window means plenty of natural sun rays), or if you're getting dolled up for a night on the town you can flip on the vanity lights above and to either side of the mirror. There's also a three-way fan in the ceiling, which has a hot air blower, regular room fan, and soft light when you just need a little glow to guide your way. 
  • Eco-friendly insulation     Nowadays there's no excuse for toxic fiberglass insulation. All insulation-related updates at Better Farm have utilized cotton insulation that's so safe you can rub your hands and face in it.
With these elements in place, Gary Scholes came in to complete the carpentry and plumbing.  Gary Stevenson finished the project off by creating a small oak stage for the tub (he found a pile of beautiful, aged oak out in our barn and planed some of it for this project—stay tuned for future uses we put the rest to!) and hooking it into the pipework Fred and Bobby laid.

Photos from the process:

And for the finished product...


Many thanks to the following people for their support and expertise:
Kristen Caldwell's generous donation
Hunter Ciliberti, demolition
Fred Ciliberti, demolition, plumbing, and carpentry
Bob Rockerman, plumbing
David Garlock, consulting
Gary Scholes & crew, plumbing, tiling, and carpentry
Laura Caldwell, vintage towel rack
Scott Mueller, fish painting
Kate Garlock, bathtub refinishing and painting
Gary Stevenson, plumbing
Chris Menne, Brian Hines, and Sarah Herold, painting and staining

Upstairs Bedroom Ditches the Blues

Once upon a time, there was a young boy who got to design his very own bedroom.
Only problem was, that little boy moved out and left Better Farm his bright blue walls. It was time for a little updating; though the room itself is in very good structural shape. That is, except for the closet:
The first thing we did was put up a wall between the closet and the room next door. Then we reinsulated, and installed a shelf and clothes rack. Many thanks to Fred Ciliberti for getting that sorted!

Next up was the room color. We went with basic white to give the room a clean jump-start. Then we brought in Clayton "Ikea" Carlson, who had a killer furniture collection that is all clean lines and airy patterns. The result? Well, you might not recognize the space...
 
Amazing what a fresh coat of eco-friendly paint can do.

Better Renovations: Upstairs kitchen, before

A house inhabited by hundreds of people over the course of its life holds many secrets in its walls—or lack thereof.


The above photo captures what we discovered upon pulling the upstairs fridge away from the wall. No insulation whatsoever between the room and the outdoors! Not to mention wires in desperate need of grounding and reconnoitering; a wall of windows needing insulation, caulk, and molding; and hundreds of square feet seeking spackle, sanding, and paint.

All that, plus the removal of a space heater we won't be using and a nice, deep clean: Our work is cut out for us. Stay tuned for after pics!


1 Comment

Nicole Caldwell

Nicole Caldwell is a self-taught environmentalist, green-living savant and sustainability educator with more than a decade of professional writing experience. She is also the co-founder of Better Farm and president of betterArts. Nicole’s work has been featured in Mother Earth News, Reader’s Digest, Time Out New York, and many other publications. Her first book, Better: The Everyday Art of Sustainable Living, is due out this July through New Society Publishers.