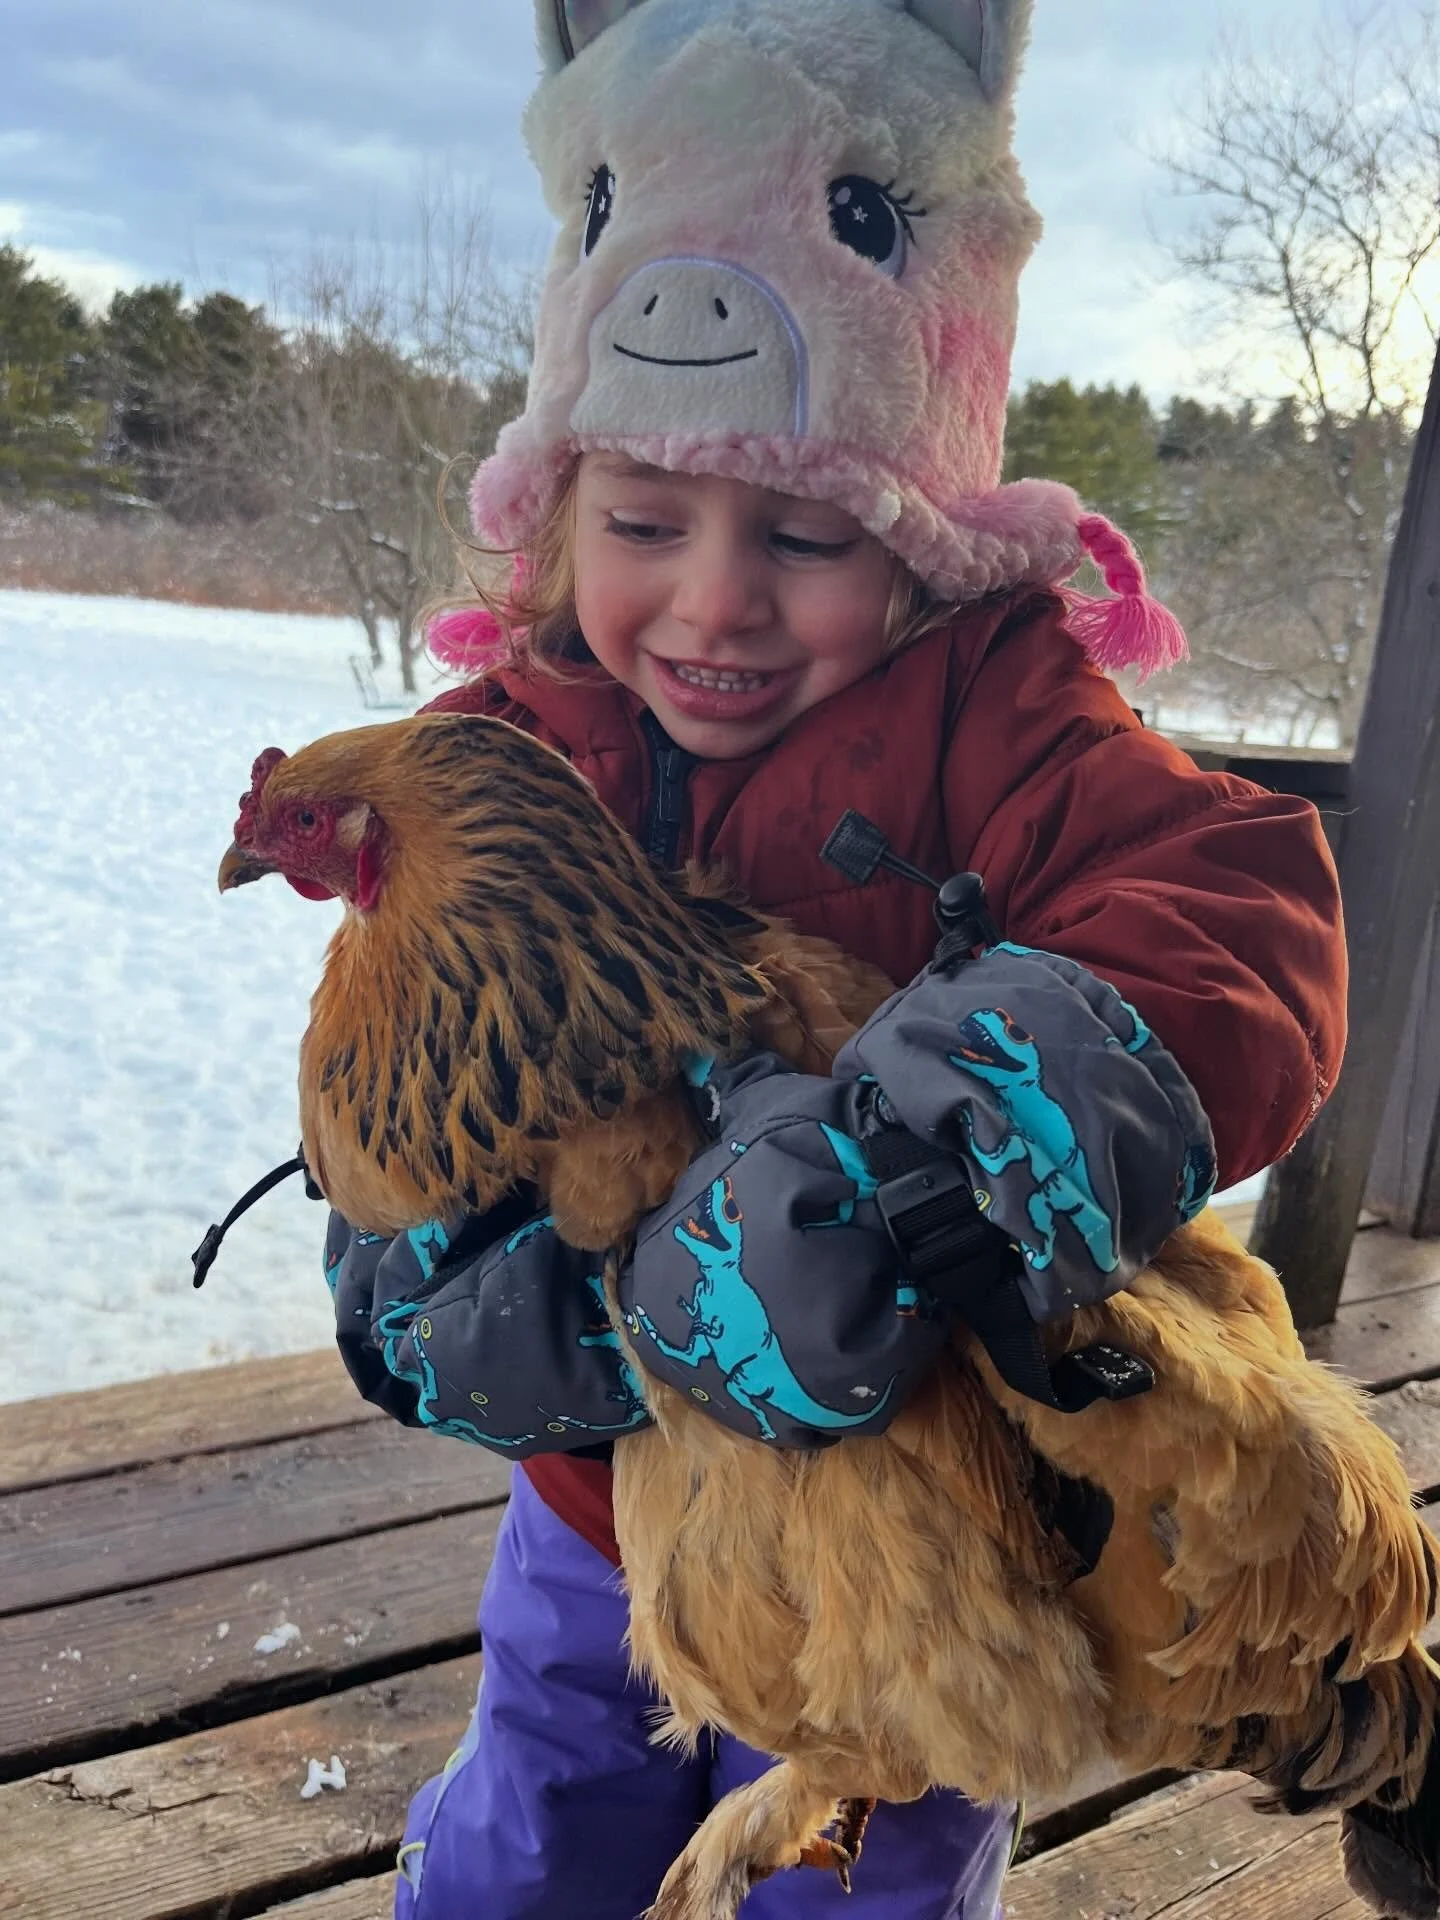
We've Got Chicks!

 
There is new life on the farm! We have eight baby chickens who hatched last week after 21 days in the incubator.
To prepare for the babies' arrival, we borrowed a heat lamp and metal trough from our friends Penny and Steve in Clayton. It's very important that new hatchlings be kept in a circular container in order to avoid anyone getting crushed in a corner (the birds have a tendency to "pile on" and stay huddled together). Water for newborns is kept in ice cube trays to prevent drowning; and food (specially formulated for babies) is kept in a small trough or in the ring of a waterer.

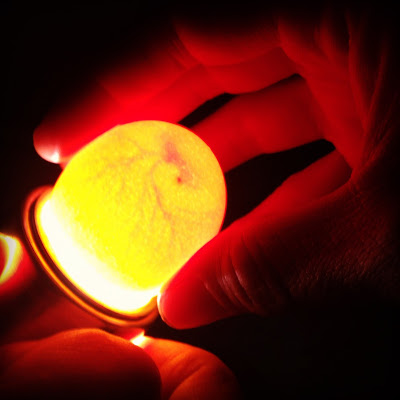
It was only hours after we'd stocked up on supplies that I went to check on the eggs and saw four had cracks. I was so excited, I kept vigil overnight in the room with the incubator. The next day around 10 a.m., one of the baby chick started to make her way out of the shell. It took the little lady about 15 minutes to break free from the shell: I became a mother! Later that day we had four more chicks; the next day, two more hatched. 

When a chick hatches, it's very important to leave it alone while it dries off. A chick can live up to two days in an incubator after hatching, living off the innards of the egg it came from. Our chicks took 24 hours to dry off completely, at which point we moved them to the metal trough. We suspended the heat lamp approximately 18 inches off the ground, and adjusted accordingly. If the chicks are all huddled directly under the light, they are too cold and the light needs to be lowered. If they avoid the light altogether, that means it's too hot and needs to be raised. As the chicks grow, the light will gradually be raised more and more until it is no longer needed.

All told, we had eight chicks hatch from the eggs. Let’s hope they all love me as much as I love them!

Making Blueberry Wine


Alcohol fermenter Paul Jennings came to Better Farm this past Saturday, July 13, to teach a workshop on how to make two gallons of blueberry spice wine. It was much faster and simpler than I could have ever imagined! Anyone can do it in their own homes with the proper equipment. 

Here is the breakdown of ingredients:

4 - 6 lbs. of blueberries 4.5 lbs. sugar
1 tsp. ginger 1 tsp. nutmeg
1 tsp. cinnamon 2 tsp. acid blend
2 tsp. yeast nutrient 1 tsp. tannin
1 tsp. pectic acid Nylon mesh bag
Montrachet yeast Stabilizer

Directions:

1)   Chill 1 gallon of water. 
2)   Boil the 1 gallon of water, spices and sugar
3)   Wash berries and place them into mesh bags and place in primary fermenter. Mash      
      berries.
4)   Pour boiled sugar water over berries in primary (this will set the color). Add 1 gallon
      of cool/cold water. Add tannin, acid blend, and yeast nutrient.
5)   When temperature of liquid has cooled, add the pectic enzyme and check and 
      record of the S.G.
6)   24 hours later, add yeast
7)   Stir daily
8)   When S.G. is about 1.030 (about 1 week), remove the berries and rack to 
      secondary after about 4 weeks, S.G. should be at 1.000 (this means that the 
      fermentation is complete). Rack again. Add clearing agent.
9)   Check clarity in about 1 month. If not clear at this point, wait another 2 weeks and
      re-check.
10)  When must is ready to bottle, add stabilizer
11)  If sweetening is needed, boil 4 - 12 oz. sugar in water and add
12)  Bottle!

NOTE: the longer the wine "ages," the better it will taste. Since this wine has no preservatives added, it should be consumed within one year.

What was really special about this wine-making workshop was that residents at Better Farm were able to go out and pick local wild blueberries growing a town over in Plessis! It was a very sustainable and educational experience that provided a unique way to utilize local agriculture.

Making Natural Plant Dyes

After recently learning how to identify different types of edible wild plants, I decided to find wild plants that could be used to make natural fabric dyes. One of the main benefits of creating natural dyes is that the process is completely safe and allows you the ability to create your own colors and dye your own fabrics. To begin the process, I took a walk through the woods by the farm and picked a variety of flowers and berries, planning to identify them and determine if they would be suitable for fabric dyes. Although certain plants that are harmful when eaten remain suitable for dyeing, others can cause skin irritations so it is important to have a basic knowledge of the plants you intend to use in the dye.

Pioneer Thinking’s website has a great list of different plants, including which colors and shades they make when used for dyeing.

When using plant dyes, you first need to set the fabric that you will be dyeing with a salt fixative. I used ¼ cup of salt because I was only testing the dye on a small piece of fabric,

but most instructions recommend ¾ cup of plain salt.

Mix the salt with several cups of water and bring to a boil, then submerge your fabric and allow it to simmer for an hour. When the fabric is through, you should rinse it with cold water and ring out. For my dye, I used about 2 cups of red berries I found in the woods, along with a handful of petals from purple clovers and purple loosestrife. If any of the ingredients you are using as dye could be harmful if ingested or irritate skin, use an old pot that you don’t use for cooking anymore when boiling the plants. For the berry and petal mixture, I boiled them for about an hour and then let the berries soak in the water for another half hour before straining them and soaking the cloth in the mixture. The berries and petals created a light pink tint on the cloth I used, although I had hoped it would be darker. 

Home-Brewed, Jamaican Ginger Beer

Artist-in-residence Brad Smith helps out with ginger beer bottling.
With the over-21-ers enjoying beer in the house, I figured I'd make a lil' something for the kids. Ginger beer has the carbonation and sweetness of soda without all the preservatives and processed ingredients.

Sustainability intern Jacob Firman bottles ginger beer.
All you need is ginger root, lemon, and sugar. No commercial yeasts necessary-- this process utilizes omnipresent free-floating yeasts and bacteria, a process called wild fermentation.
This recipe is from Chelsea Green:

TIMEFRAME: 2 to 3 weeks
INGREDIENTS (for 1 gallon/4 liters):
  • 3 inches/8 centimeters or more fresh gingerroot
  • 2 cups/500 milliliters sugar
  • 2 lemons
  • Water
TIMEFRAME: 2 to 3 weeks
INGREDIENTS (for 1 gallon/4 liters):
  • 3 inches/8 centimeters or more fresh gingerroot
  • 2 cups/500 milliliters sugar
  • 2 lemons
  • Water
PROCESS:
  1. Start the “ginger bug”: Add 2 teaspoons (10 milliliters) grated ginger (skin and all) and 2 teaspoons (10 milliliters) sugar to 1 cup (250 milliliters) of water. Stir well and leave in a warm spot, covered with cheesecloth to allow free circulation of air while keeping flies out. Add this amount of ginger and sugar every day or two and stir, until the bug starts bubbling, in 2 days to about a week.
  2. Make the ginger beer any time after the bug becomes active. (If you wait more than a couple of days, keep feeding the bug fresh ginger and sugar every 2 days.) Boil 2 quarts (2 liters) of water. Add about 2 inches (5 centimeters) of gingerroot, grated, for a mild ginger flavor (up to 6 inches/15 centimeters for an intense ginger flavor) and 11/2 cups (375 milliliters) sugar. Boil this mixture for about 15 minutes. Cool.
  3. Once the ginger-sugar-water mixture has cooled, strain the ginger out and add the juice of the lemons and the strained ginger bug. (If you intend to make this process an ongoing rhythm, reserve a few tablespoons of the active bug as a starter and replenish it with additional water, grated ginger, and sugar.) Add enough water to make 1 gallon (4 liters).
  4. Bottle in sealable bottles: Recycle plastic soda bottles with screw tops; rubber gasket “bail-top” bottles that Grolsch and some other premium beers use; sealable juice jugs; or capped beer bottles, as described in chapter 11. Leave bottles to ferment in a warm spot for about 2 weeks.
  5. Cool before opening. When you open ginger beer, be prepared with a glass, since carbonation can be strong and force liquid rushing out of the bottle.
- See more at: http://www.chelseagreen.com/content/recipe-ginger-beer/#sthash.61GhEqXl.dpuf

Recipe: Ginger Beer

Categories: Food & Health
Posted on Thursday, October 18th, 2012 at 9:00 am by jmccharen

Ginger is a spice perfect for fall weather. Its fragrance can perk up everything from chai tea to apple pie. This humble root can also add a gentle kick of heat to stir fries or soups.
The natural yeasts in the root can also be used to kick start a bubbly ginger beer. Give it a try!
The following recipe is from Wild Fermentation: The Flavor, Nutrition, and Craft of Live-Culture Foods, by Sandor Katz.
This Caribbean-style soft drink uses a “ginger bug” to start the fermentation. I got this idea from Sally Fallon’s Nourishing Traditions. The ginger bug is simply water, sugar, and grated ginger, which starts actively fermenting within a couple of days. This easy starter can be used as yeast in any alcohol ferment, or to start a sourdough.
This ginger beer is a soft drink, fermented just enough to create carbonation but not enough to contribute any appreciable level of alcohol. If the ginger is mild, kids love it.
TIMEFRAME: 2 to 3 weeks
INGREDIENTS (for 1 gallon/4 liters):
  • 3 inches/8 centimeters or more fresh gingerroot
  • 2 cups/500 milliliters sugar
  • 2 lemons
  • Water
PROCESS:
  1. Start the “ginger bug”: Add 2 teaspoons (10 milliliters) grated ginger (skin and all) and 2 teaspoons (10 milliliters) sugar to 1 cup (250 milliliters) of water. Stir well and leave in a warm spot, covered with cheesecloth to allow free circulation of air while keeping flies out. Add this amount of ginger and sugar every day or two and stir, until the bug starts bubbling, in 2 days to about a week.
  2. Make the ginger beer any time after the bug becomes active. (If you wait more than a couple of days, keep feeding the bug fresh ginger and sugar every 2 days.) Boil 2 quarts (2 liters) of water. Add about 2 inches (5 centimeters) of gingerroot, grated, for a mild ginger flavor (up to 6 inches/15 centimeters for an intense ginger flavor) and 11/2 cups (375 milliliters) sugar. Boil this mixture for about 15 minutes. Cool.
  3. Once the ginger-sugar-water mixture has cooled, strain the ginger out and add the juice of the lemons and the strained ginger bug. (If you intend to make this process an ongoing rhythm, reserve a few tablespoons of the active bug as a starter and replenish it with additional water, grated ginger, and sugar.) Add enough water to make 1 gallon (4 liters).
  4. Bottle in sealable bottles: Recycle plastic soda bottles with screw tops; rubber gasket “bail-top” bottles that Grolsch and some other premium beers use; sealable juice jugs; or capped beer bottles, as described in chapter 11. Leave bottles to ferment in a warm spot for about 2 weeks.
  5. Cool before opening. When you open ginger beer, be prepared with a glass, since carbonation can be strong and force liquid rushing out of the bottle.
- See more at: http://www.chelseagreen.com/content/recipe-ginger-beer/#sthash.61GhEqXl.dpuf 
PROCESS:
  1. Start the “ginger bug”: Add 2 teaspoons (10 milliliters) grated ginger (skin and all) and 2 teaspoons (10 milliliters) sugar to 1 cup (250 milliliters) of water. Stir well and leave in a warm spot, covered with cheesecloth to allow free circulation of air while keeping flies out. Add this amount of ginger and sugar every day or two and stir, until the bug starts bubbling, in 2 days to about a week.
  2. Make the ginger beer any time after the bug becomes active. (If you wait more than a couple of days, keep feeding the bug fresh ginger and sugar every 2 days.) Boil 2 quarts (2 liters) of water. Add about 2 inches (5 centimeters) of gingerroot, grated, for a mild ginger flavor (up to 6 inches/15 centimeters for an intense ginger flavor) and 11/2 cups (375 milliliters) sugar. Boil this mixture for about 15 minutes. Cool.
  3. Once the ginger-sugar-water mixture has cooled, strain the ginger out and add the juice of the lemons and the strained ginger bug. (If you intend to make this process an ongoing rhythm, reserve a few tablespoons of the active bug as a starter and replenish it with additional water, grated ginger, and sugar.) Add enough water to make 1 gallon (4 liters).
  4. Bottle in sealable bottles: Recycle plastic soda bottles with screw tops; rubber gasket “bail-top” bottles that Grolsch and some other premium beers use; sealable juice jugs; or capped beer bottles, as described in chapter 11. Leave bottles to ferment in a warm spot for about 2 weeks.
  5. Cool before opening. When you open ginger beer, be prepared with a glass, since carbonation can be strong and force liquid rushing out of the bottle.
TIMEFRAME: 2 to 3 weeks
INGREDIENTS (for 1 gallon/4 liters):
  • 3 inches/8 centimeters or more fresh gingerroot
  • 2 cups/500 milliliters sugar
  • 2 lemons
  • Water
- See more at: http://www.chelseagreen.com/content/recipe-ginger-beer/#sthash.61GhEqXl.dpuf

Recipe: Ginger Beer

Categories: Food & Health
Posted on Thursday, October 18th, 2012 at 9:00 am by jmccharen

Ginger is a spice perfect for fall weather. Its fragrance can perk up everything from chai tea to apple pie. This humble root can also add a gentle kick of heat to stir fries or soups.
The natural yeasts in the root can also be used to kick start a bubbly ginger beer. Give it a try!
The following recipe is from Wild Fermentation: The Flavor, Nutrition, and Craft of Live-Culture Foods, by Sandor Katz.
This Caribbean-style soft drink uses a “ginger bug” to start the fermentation. I got this idea from Sally Fallon’s Nourishing Traditions. The ginger bug is simply water, sugar, and grated ginger, which starts actively fermenting within a couple of days. This easy starter can be used as yeast in any alcohol ferment, or to start a sourdough.
This ginger beer is a soft drink, fermented just enough to create carbonation but not enough to contribute any appreciable level of alcohol. If the ginger is mild, kids love it.
TIMEFRAME: 2 to 3 weeks
INGREDIENTS (for 1 gallon/4 liters):
  • 3 inches/8 centimeters or more fresh gingerroot
  • 2 cups/500 milliliters sugar
  • 2 lemons
  • Water
PROCESS:
  1. Start the “ginger bug”: Add 2 teaspoons (10 milliliters) grated ginger (skin and all) and 2 teaspoons (10 milliliters) sugar to 1 cup (250 milliliters) of water. Stir well and leave in a warm spot, covered with cheesecloth to allow free circulation of air while keeping flies out. Add this amount of ginger and sugar every day or two and stir, until the bug starts bubbling, in 2 days to about a week.
  2. Make the ginger beer any time after the bug becomes active. (If you wait more than a couple of days, keep feeding the bug fresh ginger and sugar every 2 days.) Boil 2 quarts (2 liters) of water. Add about 2 inches (5 centimeters) of gingerroot, grated, for a mild ginger flavor (up to 6 inches/15 centimeters for an intense ginger flavor) and 11/2 cups (375 milliliters) sugar. Boil this mixture for about 15 minutes. Cool.
  3. Once the ginger-sugar-water mixture has cooled, strain the ginger out and add the juice of the lemons and the strained ginger bug. (If you intend to make this process an ongoing rhythm, reserve a few tablespoons of the active bug as a starter and replenish it with additional water, grated ginger, and sugar.) Add enough water to make 1 gallon (4 liters).
  4. Bottle in sealable bottles: Recycle plastic soda bottles with screw tops; rubber gasket “bail-top” bottles that Grolsch and some other premium beers use; sealable juice jugs; or capped beer bottles, as described in chapter 11. Leave bottles to ferment in a warm spot for about 2 weeks.
  5. Cool before opening. When you open ginger beer, be prepared with a glass, since carbonation can be strong and force liquid rushing out of the bottle.
- See more at: http://www.chelseagreen.com/content/recipe-ginger-beer/#sthash.61GhEqXl.dpuf
Some notes on what I learned from this experience:
  • Make sure the bottle caps are compatible with the bottles.
I mistakenly used european bottles (stella artois) with American style bottle caps which are not compatible.
  • Flip top bottles or Grolsch bottles are great because they are glass and the seal is reusable and easy to apply.
  • Be sure to leave plenty of space (two inches or more) in the neck because I had one bottle blow up. Fortunately, the bottom of the bottle blew off so I didn’t have to mop up the walls and ceiling. Which brings me to another lesson— be sure to put the bottles in a bucket or box so that in case they do explode, the mess is contained.
  •  
  • Old plastic bottles with twist tops work for bottling but I prefer glass for the taste.
  •   Get a friend to help you with bottling. It takes two to tango.
    Some of the best things in life require a little patience. In two weeks you'll be in a gingery heaven.

    DIY Pallet Benches

    I stumbled last year upon a DIY webpage that had plans for a bunch of different furniture all made from wood pallets. I instantly decided that I would start making things. Right before I came to Better Farm I constructed a poorly designed bed frame from pallets because I had no idea what I was doing and didn’t have the right tools. After learning a few things here at Better Farm, I was ready to try again; this time, with benches. I found the perfect pallet and grabbed some extra 2x4s that had been pulled off of other pallets that we were using for the sauna.

    I took a circular saw and cut the pallet at the edge of the middle board so that I now had two separate pieces. From there I took a 2x4 and reconnected the boards that had just been cut with nails so I had two skinny pallets which would be used for the seat of the bench. I filled in the ends of each pallet with a 2x4 that had been cut to size so that I had a rectangular frame on the bottom.

    The 2x4s were all roughly 36 inches in length so I cut 8 legs from them that measured roughly 18 inches. Each bench has four legs, which I attached in the corners after making sure they were square. I then attached a scrap piece at the ends of the benches on the legs for a little bit of extra support. The benches were made in about 2 hours and it was pretty simple.
    To keep them looking rustic I gave them a light sanding and put some polyurethane on them. The first bench was more of a prototype so I just put it together without taking note of the writing that was on the pallets. The second time around I made a point to put the writing on the outside to give the bench more of a handmade look. It was a great project that anyone can do and I can’t wait to make more.     

    This Saturday: Blueberry Wine Workshop

    Our second annual Blueberry Winemaking Workshop is slated for 11 a.m. this Saturday, July 13, at Better Farm in Redwood.

    Students will go through the entire first phase of fermenting their own wine utilizing locally harvested fruit. This is a great class for the novice winemaker; or the wine hobbyist who would like to come out and compare notes. There is a suggested $10 donation for this course.

    Instructor: Paul Jennings

    Better Farm is located at 31060 Cottage Hill Road in Redwood. To see our full roster of upcoming workshops, please

    click here

    .

    Comment

    Nicole Caldwell

    Nicole Caldwell is a self-taught environmentalist, green-living savant and sustainability educator with more than a decade of professional writing experience. She is also the co-founder of Better Farm and president of betterArts. Nicole’s work has been featured in Mother Earth News, Reader’s Digest, Time Out New York, and many other publications. Her first book, Better: The Everyday Art of Sustainable Living, is due out this July through New Society Publishers.

    Mushroom Hunt

    One afternoon last week, the Better Farm crew and I went out for a hike to find mushrooms (and maybe my truck keys, which I'd lost in the woods a week earlier). The hike is part of our outdoor survival unit, which includes foraging and identifying edible wild plants.

    Once we got into the woods, we started to really fight with the bugs. But we also started to see a bunch of mushrooms: two on the hillside, and three more on the flat ground. 

    After walking for a little while, we found another mushroom in a clearing then a few more on a stick. Three more were growing in decaying bark. Another grew in the shade of a rock, and lastly there was one growing among the grass. All together we found 10 mushrooms. Here's what we identified:

    1.       Pluteus
    2.       Eucocoprinns Bimbanmii
    3.       Unkown
    4.       Hygrocybe Vitellina (inedible)
    5.       False Chanterelle (edible)
    6.       Gymnopilus
    7.       Atramentaria
    8.       Galerina Autumnails (inedible)
    9.       Literocybe Clari
    10.   Amanita
    11.   Laccaria Amethystea (Edible)

    Upcycling Workshop

    Before coming to Better Farm, I had heard of the idea of upcycling, but had never participated in it before Saturday's workshop: Creative Upcycling and the Art of Transforming Junk.

    Upcycling is the process of converting waste materials or useless products into new materials or products of better quality or for better environmental value.  Upcycling is the process of converting waste materials or useless products into new materials or products of better quality or for better environmental value.  Upcycling is taking the recyclable materials and using them directly to benefit you, or your environment.

    This past Saturday on July 6, Stephanie DeJoseph of La Mia Designs came to Better Farm to involve the Better Farm community in upcycling through a workshop sponsored by betterArts.  Through "Creative Upcycling and the Art of Transforming Junk," Stephanie helped the students to think outside of the box and create something new from recycled materials. The idea of upcycling is an alternative to recycling, where the recycled materials are sent to a recycling center.

    Some of the upcycling projects that the interns participated in was an old rundown lampshade turned into a new improved functioning lampshade, a broken table turned into a beautiful tile mosaic, a wooden table turned into a Charlie Brown modge-podge, and a wine bottle turned into a flower vase.


    For our full schedule of summer workshops, visit www.betterfarm.org/upcoming-workshops.

    'Creative Upcycling and the Art of Transforming Junk' Workshop this Saturday!

    A workshop dedicated to the art of transforming junk is slated from 11 a.m.-1:30 p.m. Saturday, July 6 at Better Farm in Redwood.

    In "Creative Upcyling and the Art of Transforming Junk",each student will bring an old, tired furniture or clothing piece to transform into something else that is functional. From sketches to the final product, instructor Stephanie DeJoseph of La Mia Designs will help students visualize, create, transform, and finalize an upcycled piece. Encouraged materials (anyone without the following is not excluded from attending): one piece to upcycle, sewing machine, fabric scraps, old clothing, small furniture pieces. Ages 15 and up. This workshop is being put on in partnership with betterArts.

    There is a suggested $10 donation for all workshops held at Better Farm. To register or for more information, call (315) 482-2536 or email info@betterarts.org. Better Farm is located at 31060 Cottage Hill Road in Redwood.

    Comment

    Nicole Caldwell

    Nicole Caldwell is a self-taught environmentalist, green-living savant and sustainability educator with more than a decade of professional writing experience. She is also the co-founder of Better Farm and president of betterArts. Nicole’s work has been featured in Mother Earth News, Reader’s Digest, Time Out New York, and many other publications. Her first book, Better: The Everyday Art of Sustainable Living, is due out this July through New Society Publishers.

    We're having babies!

    Candling one of Bernadette's eggs after one week.
    Last Tuesday I had chicken duty and noticed that Bernadette, one of our barred rock chickens, was missing. I looked around thinking she had simply stayed outside of coop overnight, but she was gone. Later that day I saw her alongside the other birds; but the next morning she was missing again. 

    We found her next to the farm stand, sitting on a nest of nine eggs! After discussing all the pros and cons of letting her sit it out or hatching the eggs in an incubator, we decided to incubate the babies ourselves. We took a roadtrip out to Agway in Lafargeville and picked up an incubator with fan and automatic egg turner. 

    It took about 12 hours for us to get the optimal 99.5-degree temperature in the incubator with 50- to 60-percent humidity. Once we were ready, Nicole and I scared Bernadette of the eggs and herded her into her coop, where she could relax and un-brood (a task that took overnight: By morning, she was back to normal). 

    Eggs in hand, we loaded the incubator; along with a bunch of eggs from the other chickens (freshly laid).

    After a week of carefully checking the heat and humidity, we candled the eggs to see if any of them were developing into baby birds. Out of all of them, we think only two are not fertilized.

    Stay tuned for Week Two!!

    DIY Sauna: Day One

    The beginnings of Better Farm's new sauna!
    We started building a sauna last weekend that utilizes recycled and new lumber, upcycled insulation, as well as incorporating an old tree stump into the design as one of the corner posts.

    Our workshop instructor, Bob Laisdell, started out with a basic design that utilizes a tree stump left over after a wind storm two years ago knocked over a tree on Better Farm's property:
     The stump in this drawing is being re-imagined as a corner bench seat. Here's the rough materials list:
    To start, we began clearing the ground where the sauna will be: mostly getting rid of large clumps of weeds and roots.
    The chickens love to be around when we're shoveling: It's like a worm/grub/bug buffet!
    Then we cruised over to Redwood Lumber Co. (next door at our neighbor John Grisanti's place) to pick up the wood we'd need:

    Next, we determined where each of the corners would be, using the stump as a starting point, and dug holes for cinder blocks where the other corner posts would be. While that was getting done, Katie and AmberLee notched 4x4's that would be pieced together to create the shape of the sauna.


    After that, we placed floor joists and a center beam, and nailed small pieces of boards from a wood pallet onto the sides of the floor joists to hold the insulation. Simultaneously, another group was putting up the wooden beams for the side walls and temporarily nailing them in place with a crossways board.


    Insulation going in:


    After measuring the distance across the base of the sauna, we began cutting boards from the wood pallets into our different sizes in order to create an alternating flooring pattern and nailing down the boards as they were being cut.


     Here's our progress after Day One:

    For a full listing of upcoming workshops, click here. Care to join us as we finish constructing the sauna? Email us at info@betterfarm.org.

    Firman's Fermentation Adventures: Sauerkraut

    Jacob Firman makes sauerkraut.


    To ferment means ‘to bubble’ or excite; and boy have I become fermented about fermentation—mostly thanks to the guru of fermentation Sandor Katz, author of Wild Fermentation and The Art of Fermentation. I intend this summer to ferment a variety of things. Last week I did sourdough and this week, I ventured into the world of vegetable ferments with sauerkraut.
    My biggest challenge in making sauerkraut was finding the right container. You need a cylindrical container such as crock or a jar and something flat like a plate that fits snug into the container to keep the vegetables submerged. Ideally you would use a ceramic crock like the recipe suggests but I couldn’t find one so I used a mason jar, a smaller jar lid that fit inside and a glass to push it down.

    I took the most basic route to make sauerkraut, using just cabbage and salt. It tasted wonderful! Sour, tangy, and alive with bacteria. Judging by how fast we went through the jar, the rest of the house must have thought so too. Next time I make kraut I'll be sure to use a larger container.

    Here's a simple recipe for making your own sauerkraut: 

    From Wild Fermentation:
    Timeframe: 1-4 weeks
    Special Equipment: ceramic crock or food-grade plastic bucket, one gallon capacity or greater; plate to fit inside crock or bucket; gallon jug filled with water; cloth cover (dish towel will work)


    Ingredients:
    5 pounds cabbage
    3 Tbsp. sea salt

    Instructions:
    Chop or grate cabbage, finely or coarsely, with or without hearts, however you like it. Place cabbage in a large bowl as you chop it. Sprinkle salt on the cabbage as you go. The salt pulls water out of the cabbage (through osmosis), and this creates the brine in which the cabbage can ferment and sour without rotting. The salt also has the effect of keeping the cabbage crunchy, by inhibiting organisms and enzymes that soften it. 3 tablespoons of salt is a rough guideline for 5 pounds of cabbage. I never measure the salt; I just shake some on after I chop up each cabbage. I use more salt in summer, less in winter.

    Add other vegetables. Grate carrots for a coleslaw-like kraut. Other vegetables I’ve added include onions, garlic, seaweed, greens, Brussels sprouts, small whole heads of cabbage, turnips, beets, and burdock roots. You can also add fruits (apples, whole or sliced, are classic), and herbs and spices (caraway seeds, dill seeds, celery seeds, and juniper berries are classic, but anything you like will work). Experiment.

    Mix ingredients together and pack into crock. Pack just a bit into the crock at a time and tamp it down hard using your fists or any (other) sturdy kitchen implement. The tamping packs the kraut tight in the crock and helps force water out of the cabbage.

    Cover kraut with a plate or some other lid that fits snugly inside the crock. Place a clean weight (a glass jug filled with water) on the cover. This weight is to force water out of the cabbage and then keep the cabbage submerged under the brine. Cover the whole thing with a cloth to keep dust and flies out.

    Press down on the weight to add pressure to the cabbage and help force water out of it. Continue doing this periodically (as often as you think of it, every few hours), until the brine rises above the cover. This can take up to about 24 hours, as the salt draws water out of the cabbage slowly. Some cabbage, particularly if it is old, simply contains less water. If the brine does not rise above the plate level by the next day, add enough salt water to bring the brine level above the plate. Add about a teaspoon of salt to a cup of water and stir until it’s completely dissolved.

    Leave the crock to ferment. I generally store the crock in an unobtrusive corner of the kitchen where I won’t forget about it, but where it won’t be in anybody’s way. You could also store it in a cool basement if you want a slower fermentation that will preserve for longer.

    Check the kraut every day or two. The volume reduces as the fermentation proceeds. Sometimes mold appears on the surface. Many books refer to this mold as “scum,” but I prefer to think of it as a bloom. Skim what you can off of the surface; it will break up and you will probably not be able to remove all of it. Don’t worry about this. It’s just a surface phenomenon, a result of contact with the air. The kraut itself is under the anaerobic protection of the brine. Rinse off the plate and the weight. Taste the kraut. Generally it starts to be tangy after a few days, and the taste gets stronger as time passes. In the cool temperatures of a cellar in winter, kraut can keep improving for months and months. In the summer or in a heated room, its life cycle is more rapid. Eventually it becomes soft and the flavor turns less pleasant.

    Enjoy! I generally scoop out a bowl- or jarful at a time and keep it in the fridge. I start when the kraut is young and enjoy its evolving flavor over the course of a few weeks. Try the sauerkraut juice that will be left in the bowl after the kraut is eaten. Sauerkraut juice is a rare delicacy and unparalleled digestive tonic. Each time you scoop some kraut out of the crock, you have to repack it carefully. Make sure the kraut is packed tight in the crock, the surface is level, and the cover and weight are clean. Sometimes brine evaporates, so if the kraut is not submerged below brine just add salted water as necessary. Some people preserve kraut by canning and heat-processing it. This can be done; but so much of the power of sauerkraut is its aliveness that I wonder: Why kill it?

    Develop a rhythm. I try to start a new batch before the previous batch runs out. I remove the remaining kraut from the crock, repack it with fresh salted cabbage, then pour the old kraut and its juices over the new kraut. This gives the new batch a boost with an active culture starter.

    DIY Hinged Bench from Old Doors

    This bench, made from old, discarded doors, has a hinged top for huge amounts of storage space.

    We kept busy last Saturday building the frame for a sauna, installing a lot of lights and new sound equipment in the Art Barn, and increasing storage in the barn's studio space. For that, Greg and I made a hinged bench that doubles as seating and storage.

    For the sides of the bench, Greg cut one side of pocket door in half, using the other half as the front of the bench. He reinforced the walls and front by nailing the pieces together and screwing them into a small wood frame running along the floor and wall.  

    When the base was all put together, we started on the top. We realized pretty quickly that we'd need a support beam running along the length of its center; and we had to put a piece of wood into the wall so the whole thing wouldn't move. 


    We hinged the top door to a piece of wood screwed into the back of the frame so that the entire top of the bench can lift up for storage. We plan to make another one of these so we have two long benches underneath the bank of windows on the second floor. In total, this project cost us $0, the only expenses being hinges (which we had), and the correct screws for the job (we used 2.5").


    Got a great DIY project you'd like to share? Email us at info@beterfarm.org.