Aquaponic Gardening Phase III: Build your light stand
/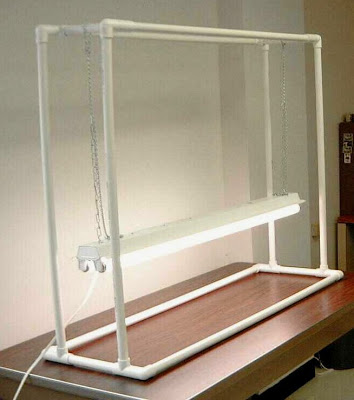

There are tons of designs on the market for building a grow light stand, or you can buy your own for a pretty penny. We liked the simple, lightweight construction afforded by plastic pipes; though you could create a similar design with 1x1's as long as your light isn't too heavy.
Here are some easy plans for building a 24-inch grow light stand, courtesy of Cornell University. If you're like us and have a different size grow bed/light system/tank, be sure to adjust the measurements listed below to accommodate your system.

Before you start:
Before making any connection, make sure that the pipe and fitting are correctly positioned. (See diagrams.) Insert the pipe into the fitting as far as you can by hand. The fitting has an internal ridge. The end of the pipe should touch this ridge. Hit the fitting with a block of wood until the pipe is snug against the ridge. Several blows with some force will probably be necessary.
Cut the pipe:
Most types of saws will make the cuts. A miter box is helpful to make straight cuts.
- From one 10' pipe length saw two 49" pieces and two 8" pieces.
- From a second 10' pipe length saw three 36" pieces.
- From the third 10' pipe length saw one 36" piece, two 8" pieces and eight short pieces.
To determine the length of the short pieces: Measure the depth a pipe will enter an elbow from the edge of the elbow to its internal ridge. (This depth varies depending on the manufacturer of the fitting.) Measure the similar internal depth in a Tee. Add the two depths together and subtract 1/8". This will be the length of the eight short pieces to be cut. - From the fourth 10' pipe length two other pieces will be cut after their lengths are determined.
- Connect one 90º elbow to a 49" pipe. Connect another elbow to other end of the pipe in the same direction as the first elbow. Connect elbows to other 49" pipe in the same manner.
- Position a Tee in the proper direction. Insert a short piece of pipe between them and force the fittings together. Connect three other Tees in the appropriate directions.
- Connect two 8" pipes (one fitting at a time) between the Tees on each side of the base.


The front assembly of the top should have the same width as the front assembly of the base.
- Place an elbow and a Tee touching each other along one end of
the front of the base. Place another Tee and an elbow touching each
other along the other end of the front of the base.
- Measure the distance between the edges of the Tees and then add to this measure the depths the pipe will fit into the two Tees. (This depth varies depending on the manufacturer of the fittings.) The total is the length of each of the two pieces of pipe remaining to be cut.
- Cut the two pieces. With two elbows, two Tees, two short pieces of pipe and one of the new pieces of pipe, connect the front assembly of the top. Connect the back assembly of the top with similar pipes and fittings.
- Connect the front and back assemblies of the top with two 8" pieces of pipe.


Connect each of the four 36" pipes to the four Tees on the base. Position the top assembly onto the 36" pipes. Connect the four Tees of the top, one at a time, to the 36" pipes.

Hang the shop light
Loop the chain around a top 8" pipe and close the loop by connecting the end of the chain to one of its links with an S hook. Similarly loop the other piece of chain around the other top 8" pipe. With S hooks attach the lower end of the chains to the slots on the shop light.
The distance between the top of the plants and the shop light can be adjusted by changing the lengths of the loops.
Double shoplight option
If you would like to double the depth of the unit described, cut and use four 17" pieces of pipe instead of the four 8" pieces. Purchase a second 48" fluorescent shop light (2 lamp) (40 watt), one 48"cool white fluorescent bulb (40 watt), one 48" daylight (warm) fluorescent bulb (40 watt), (4) S hooks ( 1" size) and (2) 2 ½ feet of chain ( loops large enough for S hooks).
This system of using two shop lights will allow you to adjust the height of each set of lights independently and provide light to both short and tall plants within the same unit.
24-inch model:
If you have limited space, you can construct a frame that will accomodate a 24" shop light. This smaller version requires only 3 10' sections of PVC pipe. Follow these initial cutting instructions:
- From one 10' pipe length saw two 25" pieces and two 34" pieces.
- From a second 10' pipe length saw two 34" pieces. Two other
pieces will be cut from this pipe after their lengths are determined.
- From the third 10' pipe length saw four 6" pieces and eight short
pieces. Follow instructions above for determining the length of the
short pieces.
- Follow the assembly instructions above, only substitute the 25" pieces for the 49" pieces, and the 34" pieces for the 36" pieces.
Read about our aquaponic set-up in its entirety:
Aquaponic Gardening: Phase I
Aquaponic Gardening: Phase II
Building a Grow Bed for your Aquaponic Garden