Troubleshooting At-Home Hydroponics and Aquaponics Kits

Better Farm's aquaponics tanks.
Aquaponics is the method of growing aquatic animals and crops simultaneously in a closed system. Water from the aquaculture component transfers to the hydroponics component, where nitrogen-fixing bacteria break down the byproducts into nitrates and nitrites (which the plants use as nutrients). The clean water then recirculates back into the aquaculture component, and the process starts again.


With Better Farm’s aquaponics system, a bed of lettuce and tomato rests above a fish tank, and pea gravel is used in place of soil. A tube transports water from the fish tank to the bed, and because the bed tilts at an angle, excess water drains back into the tank. Essentially, aquaponics requires no soil, fertilizers, weeding, or direct watering to grow the plants—and the fish tank gets cleaned out, too. Pretty darn cool.

Here's our first aquaponic tomato:
In any basic hydroponic or aquaponic system, you want to keep a close eye on a few major factors: one, the nutrients getting to your plants; two, the health of your water (and fish in aquaponics); and three, the life cycle of your plants and timing regular clean-outs for your setup.
 
We learned by trial-and-error that in an aquaponics setup, you need to be careful how much food you are feeding your fish. Too much, and you'll be dealing with a disastrously cloudy tank.  We dealt with this last month by doing a thorough cleaning-out of the entire grow bed. Rinsing out the pea gravel and scrubbing the container (and scrubbing the walls of fish tank, and changing the tank's filters) gave us a pristine system in which to continue growing.

Yesterday, we did our annual maintenance of the hydroponic setup, which involves cleaning out the grow bed and water tank, scrubbing the gravel, and refilling the tank with fresh water.


The annual or semi-annual maintenance required for aquaponics and hydroponics makes these methods some of the easiest for growing fresh, organic produce.

Further reading:
Aquaponics at Better Farm
Hydroponics

You Say Tomato...

The pollination has paid off! After giving our aquaponic tomato plants a few good shakes back in January and manually pollinating flowers with Q-tips, we've got baby tomatoes growing indoors on the vine.

With same-flower pollination for plants like tomatoes, gently shaking or vibrating the plants or individual flowers a few times a week (daily is best) after flowers appear is the most straight-forward way to ensure pollinations. Fish water is particularly ideal for tomatoes, providing the right level of nutrients for growth and fruit production. Check out these beauties!

Here are a few great ideas for growing your own aquaponics tomatoes from Aquaponics Online Tips:
  • You must test the pH level of the water to ensure it is between 6.8 and 5.8.  As long as you have a pH stabilizer that is safe for your fish, you can adjust the level as needed.  You should be able to find one in most garden stores or supply stores who carry aquaponic systems.
  • In order to remove dust and other particles that can have an adverse effect on the pH level of the water, be sure to rinse the growing container. Fill the growing container with the medium just about one-third full.
  • Gently rinse the roots of your tomato seedlings to remove any soil or composites.  Be sure to be careful not to damage the roots.  Easy does it.  Go ahead and gently plant your seedlings by spreading out the roots.  After that you can cover them, making sure the plant is secure and upright by covering at least two inches of stem in the medium.
  • If you want to control the algae build up, add some red wiggler worms.  This will also add some nutrients that are healthy for the continued growth of your plants and your fishes.
  • Watch carefully for aphids on your plants, which are little bugs that can eat away at them.  They look like lice but you can generally keep them away by using a vinegar solution that is equal parts water and vingar. As you do this, be sure to ensure the pH level is still secure.
Comment

Nicole Caldwell

Nicole Caldwell is a self-taught environmentalist, green-living savant and sustainability educator with more than a decade of professional writing experience. She is also the co-founder of Better Farm and president of betterArts. Nicole’s work has been featured in Mother Earth News, Reader’s Digest, Time Out New York, and many other publications. Her first book, Better: The Everyday Art of Sustainable Living, is due out this July through New Society Publishers.

DIY Pollination

Pollinating tomato plants in Better Farm's aquaponic garden.
Gardening applications such as indoor aquaponics and hydroponics are wonderful for a host of reasons: temperature and climate control, the absence of pests and weeds, and control over the grow cycle. But playing garden god has its consequences; not the least of which being the utter lack of pollinators and helpers-along, namely bees and the wind.


Put simply, there are two types of pollination: same-flower pollination, and multi-flower pollination.
  • Same-flower pollination Veggies and fruits in this category include peppers, tomatoes, and eggplants. In these plants, pollen just needs to be released from one part of a flower to another part in the same flower in order for pollination to occur. Wind is the most common pollinator here, literally “shaking loose” the pollen. Insects, like bees, also help with the vibration of their wings or the physical action of their climbing on flowers moving the pollen around.
  • Multi-flower pollination Plants in this category include cucumbers, melons and squash. These plants produce both male and female flowers. For pollination to occur, pollen must move from the male flower to the female flower. Generally, this is accomplished by insects flying or crawling from one flower to another.
With same-flower pollination, gently shaking or vibrating the plants or individual flowers a few times a week (daily is best) after flowers appear is the most straight-forward way to ensure pollinations.

For plants with male and female flowers, you're going to have to manually transport pollen from male flowers to females. Can't tell which is which?  Male flowers are smaller and you can often see the pollen as “dust” inside. Female flowers tend to be larger and often have a small, unfertilized fruit at their base. For example, with cucumbers, you can actually see a small ½ inch long cucumber at the base of the female flowers. If left unpollinated, this will drop off. If pollinated, it grows into a full-sized fruit.

To fertilize these plants, you can use a Q-tip or tiny paintbrush. Just dab the male flowers a few times and then dab the female flowers and buds. This morning I pollinated tomato plants and clovers using both methods just for due diligence. I'll be knee-deep in aquaponics for the next few weeks repeating the process and capturing pics of the progress. Here are some action shots:


Comment

Nicole Caldwell

Nicole Caldwell is a self-taught environmentalist, green-living savant and sustainability educator with more than a decade of professional writing experience. She is also the co-founder of Better Farm and president of betterArts. Nicole’s work has been featured in Mother Earth News, Reader’s Digest, Time Out New York, and many other publications. Her first book, Better: The Everyday Art of Sustainable Living, is due out this July through New Society Publishers.

Dirty Jobs: Aquaponics in Autumn

Yesterday I cleaned out the aquaponics setup at Better Farm to ready the grow bed for autumn, winter, and spring growing of salad greens and herbs. It's important to clean out your aquaponics setup regularly to keep it operating at top efficiency, and to ensure the health and well-being of your fish.

We have two corner filters running 24/7 to keep the tank fresh, which work in tandem with the pea gravel in our aquaponic grow bed to filter water. I find it easiest to clean out the grow bed and filters every six months (normal fish tanks require monthly cleanings; but our bottom feeder fish, living plants, and pea gravel do such an amazing job keeping everything clean, we have to do a deep cleanse very infrequently). The simplest way to do this is to rinse the pea gravel in colanders on the driveway or in one of the bathtubs in the house. The latter makes it easy to hang onto the dirty water and reuse it on your houseplants. It's like steroids for plants, which absolutely love fish poop.

Aquaponics maintenance is definitely one of the dirtier, least unpleasant farm jobs we have here. But, as they say, someone's got to do it...
The work is worth it to have a great fish tank setup and yummy greens year-round:
Comment

Nicole Caldwell

Nicole Caldwell is a self-taught environmentalist, green-living savant and sustainability educator with more than a decade of professional writing experience. She is also the co-founder of Better Farm and president of betterArts. Nicole’s work has been featured in Mother Earth News, Reader’s Digest, Time Out New York, and many other publications. Her first book, Better: The Everyday Art of Sustainable Living, is due out this July through New Society Publishers.

Aquaponic Maintenance

After a full year of use, it was time to spruce up our aquaponic grow bed.
The aquaponics setup at Better Farm is working 24 hours a day to produce fresh salad greens and herbs while aerating and filtering the water our rescue minnows, koi, and goldfish depend on. But after a year of all this work, the grow bed was in dire need of a good scrubbing—and the plants needed to be thinned.

One of the most obvious signs the grow bed needed some TLC was the restricted water flow coming out of it and back into the fish tank. The cause? The grow bed's vents were clogged with fish poop and any other debris circling through the system:


The plants inside the grow bed were also getting pretty unruly, dill in particular:

To start, we had to separate out all the plants. This involved creating a large scoop with our hands and grabbing full plants from the bottom—roots and all. It's important to be sure you don't damage the roots! We left the roots hanging on to some of the pea gravel and set those plants aside:


Then it was time to take the grow bed off the fish tank so we could run water over the gravel and give the grow bed a good scrubbing.


I recommend not using any soap on the grow bed, as this can negatively affect your fish and plants (even biodegradable stuff). Instead, we just used a scrub brush and hot water.

For the pea gravel, I plugged the kitchen sink. Then I ran hot water over the gravel, sifted the gravel in a strainer, and then put the pea gravel back in the grow bed:

Once the water in the sink cooled off, we were able to put that in a spray bottle and use the solution as a fertilizer for all our house plants and baby seedlings in the greenhouse.

Then, it was just a matter of carefully putting the plants back into the grow bed. Now our greens have plenty of room to grow, and the water system is flowing more smoothly—good news for fish and plants alike.
Comment

Nicole Caldwell

Nicole Caldwell is a self-taught environmentalist, green-living savant and sustainability educator with more than a decade of professional writing experience. She is also the co-founder of Better Farm and president of betterArts. Nicole’s work has been featured in Mother Earth News, Reader’s Digest, Time Out New York, and many other publications. Her first book, Better: The Everyday Art of Sustainable Living, is due out this July through New Society Publishers.

Season Kick-Off Weekend at Better Farm

Community potluck dinner-party season has started back up!
We've got spring fever at Better Farm, and have kicked the season off right by getting seed flats planted, harvesting an aquaponic bounty and copious amounts of free-range eggs, rehabilitating some unwanted plants, making signs for our new trails system, and pasteurizing last year's compost.

Seed Planting
Our artichokes, peppers, mulberries, huckleberries, leeks,  and several other varieties of produce have been planted in flats throughout the main house at the farm. Aloe plants have been divided and repotted to encourage growth for a budding skincare and essential oil line (stay tuned for more information about that!).


Aquaponic Harvest
We have a variety of beautiful, organic lettuces ready to go! Please contact us at (315) 482-2536 or info@betterfarm.org if you would like to place an order.

Egg Heads
The chickens are hip to the season shift and are laying dozens upon dozens of beautiful Ameraucana, Leghorn, and Bard Rock eggs. A dozen eggs is $3 and includes a variety of all the above-listed varieties

Plant Rehab
A trip to Watertown on Friday yielded a handful of sick cactuses and orchids being discarded at a local store that we'll be rehabilitating over the next several months. This "plant hospital" will afford us the opportunity to educated visitors on bringing plants back to life—and keep these beauties from ending up in the garbage.

New Trail-System Signs
Over the weekend a group of us walked the new trail system in Better Farm's woods—and made trailhead signs to guide the way. By summer, we'll have a map to go along with the trails, as well as trail markers and camping sites. E-mail us if you'd like to volunteer on this project.

Compost Pasteurization
We blogged in February about how pasteurizing your compost can benefit from pasteurization:
Many people choose the safest route to prevent hitchhiking seeds and damping-off by buying a pre-sterilized package of potting soil, if you have a large amount of pots and flats to fill, this could be expensive. By taking a couple of extra steps before you begin, you can use your own rich, organic compost. Some people "bake" their soil in their oven to kill micro-organisms. But this process of sterilization kills everything, even the healthy organisms that you have worked so hard to create. The answer is simple: Instead of sterilizing compost and garden soil, pasteurize it. While sterilizing kills virtually all surface-dwelling microorganisms, when you pasteurize your potting mixture, it is only heated to a temperature that kills harmful organisms and leaves beneficial organisms alone.
We experimented with this process, which wasn't as smelly as you might initially imagine; and we've been left with fluffy black soil that's going to be very very good to our seeds and seedlings in the garden.

Fish Selection for Aquaponics


We've written extensively about the aquaponics setup at Better Farm—from the budget to the science behind it to the crops we're growing. But one of the biggest (if not the biggest) components to a healthy aquaponics setup is your selection of fish. So today we're going beneath the surface to check in with our fishy friends.

Photo/Aaron Youngs
Photo/Aaron Youngs

The fish and plants you select for your aquaponic system should have similar needs as far as temperature and pH. There will always be some compromise to the needs of the fish and plants but, the closer they match, the more success you will have.

As a general rule, warm, fresh water, fish and leafy crops such as lettuce and herbs will do the best; as will your dirtiest, most durable fish (our opinion: goldfish and minnows). In a system heavily stocked with fish, you may have luck with fruiting plants such as tomatoes and peppers.

Fish regularly raised in aquaponics with good results (please note: all "edible" fish should be raised in a tank that holds at least 40 gallons of water):
  • tilapia
  • large mouth bass
  • sunfish
  • crappie
  • koi
  • fancy goldfish
  • pacu
  • various ornamental fish such as angelfish, guppies, tetras, swordfish, mollies
Other fish raised in aquaponics:
  • blue gill/breem
  • carp
  • barramundi
  • silver perch, golden perch
  • yellow perch
  • Tilapia
  • Catfish
  • Large mouth Bass
Plants that will do well in any aquaponic system:
  • any leafy lettuce
  • pak choi
  • spinach
  • arugula
  • basil
  • mint
  • watercress
  • chives
  • most common house plants
Plants that have higher nutritional demands and will only do well in a heavily stocked, well established aquaponic system:
  • tomatoes
  • peppers
  • cucumbers
  • beans
  • peas
  • squash
At Better Farm, we wanted fish that could withstand cooler water temperatures, fish that exhibited hardiness  (longevity), and fish that would maintain a good nitrogen level for plants—all without breaking the bank. We settled on a bunch of "feeder fish" (minnows and goldfish), which were extremely inexpensive. We also picked up two koi (we bought the smallest/cheapest, which have now quadrupled in size and appetite) and a few "hand-me-down" fish (tetras, a sucker fish, and a carnival prize from two summers ago).

Because we have a 70-gallon tank, there's space to experiment with tillapia or other trout; so long as we account for the space needed by mature fish (roughly one gallon per inch of fish). Our ratio of fish-to-water-to-plants has worked swimmingly so far; stay tuned as we expand and experiment with new setups, more setups, and different fish.
Comment

Nicole Caldwell

Nicole Caldwell is a self-taught environmentalist, green-living savant and sustainability educator with more than a decade of professional writing experience. She is also the co-founder of Better Farm and president of betterArts. Nicole’s work has been featured in Mother Earth News, Reader’s Digest, Time Out New York, and many other publications. Her first book, Better: The Everyday Art of Sustainable Living, is due out this July through New Society Publishers.

Hydroponics: Reservoir method

Up here in Redwood we're receiving frost every night and expecting snow anytime. During these times when the garden doesn't produce as much we like, we have come up with simple instructions for creating a homemade hydroponic system.

To create hydroponics using the reservoir method is surprisingly easy. The first thing needed is a tub to hold the water and the plants, it can be a fish tank or a large bin or container. Following this, a sheet of Styrofoam should be cut out to the bottom dimensions of the tub with a quarter inch less than each dimension. Then, the plant pots should be appropriately arranged on the Styrofoam tray and traced in a formation that will allow each plant to get the light they need. Cut a hole in the Styrofoam along the tracings so that the plant containers can rest on the tray easily.

The next step is to get an air pump specific for the amount of water in the tub (be sure to measure how many gallons it takes to fill your reservoir). Connect the pump to the tub so the airline is well below the tray so that the oxygen flow can reach the roots of the plants.

The plant containers used can be filled with soil or another growing agent or they can simply support the seeds from falling in the water.

Make sure to supplement the water with nutrients depending on the growing material used for the plants. Once the air pump, tray and containers are complete, fill the halfway to two thirds with water and drop the tray in. Add the pots, and place a grow lamp overhead, turning it on and off every 12 hours. That's the basics for deep water culture hydroponics! We'll be back with more ways to keep your kitchen full of greens in the winter!

For detailed information on creating your own aquaponics setup, click here

.

Comment

Nicole Caldwell

Nicole Caldwell is a self-taught environmentalist, green-living savant and sustainability educator with more than a decade of professional writing experience. She is also the co-founder of Better Farm and president of betterArts. Nicole’s work has been featured in Mother Earth News, Reader’s Digest, Time Out New York, and many other publications. Her first book, Better: The Everyday Art of Sustainable Living, is due out this July through New Society Publishers.

Aquaponics Harvest

Intern Jackson Pittman harvests basil, center, dill, top right and left, and lettuce, bottom right, from the aquaponics tank.
Temperatures outside may be dropping, but we're enjoying permanent summer inside Better Farm's aquaponics setup.

With our grow light going strong 12 hours a day, and rotating our bumper crop of lettuces and herbs, we've got daily pickings of fresh dill, basil, and a variety of salad greens. On average, we're saving $10 each week in organic lettuce, a myriad of sprouts (clover, alfalfa, brassica blend, sunflower, and more), fresh basil, dill, and oregano, and more. With our total cost of setup (grow light, tank, filters, gravel, fish, and fish food) topping out around $400, that means we're still about 20 weeks out from breaking even—and after that, it's basically like having $10 extra in our Better Farm pocket each week. As far as investments go, we consider that a great return. Our grow light uses a high-efficiency fluorescent bulb, costing us just a few dollars each month.

Money aside, nothing compares to fresh greens year-round. Check out that bounty:

Comment

Nicole Caldwell

Nicole Caldwell is a self-taught environmentalist, green-living savant and sustainability educator with more than a decade of professional writing experience. She is also the co-founder of Better Farm and president of betterArts. Nicole’s work has been featured in Mother Earth News, Reader’s Digest, Time Out New York, and many other publications. Her first book, Better: The Everyday Art of Sustainable Living, is due out this July through New Society Publishers.

Better Science: Aquaponics and the Nitrogen Cycle

What is an appropriate nitrogen level for a freshwater fish tank? When checking the nitrogen level of our

aquaponics system yesterday, we wondered the same thing. Unaware if our nitrogen level results of 20 ppm indicated anything good or bad, we traveled back in time to those days of high school biology and chemistry and did some research on the nitrogen cycle.

The nitrogen cycle, like our aquaponics setup, starts with fish poop. The fish poop decays into ammonia, an incredibly toxic substance. Bacteria living in the water (nitrosomonas) then eat the ammonia creating a byproduct of

nitrites

- also a very toxic substance. Then another kind of bacteria (nitrobacter) consumes nitrites in the water, creating a byproduct of 

nitrates

. Now, this is where things get healthy.

Nitrates

are good. We want nitrates, especially when working with hydroponics, because nitrates are a fertilizer. Plants and algae thrive when the nitrate levels are high—which would explain why the herbs and lettuces we're growing over our fish tank are green and growing. Healthy plants in (or above!) a fish tank are an excellent indicator that the nitrogen cycle is acting as it should.

After the plants consume most of the nitrate, the freshly and naturally filtered water recycles back into the tank and the fish don't swim in clean and clear water. Not to mention we get freshly grown herbs and salad greens out of all of this, as well...thanks, science!

Lettuce Present: Aquaponic harvest

Lettuce and baby herbs in our aquaponic grow bed.
Back in July we finished our aquaponic setup in Better Farm's library, complete with grow light, grow bed, light stand, and 70-gallon fish tank which also served as a home to a dozen or more koi, goldfish, minnows, and one friendly sucker fish.

Just one month later, our crop of organic, loose-leaf lettuce is ready for harvest. That's a full month earlier than most lettuce grown in dirt! The leaves on our aquaponic lettuce are unbelievably delicate and nutritious—be sure to stop by our farm stand and see for yourself! You can read all about the benefits of aquaponic gardening here.

Here are some photos of our setup:


For more information on setting up an aquaponic system in your own home, school, or office, click here.
Comment

Nicole Caldwell

Nicole Caldwell is a self-taught environmentalist, green-living savant and sustainability educator with more than a decade of professional writing experience. She is also the co-founder of Better Farm and president of betterArts. Nicole’s work has been featured in Mother Earth News, Reader’s Digest, Time Out New York, and many other publications. Her first book, Better: The Everyday Art of Sustainable Living, is due out this July through New Society Publishers.

Aquaponic Setup Complete!


Aquaponics in action!
Our aquaponic growing experiment is complete! The seeds are planted, the light is on, the water is circulating, and the fish are doing what they do best—swimming around in the water, eating, hanging out, and fertilizing the tank system.

Here's a quick synopsis of how we got to where we are:

First, we consulted with a dear friend who works for Brooklyn Farms about how to set up our tank, what supplies we needed, and how the whole thing works. He started us out with these marching orders:
  • Purchase at least a 40-gallon fish tank, with two corner filters and gravel for the bottom
  • Fill the tank with water
  • Two days later, add fish. At first, only add feeder fish. Some will die—and when they do, leave them floating in the water. As the feeder fish break down, they'll be ammonia-based waste. Bacteria will slowly colonize and turn ammonia into nitrite (ammonia and nitrite are both toxic to plants). After that, more bacteria will colonize and change nitrite into nitrate, which is usable fertilizer.
Next up was letting the whole system grow into itself, so to speak. The water underwent weekly nitrogen and pH tests until everything was just right. Then it was time to pick up our grow bed, water pump, tubing, light and grow bed medium. The last two on that list came from the newly opened North Country Hydroponics in Watertown. With all the supplies at the ready, it was time to build the stand for our grow bed, borrowing from a design that utilized PVC tubing. We instead used wood scraps we had on the property:
Intern Director Jaci Collins, left, with Carl Frizzell and Noah Bogdonoff
Then we hooked up the pump and tubes so the water came up out of the tank and over the pea gravel in the grow bed (we also poked holes at one end of the grow bed so the water could drain back out into the tank):

Finally, it was time to plant the seeds. But how do you plant seeds directly into gravel? Here are some tips we gleaned online:
  1. Select your seeds. To grow directly from seed rather than seedling, use small seeds such as carrots, herbs, radishes, lettuce or other salad greens.
  2. “Broadcast” the seeds over your aquaponic system by gently tossing them on the growing surface -- in this case, the water of the growing beds. Allow the seeds to settle into the gravel at the bottom of the bed. Distribute the seeds as evenly as possible.
  3. Insert seeds into seed-starting media if you're attempting to grow larger plants such as beans, cucumbers, melons or peas. With your index finger, push seeds into the center of starting media such as rockwool or peat sponges. Distribute the media evenly throughout the growing beds.
  4. Clean young seedlings thoroughly under a water faucet, removing all dirt before attempting to plant them in your aquaponic system. Arrange seedlings evenly, gently securing their roots with the gravel of the growing beds.
  5. Keep the fish-to-tank volume ratio at about 2:1 as you grow your seeds. Feed the fish daily -- fish consume about 1.5 percent of their body weight each day. Maintain consistent water quality and pH levels, and clean your filtration system and tubing once a month. When plants appear, trim or harvest them as needed for each individual plant type.
(Tip: Seeds that require lots of acid, such as blueberries, generally don't perform well in aquaponic systems.)

Now we wait for the seedlings to appear. Stay tuned!

For more information on this process, click here.
Comment

Nicole Caldwell

Nicole Caldwell is a self-taught environmentalist, green-living savant and sustainability educator with more than a decade of professional writing experience. She is also the co-founder of Better Farm and president of betterArts. Nicole’s work has been featured in Mother Earth News, Reader’s Digest, Time Out New York, and many other publications. Her first book, Better: The Everyday Art of Sustainable Living, is due out this July through New Society Publishers.

Aquaponics Part IV: Why Aquaponics?

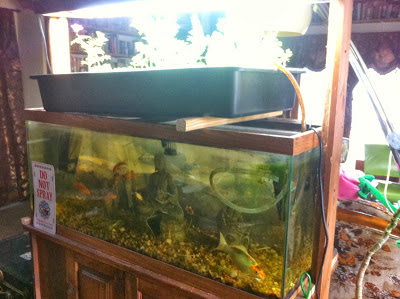
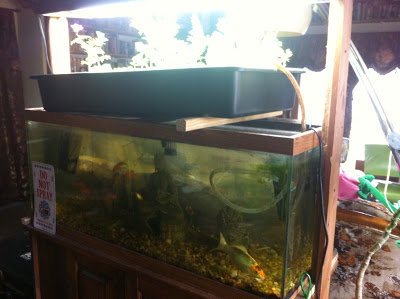
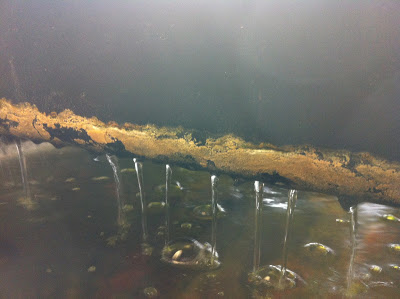
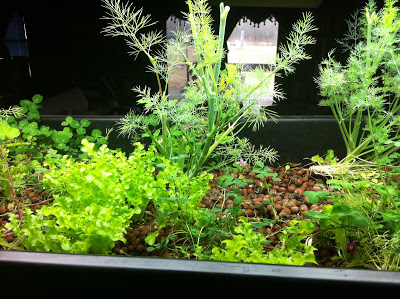
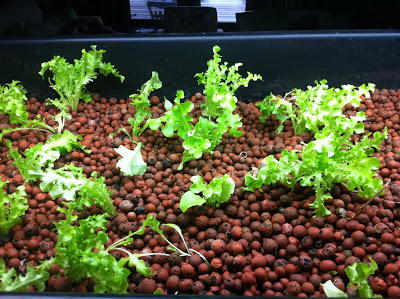
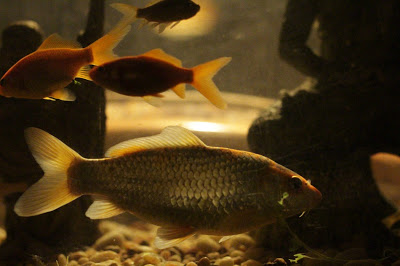
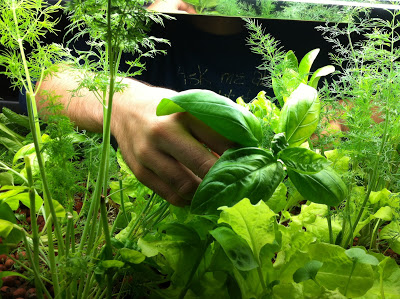
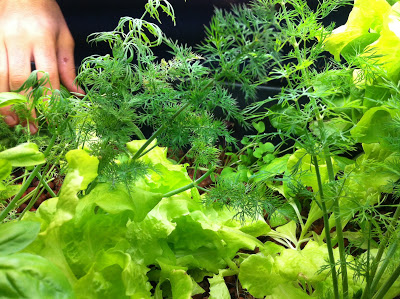
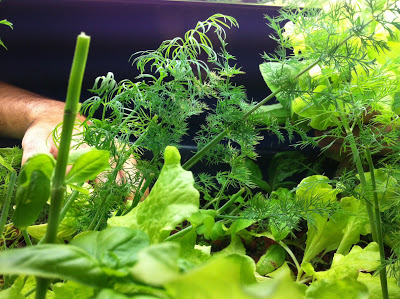
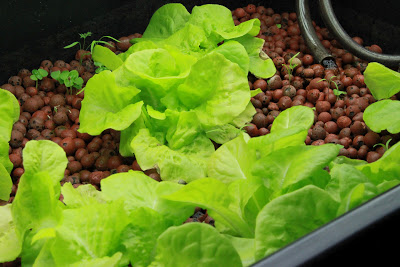
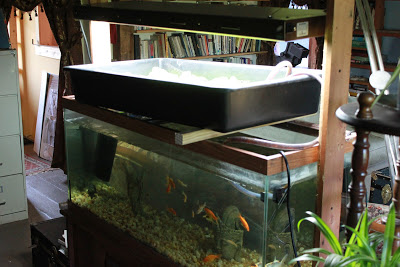
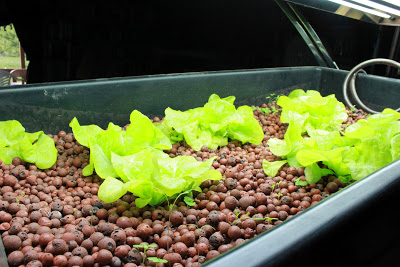
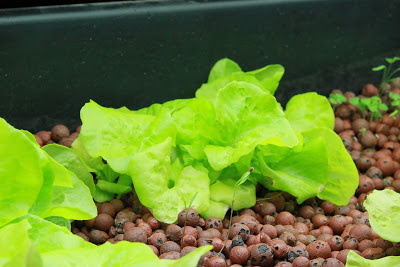
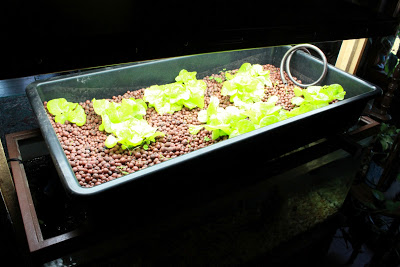
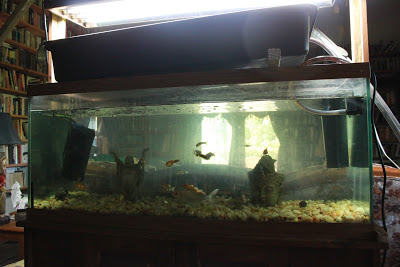
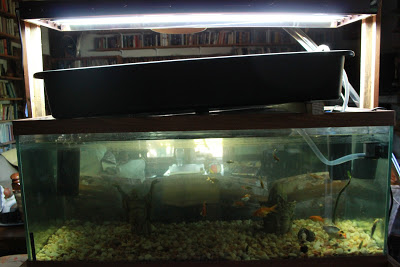
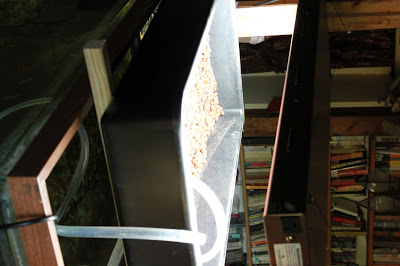
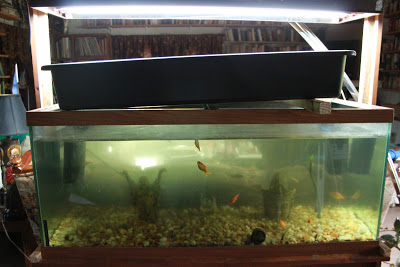
The aquaponic setup at Better Farm.
By Noah Bogdonoff
In case you missed it, Better Farm has been steadily working 
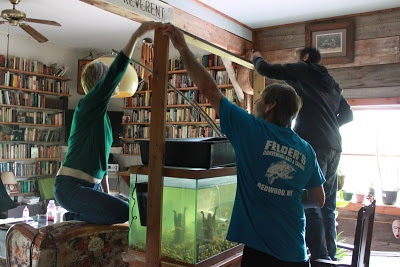
on setting up an indoor aquaponic garden. We’ve taken you through the set-up and installation of our own system, but one big question remains: Why aquaponics? What can this type of system give us that we don’t already get from our (beautiful!) garden?


Firstly, aquaponic gardening is space-efficient. This isn’t so much an issue up in the North Country, where land is easy to come by, but in urban areas aquaponic gardening could revolutionize the way people think about food. Because aquaponic systems don’t require soil, all one needs to garden is enough space for a fish tank and a growing container that can fit atop it. This is also space-efficient in that it builds vertically, preserving precious floor space! Since many residents and interns (myself included) hail from cities, this is a perfect way for them to get started with sustainability when they return to their natural habitats.

Secondly, this system provides us with food year-round. North Country winters are notoriously harsh and the availability of fresh produce could save us from a winter of frozen and canned foods. For people living far away from grocery stores or those who don’t have easy access to organic and local foods, aquaponics is a surefire way to add some fresh, healthy food to your diet without having to go on a road trip. And, speaking of road trips, aquaponic gardening is a beautiful form of “lifestyle activism”—by growing food in your own home, you can avoid wasting the energy required to transport the food as well as the energy required to drive to the store.

The third big advantage of aquaponic gardening is that, given all of the above, it actually saves you money and time. As with outdoor gardens, growing your own food can save you hundreds or thousands of dollars every year. The average payback time for an aquaponic garden has been estimated at two years, meaning that after two years, you’ll have saved the amount of money you spent on the system. After that, your average cost of living per year will decrease. Unlike traditional gardens, however, which require laborious hours of weeding, watering, and tending, aquaponic gardens are extremely low maintenance. Once the nitrogen cycle is set up and the seeds are planted, the closed-loop nature of the system allows it function mostly on its own, as long as you’re feeding your fish. Once a plant is fully grown, just pull it up and pop another seed in its place.  

There are many more reasons to go aquaponic, but it’s easy to see why the above three could completely change the landscape of food politics in cities, suburbs, and harsh climates. Stop by the farm later on in the summer to see the fruits (well, vegetables) of our labor!