betterArts Membership Drive: Support art and music outreach in the North Country!


Your membership contribution to betterArts will support vital services and events, increase economic vitality to the community, promote access to the arts in the North Country regardless of economic status, enhance cultural tourism, and improve the quality of life in our region. All membership contributions are tax-deductible to the fullest extent of the law. Membership moneys go directly into our programming, which includes:

  • Artist Residencies: betterArts seeks to provide an opportunity for creative exploration and growth to artists, writers, and musicians within the context of Better Farm's dynamic environment through a year-round, low-cost artist residency program. 
  • Free and Low-Cost Music and Art Instruction: We are in the process of designing private music and art instruction for all age groups. These programs will be offered in Better Farm's Art Barn year-round. Moneys we raise allow us to pay teachers fair wages while offering the public reduced-cost or free instruction.
  •  Workshops, Performances, and Events: As part of our outreach efforts, we offer concerts, gallery openings, and performances to the public for free. We also have studio space available for artists and musicians at low cost, and ongoing group art projects including murals and sculptures that we invite the public to participate in year-round.
All levels of membership include the following benefits:
  • Online delivery of the seasonal betterArts/Better Farm newsletter
  • Access to monthly membership meetings
  • Invitations to members-only mixers, special events, and gallery previews
Rates are as follows:
  • Individual, $25/year
  • Family, $30/year
  • Friend, $50/year: Also includes betterArts mug and one-of-a-kind betterArts postcard
  • Arts Organization, $100/year: Also includes mug, postcard, 20% off coupon for the gallery, and free table set-up with your organization's information at betterArts events.
  • Patron, $200/year: Also includes mug, postcard, 20% off coupon for the gallery,  free table set-up with your company's information at betterArts events throughout the year, and one free ticket to our annual, end-of-summer, formal dinner party fundraiser.
  • Corporate Patron, $500/year: Also includes mug, postcard, 20% off coupon for the gallery,  free table set-up with your company's information at betterArts events throughout the year, and two free tickets to our annual, end-of-summer, formal dinner party fundraiser.
Click here to sign up!
Comment

Nicole Caldwell

Nicole Caldwell is a self-taught environmentalist, green-living savant and sustainability educator with more than a decade of professional writing experience. She is also the co-founder of Better Farm and president of betterArts. Nicole’s work has been featured in Mother Earth News, Reader’s Digest, Time Out New York, and many other publications. Her first book, Better: The Everyday Art of Sustainable Living, is due out this July through New Society Publishers.

Breaking Ground on Art Barn Deck

The men of Passerino Painting and Contracting dig holes for 6x6 posts that will hold up our new Art Barn deck.
It was a little more than one year ago when we began putting together plans for Better Farm's new Art Barn. Continuing from those ideas (several new banks of windows and sliding doors, gallery walls, track lighting, and recycled spray foam soy insulation), Passerino Painting and Contracting stopped by the farm yesterday to break ground on the Art Barn's brand-new custom, second-floor deck. Spanning more than 26 feet by 12 and overlooking a lovely natural amphitheater, this is going to be our new outdoor concert hall: bands on the deck, crowd on the hill...

The materials.
The decking material we decided on is MoistureShield, environmentally friendly composite decking that utilizes 95 percent recycled materials. Here are some fast facts about this company:
  • No new trees are cut down to make MoistureShield Decking.
  • Their process stops more than 270 million pounds of trash from entering landfills every year—that's 36 football fields of trash, each stacked 10 feet high!
  • They save more than 5.3 trillion BTUs of energy per year.
  • MoistureShield's process saves 1 million gallons of gas a year.
  • Not only does a 12´ x 12´ MoistureShield deck save 110 gallons of gas, but it also reduces greenhouse gas by 619 lbs. CO2 equivalent.
  • The plastic and wood A.E.R.T. recycles annually is comparable to taking 54,000 vehicles off the road.
Here's what goes into each board of MoistureShield:


The deck is going to run up the side of the barn:

Then across the entire back of the barn:

And overlook a natural amphitheater behind it:

As the guys get the deck in ship shape, we're going to bring in a friendly neighborhood goat to clear out all that brush and burdock (seriously). Stay tuned for more photos!

To schedule an estimate for one of your at-home projects, contact Passerino Painting and Contracting at passerinojm@gmail.com or (315) 783-3994.
Comment

Nicole Caldwell

Nicole Caldwell is a self-taught environmentalist, green-living savant and sustainability educator with more than a decade of professional writing experience. She is also the co-founder of Better Farm and president of betterArts. Nicole’s work has been featured in Mother Earth News, Reader’s Digest, Time Out New York, and many other publications. Her first book, Better: The Everyday Art of Sustainable Living, is due out this July through New Society Publishers.

Seeking Sponsors, Talent for Our Annual Open House

betterArts, a new arts and music not-for-profit offering free and low-cost workshops, private instruction, artist residencies, and events out of its location at Better Farm in Redwood, NY, is seeking musicians and artists to participate in its Second Annual Open House and Fundraiser from 10 a.m.-8 p.m. Saturday, May 26.

This event will feature live music and performances, interactive art projects, information on upcoming workshops and private instruction, arts and crafts stations, a gallery of work by local and visiting artists, a tour of our studios, a potluck barbecue, and raffles. A cash bar will also be available. Entrance is free and open to the public.

Visitors can also tour the grounds of Better Farm, step inside “green” buildings and learn about construction methods, check out the no-till, organic gardens and composting stations, and meet the staff.

The open house is in conjunction with the First Annual Artists' Studio Tour scheduled for the Thousand Islands Region from 10 a.m.-5 p.m. May 26 and 27.

Better Farm and betterArts are seeking the following participants for the event (click here to RSVP!):
  • Bands/Musicians: If you and/or your band is interested in volunteering your time for this cause, please send an e-mail to info@betterarts.org. Those musicians who are also interested in teaching for betterArts in future programming efforts (private instruction, group workshops or lessons) can visit http://www.betterarts.org/teach-for-us to download a form.
  • Artists: There is no charge for artists who would like to display their work in the gallery on this date. betterArts will recoup 20 percent of all art sales. Price your work accordingly! All work must be brought to Better Farm by May 20. To arrange for a drop-off, call (315) 482-2536 or e-mail nicole.caldwell@betterarts.org. Every piece must have the following information with it: Full name of artist, title of piece, medium (watercolor, 35 mm, mixed media, etc.), price, and contact information.
  • Sponsors: Individuals, businesses, or organizations interested in donating items for raffle or making a monetary contribution to defray costs will be cited in all press releases and advertisements, as well as on Better Farm and betterArts' websites and blog. Their names will also be displayed prominently at the event. To offer a sponsorship, e-mail info@betterarts.org or call (315) 482-2536.
  • Volunteers: Anyone willing to run an arts & crafts table, membership sign-up, clean-up/set-up, or the beer tent is asked to please e-mail info@betterfarm.org or call (315) 482-2536. There are five shifts: 10 a.m.-12 p.m., 12-2 p.m., 2-4 p.m., 4-6 p.m., and 6-8 p.m.
  • Organizations: Any local organizations or businesses are welcome to set up a table at this event. Tables cost $10/group. To register your group or organization for this event, contact Nicole Caldwell at (315) 482-2536 or nicole.caldwell@betterfarm.org.
The betterArts board meets at 7 p.m. the first Thursday of every month at Better Farm, 31060 Cottage Hill Road, in Redwood. All meetings are open to the public.

betterArts is a 501c3 non-profit organization dedicated to increasing access to the arts throughout Redwood, N.Y., and surrounding areas. The group's purpose is to offer art and music education through the provision of workshops, residencies, internships, and low-cost or free art instruction, studio, and gallery space for residents. betterArts, Inc. affords people the opportunity to discover and develop their creative and artistic spirit while offering educational opportunities in land stewardship and sustainable agriculture. betterArts, Inc. is committed to promoting the sustainable management of environmental resources while fostering individual and collaborative creative expression for the enjoyment and education of the people of Redwood, the region, and beyond.
Comment

Nicole Caldwell

Nicole Caldwell is a self-taught environmentalist, green-living savant and sustainability educator with more than a decade of professional writing experience. She is also the co-founder of Better Farm and president of betterArts. Nicole’s work has been featured in Mother Earth News, Reader’s Digest, Time Out New York, and many other publications. Her first book, Better: The Everyday Art of Sustainable Living, is due out this July through New Society Publishers.

Spotlight On: New York State Bluebird Society

Mr. Nicol from the New York State Blue Bird Society stopped in at Better Farm on Sunday to introduce himself and give us some literature on his group (and to give us a BEAUTIFUL new bluebird house, see photo above!).

The New York State Bluebird Society is a non-profit organization dedicated to the conservation of the Eastern Bluebird (Sialia sialis), New York's state bird. It is the group's mission to:
  1. monitor and increase production of Eastern Bluebirds and certain other cavity nesting birds through a statewide nestbox program.
  2. educate or inform people of New York on the ecology and management of Eastern Bluebirds.
  3. conduct research on bluebirds and bluebird habitat selection, including nest box preference studies.
  4. cooperate and coordinate with other organizations with purposes similar to those set forth above.
  5. the corporation is organized exclusively for charitible, educational, or scientific purposes within the meaning of Section 501(C) of the United States Internal Revenue code.
Mr. Nicol said he'd spoken with my Uncle Steve about the organization once or twice in the past, which was what inspired him to stop by—extra fitting, as Sunday was also the day after the three-year anniversary of Steve's death. After Mr. Nicol's left, I set about reading the literature he'd left behind:


Then took to hanging the bluebird house he so generously gave Better Farm:


Below is information on everything you'd ever want to know about bluebirds. If you're in New York (or not) and would like to support the valuable work of the New York State Bluebird Society, click here to become a member.

Eastern Bluebird (Sialia sialis)

  • The Eastern Bluebird is a member of the thrush family, as is the Robin.
  • Adult males are a dark blue color on their head, back, wings and tail. Theyare a reddish-brown color on their chin and breast. Their belly is white.
  • Adult females are a duller blueish-gray color on the head, dull brown on their backand blue on the tail and wings. They are a light reddish-bown on the chin and breast.Their belly is white.
  • The Eastern Bluebird is found throughout the eastern US and southern Canada.
  • Eastern Bluebirds in the north will remain as far north during the winter as they can as long as they can find food, water and shelter. The harder the winter, or the more scarce food, water and shelter are, the further south they will migrate till winter breaks.
  • Eastern Bluebirds generally return north to the state of New York in early to mid-March.

Range


NestBox Location

  • Bluebirds nest in open fields or orchards. They don't generally nest in cities or suburbs.
  • Place the box in an open an area as possible, do not mount on trees or buildings. Keep away from the edge of woods as house wrens will fill them up with sticks.
  • mount the box 4 to 6 feet up a pole or board
  • put a guard on the pole to keep out raccoons, snakes and other potential predators.
  • Try to face the box opening towards a tree or bush to give thefledglings something to fledge to
  • Do not face the box opening INTO the prevailing wind direction
  • Place boxes 100 yards from each other to minimize bluebird territory overlap. This distance can be reduced if there are trees/shrubs/landscape that break up the line of sight between the boxes.
  • Consider placing boxes in pairs, either back to back or within 4-6 feet of each other to encourage tree swallows and bluebirds to both nest. They will tolerate each other but not pairs of their same species.
  • If you don't get bluebirds in some boxes (or too many house wrens) after a couple seasons, consider moving them to another location.


NestBox Dimensions

There are many styles and shapes of bluebird boxes. Some made of wood,others PVC. Some general criteria are:
  • Inside dimensions of 4x4 for the eastern bluebird, 5x5 for themountain/western bluebirds.
  • entrance hole of 1.5 inches for the eastern bluebirds, slightly largerfor the mountain/western bluebirds.
  • bottom of entrance hole should be around 6 inches above the floor
  • no perch
  • box should open from top or side to allow for monitoring
  • ventilation at top of sides, drainage holes in bottom


Average Activity Periods

Many of these periods are subject to delay or extension due to inclimate weather and availability of food.
  • Courtship - 3 to 5 days
  • Nest building - 4 to 5 days
  • Egg Laying - starts 1 or 2 days after nest is completed. One egg is laid each day until the clutch is completed. Average clutch size is 5 eggs.
  • Incubation - starts when last egg is laid, lasts on average around 14 days
  • Brooding - starts when eggs hatch, lasts on average around 18 days. Stop nest checks after 12 days to prevent premature fledging


NestBox Monitoring

  • Try to monitor at least once a week
  • Stop monitoring 12 days after the eggs hatch. The young *may* prematurely fledge at this time
  • Minimize your time at the nest, especially in wet/cold weather
  • Tapping on side of box may help flush out brooding parent
  • Take note of eggs and nestlings and dates when laid, hatched and fledged
  • Remove nest after nestlings fledge to promote a subsequent nesting. Bluebirds will nest up to 3 times a season.
  • Join your state bluebird society or the North America Bluebird Society. The society will provide valuable information and birders with similair interests. Your data will help to understand the bluebird's breeding success.


Competing Species

Tree Swallows, Chickadees, Wrens and House Sparrows my attempt to nest in your box. The first three are tolerable. House Sparrows ARE NOT. Please do not "settle" for house sparrows. If you let them breed, you are actually working AGAINST bluebirds and other native cavity nesting birds.
  • Tree Swallows: mount a 2nd box on the same pole or on a pole 4-6 feet away. Tree swallows will nest in one, bluebirds in the other.
  • Wrens: move the box out in the open, away from the edge of the woods
  • Sparrows: keep removing their nests to deter them. They are a non-native unprotected species so you can deal with them as you see fit. We have in-house trap plans if you areso inclined.


Predator Deterrance

  • Put a pole guard on the pole to keep climbing predators out
  • some people grease the poles as well
  • Have the roof of the box overhang the front around 4 inches tomake it harder for predators to reach the entrance hole
  • If birds of prey attack your bluebirds, move the boxes away fromtrees where the prey birds may be launching their attacks
  • keep grass/weeds trimmed near box to remove predator hiding spots
  • deter feral/stray cats. They prey on many bird species.


Food Supply

Bluebirds eat mainly insects that they capture on the ground. They do noteat bird seed. They will eat berries, currants, raisins and mealworms when insects are not readily available.
  • keep some areas mowed to provide ground insects more readily
  • supply some of the materials listed above in bad weather (early spring,late fall, during winter) to supplement insect food.
  • place materials on a covered, open sided tray
  • plant berry-bearing shrubs/trees (holly, olive, mulberry, cherry, honeysuckle)


The NYS DEC sells berry producing seedlings each spring. Check out their link in our links section.

Here's a list of native trees/shrubs bluebirds are known to utilize for food:
Summer or Fall Fruits Winter Fruits
Trees:Trees:
Serviceberry
Flowering dogwood
hawthorn
Serviceberry
red mulberry
black gum
pin cherry
black cherry
choke cherry
sassafras
hackberry
winterberry holly
American holly
eastern red-cedar
American Mt. Ash
Shrubs & Herbs:Shrubs:
Hercules club
red-osier dogwood
hucklebery
spicebush
pokeberry
blackberry/raspberry
American Elderberry
blueberry
arrowwood
red chokeberry
wax myrtle
bayberry
mistletoe
dwarf sumac
staghorn sumac
smooth sumac
blackhaw viburnum
Vines:Vines:
wild grape
american bittersweet
Virgina creeper
poison ivy
coral honeysuckle


Wintering Over

Bluebirds will winter over if the weather does not get too harsh and they have (1) shelter,(2) food and (3) water.

For shelter, bluebirds will roost in empty nestboxes. You can add clean dried grass in thefall if you wish for bedding material. You can also plug up air vent holes to help prevent heat loss. You can also build roosting boxes.
For food, you can plant berry bearing trees and shrubs so the bluebirds will have fresh food available. The also eat raisins and currents.

Martha Sargent suet recipe:
  • 1 cup crunchy peanut butter
  • 1 cup lard
  • 2 cups quick-cook oats
  • 2 cups cornmeal
  • 1 cup regular (white) flour
  • 1/3 cup sugar
Melt the lard and peanut butter together in the microwave or on the stove top. Stir in the remaining ingredients. Pour (actually its more like “plop”) the mixtureinto square freezer containers that will fit your suet basket. Or cool it in the fridge and crumble for a feeding platform. Store it in the freezer or refrigerator (depending on how much you use daily) until you are ready to use it. This recipe makes about six cakes. Only use the peanut butter in a mixture, not alone, as it may stick to the birds' crop.
For water, you can put fresh water out daily if there is not running water available. There are also products available to heat or vibrate the water to help prevent freezing.
Comment

Nicole Caldwell

Nicole Caldwell is a self-taught environmentalist, green-living savant and sustainability educator with more than a decade of professional writing experience. She is also the co-founder of Better Farm and president of betterArts. Nicole’s work has been featured in Mother Earth News, Reader’s Digest, Time Out New York, and many other publications. Her first book, Better: The Everyday Art of Sustainable Living, is due out this July through New Society Publishers.

Grounds Keepers

Chives wake up in one of our raised beds.
It was April last year when enough snow had melted away for us to start working on the grounds at Better Farm and get ready for the spring season. Well, things have started early this year; and on Saturday a bunch of us got busy with the seasonal yard work required to make way for the spring, summer, and fall rush.

Here are pictures from the first week of April, 2011:
Tiger lilies bed at the front of the main house.


And here are pictures this morning—still the middle of March!
Tiger lilies in the front yard.
Onion and garlic sprouts.

Here's a quick "honey-done" list from the last week:
  • Got the materials delivered for construction of the Art Barn's second-story deck and staircase
  • Raked twigs and wood chips away from wood piles and added to compost
  • Turned compost and bagged rich, black dirt for seed planting
  • Planted seeds, stocked greenhouse
  • Raked away brush from sprouting tiger lilies
  • Cleaned out raised herb beds to make way for rising-and-shining chives, garlic, and onions
  • Moved the chicken coop to another section of garden
  • Inventoried bicycles and the work they need to be road-ready this spring
  • Loaded all the bird feeders with seed
  • Inventoried wood for new chicken coop
  • Scooped gravel onto potholes in Art Barn driveway
  • Began organizing things in the Art Barn
  • Dragged some of the patio chairs and loungers out of the car port so we can really get the full effect of these beautiful days
Big thanks to Sue Kerbel, Brian Purwin, Nick Bellman, Tyler Howe, and Shani Abromowitz for getting the proverbial ball rolling. To volunteer at Better Farm, e-mail info@betterfarm.org or call (315) 482-2536.
Comment

Nicole Caldwell

Nicole Caldwell is a self-taught environmentalist, green-living savant and sustainability educator with more than a decade of professional writing experience. She is also the co-founder of Better Farm and president of betterArts. Nicole’s work has been featured in Mother Earth News, Reader’s Digest, Time Out New York, and many other publications. Her first book, Better: The Everyday Art of Sustainable Living, is due out this July through New Society Publishers.

DIY Planetarium

A DIY planetarium model with its Environmentaland crew, posted at Treehugger.com.
Written by Adam Goss for diyplanetarium.blogspot.com.

I've always enjoyed working with planetariums and have recently taken them up as a hobby. As I'm also a member of the Yahoo Groups Small Planetarium blog, I thought it would be fitting to create a blog on my project, documenting the steps for anyone who would like to replicate them. Most recently I constructed a 5-meter diameter Gore Dome inflatable Planetarium out of a thin, lightweight tablecloth plastic.

There are several methods for building a planetarium, but some methods are obviously better than others. A typical amateur approach to planetarium construction is the geodesic dome, constructed of cardboard pentagons. Although this is a perfectly valid approach, it does a poor job of representing a hemisphere as there are many flat sides.

A better approach to planetarium design is a pattern called Gore Domes. Although there is little literature on Gore Domes, the design is used in most planetariums around the world. I am a native of Colorado and live close to the Denver Museum of Nature and Science who recently renovated their planetarium. Their new all digital Gates Planetarium is constructed from a thin sheets of aluminum using the Gore Dome design. Gore domes are unique in that they take flat objects and stitch them together to create a three dimensional dome. The dome itself is constructed from many bulging triangular shaped pieces called 'Gores.' A good representation of this that many of us have done is the elementary orange peel trick; trying to make a 3D object flat (the opposite of what we want to do).


The Gores in this project will look almost exactly like these below:


MATERIALS:

The following materials will be needed when constructing this planetarium:
  • Marker
  • Pen
  • Scissors
  • Ruler (Metric)
  • 40'' wide roll of white tablecloth plastic
  • Masking tape (1.25'' wide)
  • Duct Tape
  • Blue Painters Tape
  • Calculator


STEP 1:
By using the pattern provided by the July 1973 Popular Science Article (here) on Gore Domes, scale all measurements to fit the diameter of the dome being built. The diameter of the dome in the article is 25 Feet, so in order to make my dome (5 meters), I had to multiply all of the dimensions by a scale factor of 0.656167979. This multiplier scaled all dimensions down to a 5 meter diameter, but kept units in English measurement. This is fine if you're comfortable with English units, however I find metric units to be easier to work with on a project like this. I simply set up an excel spreadsheet to calculate the proper dimensions at each height level. A link to a PDF of my calculations can be found here.


STEP2:
Setting up a solid template for cutting out the Gores is crucial when aiming towards a 'perfect' dome. After calculating the dimensions of my Gores, I found it easy to make a template out of tape on the floor. This made cutting and fabricating the sections easy. I laid out plastic over the pattern, put a few books on the top to hold things in place and just ran scissors around the edge for a nice clean cut.


STEP3:
Taping together the Gores is tedious work. If you're taping on the ground (easiest) I would recommend a pair of knee pads to combat the hours of brutality they would otherwise endure (I learned the hard way). Taping the gores together can be done on a table, but is difficult because they keep sliding around. I haven't found a cut and dried method for taping together the sections, but small strips at a time seem to work well as the curvature of the gores is always changing. In my procedure, I started with the top of the gores and worked down to the bottom. On the last section, I brought around the ends and taped them together. After the main body of the dome has been taped together, the pieces can be spread out to reveal the circle left in the top of the dome. Simply cut out a circle to fit in the top (see dimensions PDF) and tape it in.


STEP 4:
The final step of the planetarium process is the fan/inflation procedure. For my setup, I created a pipe that fitted onto a common everyday house fan with the excess plastic. I taped one end to the fan and the other to the ground. Taping the bottom of the output pipe to the ground and narrowing the top (taping parts of the top edges to the ground) creates a very steady non-turbulent airflow ideal for planetariums. After I had the inflation system in place, I laid out the planetarium on the floor so that the inflation pipe was sticking under one of the edges of the dome. The edges were held down with soup cans, but I recommend anything from tape to sandbags (the smaller the footprint the better).


STEP 5:
Enjoy...

My basement was too small for this dome to fully inflate. When I head back up to CSU next week I will be testing this dome in full capacity in one of the ballrooms, complete with a mirrordome projection system. Until then, questions and comments are welcome. I will keep this blog updated as this project progresses. My email is adamthomasgoss@gmail.com. Thanks for reading and happy building!
1 Comment

Nicole Caldwell

Nicole Caldwell is a self-taught environmentalist, green-living savant and sustainability educator with more than a decade of professional writing experience. She is also the co-founder of Better Farm and president of betterArts. Nicole’s work has been featured in Mother Earth News, Reader’s Digest, Time Out New York, and many other publications. Her first book, Better: The Everyday Art of Sustainable Living, is due out this July through New Society Publishers.

Tomorrow: Thousand Islands Central School Wellness Fair

Better Farm will participate tomorrow in the Thousand Islands Central School Wellness Fair, slated from 11 a.m.-2:30 p.m. for students and 3-6 p.m. for the public Friday, March 16, in the Thousand Islands High School gymnasium.


Every student in the high school is expected to attend the event, which is funded by the Carol M. White Physical Education Program Grant. That grant is designed to initiate, expand, and enhance physical education programs, including after-school programs for students in kindergarten through twelfth grade. The event will also feature tours of the new wellness center at the high school.

Grant recipients must implement programs that instruct students in healthy eating habits, good nutrition, and physical fitness activities. This includes fitness education and assessment to help students understand, improve, or maintain their physical well-being. Students will receive instruction in a variety of health, motor skills, and physical activities designed to enhance the physical, mental, and social or emotional development of every student, and to promote physical fitness that supports a lifelong healthy lifestyle.

Better Farm will have a booth at this event with trail guides and maps of hiking opportunities within the Indian River Lakes Conservancy, information about our sustainability internship program and betterArts residencies, a sign-up sheet for the upcoming Earth Day cleanup in Redwood, Better Farm membership opportunities and merchandise, and tons of information about ways individuals can start living healthier, more sustainable lifestyles. Hope to see you there!

Thousand Islands Central School is located at 8481 County Route 9 in Clayton, N.Y., 13624.
Comment

Nicole Caldwell

Nicole Caldwell is a self-taught environmentalist, green-living savant and sustainability educator with more than a decade of professional writing experience. She is also the co-founder of Better Farm and president of betterArts. Nicole’s work has been featured in Mother Earth News, Reader’s Digest, Time Out New York, and many other publications. Her first book, Better: The Everyday Art of Sustainable Living, is due out this July through New Society Publishers.

Building a Better Farm


Article originally published in NNY Business Magazine. Article by Ted Booker. To subscribe to NNY Business Magazine, call (315) 782-1012.

Signs of Spring

Hands in dirt: sure sign of spring.
The first week of March marks the very beginning of the growing season up here in the North Country: prepping and planting seeds, stocking the greenhouse, turning our compost, and getting the rows in the garden ready.

First, we went out to the compost heap and shoveled beautiful, black dirt into old plastic bags to use as potting soil. Then we took all our flats out of the greenhouse and set them up on the picnic table:
Our weekend intern, Shani, at left, and our latest resident, Sue.
Here are Shani and Susan filling the trays with dirt:

To make labels for the plants, Shani cut up empty plastic water bottles and Susan used a Sharpie to write out the names of the veggies we were planting. Once we pushed the seeds into the dirt, it was out to the greenhouse with the soon-to-be sprouts:

To keep the babies hydrated, we're utilizing rainwater from the catchment system installed last summer:

This week we'll be filling the greenhouse, moving the compost heap, and beginning construction on a new chicken coop for our incoming feathered friends. Spring is upon us!

If you'd like to volunteer with us, e-mail info@betterfarm.org.
Comment

Nicole Caldwell

Nicole Caldwell is a self-taught environmentalist, green-living savant and sustainability educator with more than a decade of professional writing experience. She is also the co-founder of Better Farm and president of betterArts. Nicole’s work has been featured in Mother Earth News, Reader’s Digest, Time Out New York, and many other publications. Her first book, Better: The Everyday Art of Sustainable Living, is due out this July through New Society Publishers.

Wild Edible Plants: Eat your sumac

Sumac plants in winter.

There are 250 species of sumac growing in subtropical and temperate regions all over the world. The fruits of the genus Rhus are ground into a deep-red or purple powder used as a spice in Middle Eastern cuisine to add a lemony taste to salads and meat.

In Arab cuisine, sumac is used as a garnish on dishes such as hummus and added to salads in the Levant. Iranian food features sumac on kebabs and lahmacun. In North America, the smooth sumac and staghorn sumac can be used to make "sumac-ade", "Indian lemonade", or "rhus juice". This drink is made by soaking the berries in cool water, rubbing them to extract the essence, straining the liquid through a cotton cloth and sweetening it. Native Americans also used the leaves and drupes of the smooth and staghorn sumacs combined with tobacco in traditional smoking mixtures.
Photo of sumac berries drying out from First Ways. Blogger Rebecca Lerner suggests spreading the berries out on a shelf in a warm, dry room.
A lot of people mistakenly assume all sumac plants are poisonous. But poison sumac, while related to the sumac trees this post is about, is not the same thing and actually looks very different. Poison sumac has smooth leaves and white berries, while edible sumac has tightly clumped red berries and jagged, toothy leaves:

Sumac contains calcium, potassium, magnesium, citric acid and antioxidants, according to a plant physiology study conducted by the Bulgarian Academy of Sciences. Sumac bark is useful medicinally as an astringent tea for anti-diarrhea purposes. It’s also antibacterial.

Sumac makes a great, healthy lemonade alternative. Just soak the berries in cold water, rub them to release the juice, and then leave them for several hours to infuse into the water. You can also heat it up to speed the process. You can also freeze the liquid in ice cube trays and use it year-round like lemon juice. “Wildman” Steve Brill’s Wild Vegan Cookbook offers several interesting recipes for sumac concentrate. 

If you dry the sumac berries out and grind them into a spice powder, it will last year-round without refrigeration. Sprinkle the powder on rice, hummus, or kebabs. 

Here's our friend Bob Laisdell showing how to retrieve the drupes (clusters of berries): 

And our friend Rick Lopez showing off the berries up-close:
 
Want to give it a go? Here's an easy recipe for sumac tea:


Fresh Sumac Iced Tea
Serves 4
6 cups near-boiling water
2 drupes of staghorn sumac berries
Honey or other sweetener to taste 
  1. Remove the berries from the drupes.
  2. Pour nearly boiling water over the berries and steep for an hour. Smoosh the berries in with the water. Strain the berries.
  3. Chill the drink.
  4. Take the warm berries and add to an ice cube tray. Fill with halfway spring water or with the drink itself and freeze.
  5. A few hours later fill up the ice cube tray. This way the berries will be prevented from floating to the top. Freeze again.
  6. Add the ice cubes to your glass and fill with the chilled drink. Add sweetener if you like.
3 Comments

Nicole Caldwell

Nicole Caldwell is a self-taught environmentalist, green-living savant and sustainability educator with more than a decade of professional writing experience. She is also the co-founder of Better Farm and president of betterArts. Nicole’s work has been featured in Mother Earth News, Reader’s Digest, Time Out New York, and many other publications. Her first book, Better: The Everyday Art of Sustainable Living, is due out this July through New Society Publishers.

Better Farm Scores a Spot on the 1000 Islands Agricultural Tour

Better Farm has been invited to take part in this year's 1000 Islands Agricultural Tour, a project undertaken by the 1000 Islands International Tourism Council that maps and compiles information about local farms in a free brochure. Visitors can follow the map, listen on cell phones to an audio tour, and stop in at the local operations. Similar to historic buildings tours or wine trails, the 1000 Islands Agricultural Tour allows you to sample local wines, veggies, fruits, honey, cheeses, ciders, and more—and visit with unbelievably adorable barnyard animals, alpacas, horses—and now, all the diverse, creative creatures calling Better Farm home.


When you visit the ag tour's website, be sure to check out our page! And don't forget to order a brochure—the weekend-long ag open house is slated for 10 a.m.-4 p.m. Saturday, July 21, and 12-4 p.m. Sunday, July 22. That event, open to the public, is designed to promote the agricultural industry throughout Jefferson County. It's a great chance to visit a number of local family farms, including but not limited to dairy, livestock, fruit and vegetable farms, wineries, butcher shops, and farm supply businesses. Each location will have a special, weekend-long feature going on especially for that event. Not to be missed!

For those of you who haven't stopped by Better Farm yet, that will be a perfect weekend to see what our synthesis of sustainability and creative expression looks like. The open house is supported by Jefferson County Agricultural Development Corporation, the 1000 Islands International Tourism Council, Cornell Cooperative Extension of Jefferson County, and the Jefferson County Chapter of Adirondack Harvest.
Farms and agricultural businesses interested in participating can go to www.agvisit.com or www.comefarmwithus.com to download a participation form.  The application deadline is March 30. To order a free brochure of the farms included in the tour, click here.

From Laundry to Landscape: Tap Into Greywater

Laundry To Landscape
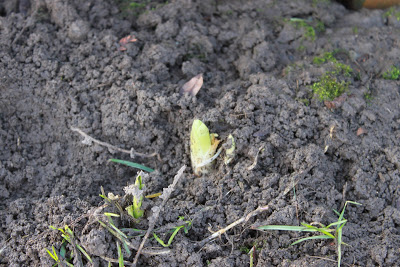
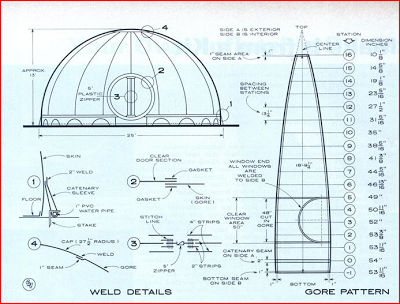
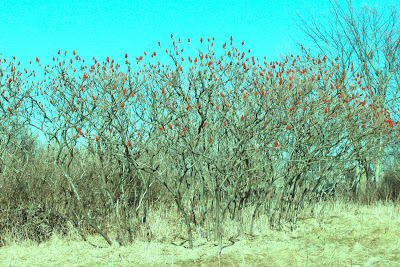
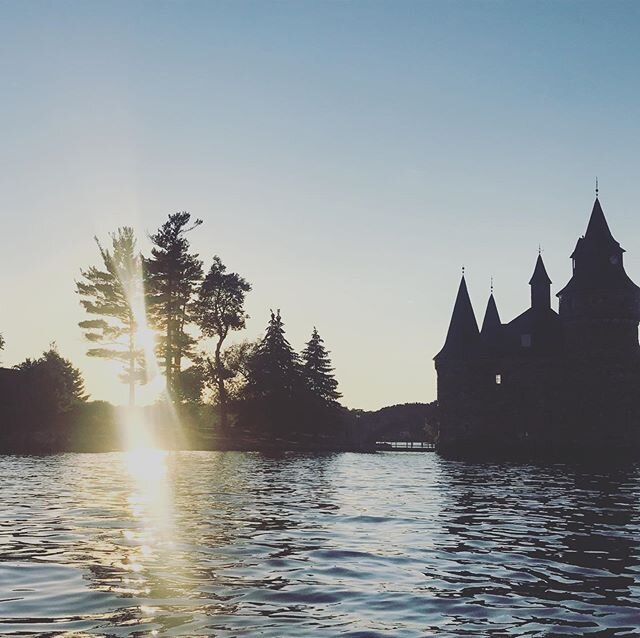
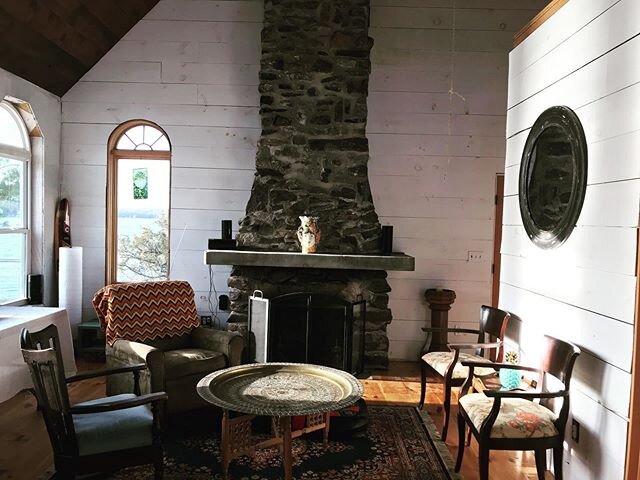
A simple laundry-to-landscape graywater system diverts water from a washing machine and directs it to mulch basins around plants. Illustration/Elayne Sears
Originally published in Mother Earth News
By Laura Allen and Cleo Woelfle-Erskine

In the United States, the average person uses about 40 gallons of water per day to bathe, wash dishes and clean clothes. Unfortunately, this water almost always goes straight down the drain. But this “greywater” could be put to good use to irrigate fruit trees and other plants. Greywater refers to all used household water except water from toilets, which is called “blackwater.” Historically, state laws have dealt with water from your sink, shower or washing machine in exactly the same way as water from the toilet — it’s all considered sewage that requires treatment. Consequently, home systems that use greywater for irrigation are sometimes illegal.


However, in recent years, greywater activists have been working to change this attitude and the state codes that enforce it. Now, with more than half of U.S. states facing water shortages and the momentum shifting as some states change their codes, we think greywater reuse is coming into the mainstream. Many policymakers are beginning to see greywater as a valuable resource that — with a few simple precautions — can be safely reused in home landscapes.

For decades, greywater has been a boon to gardeners in dry climates, but using greywater has many other benefits in all regions. Greywater use lowers your water bill, and diverting greywater from overloaded or failing septic systems can extend their life. Reusing water saves energy: Greywater irrigation replaces water that would otherwise be treated to drinking water quality, and it also isn’t treated at the sewage treatment plant, saving more energy. And perhaps most importantly, more efficient water use reduces pressure on scarce water resources — especially in the drier parts of the country, where farmers, individual households and wildlife all face the problem of limited water supplies.

A Simple Laundry-to-Landscape System

The simplest type of greywater use is to collect water in a dishpan as you handwash dishes, and then toss it over your flowerbeds or fruit trees. This is a wonderfully simple, inexpensive way to tap into greywater, but with just a little more effort and expense, you can capture much more water.
One of the easiest and most popular greywater systems is a landscape-direct system that diverts greywater from your washing machine and routes it to mulch basins around trees or bushes. This “laundry-to-landscape” system captures greywater from the drain hose of the washing machine and sends it out to your plants through 1-inch tubing, without the need to alter existing plumbing. You can expect to harvest 10 to 25 gallons of water per load for a horizontal-axis machine, or about 40 gallons per load for a vertical axis machine.

According to Art Ludwig, author of Create an Oasis With Greywater, the laundry-to-landscape system is the “simplest, least expensive, lowest effort way to get the most greywater out onto the landscape.” The washing machine’s internal pump pushes the water outside through the tubing, so these systems can work without any additional pumps on flat or downward-sloping sites.

Creating this type of system is as simple as installing a diverter valve on your washing machine, attaching and positioning the hose, and digging simple mulch basins for your plants. The mulch basins provide room for greywater to spread out around the plants, as well as preventing greywater from running off, or creating pools where mosquitoes could breed. The mulch also helps keep grease and soap from clogging the soil. These greywater systems typically cost $75 to $200 if you do the work yourself, or up to $2,000 if you hire a professional. This type of system works best for trees, bushes, and large annuals or perennials.

You can build a landscape-direct greywater system yourself if you’re knowledgeable about plumbing and basic landscaping. A plumber familiar with greywater systems can help install the diverter valve. Or hire a landscaper or plumber who has experience with greywater to install your complete system.

Other Greywater System Options

You can also use a “branched drain” system to send water from your showers and sinks to mulch basins. This system relies on gravity to distribute the water, so it only works if the plants are located below the source of water. Branched drains require little maintenance because there are no moving parts that could break. These systems can be simple or nearly impossible to install — it depends on your existing plumbing. If your garden is above your water source, you can install a pump designed for dirty water (called an effluent pump) to move water uphill in 1-inch tubing.

Greywater can be used with drip irrigation, but needs to be filtered first. Manufactured systems use filters to remove solids, and pumps to send the water into special greywater-compatible drip irrigation tubing. Drip greywater systems can distribute water to more, and smaller, plants, but the filters require regular cleaning and maintenance.

More complicated greywater projects are expensive, complex and require a higher level of maintenance, so they’re best suited for larger applications, such as apartments, schools and commercial buildings. One example of a larger greywater project is Casa Dominguez, an affordable housing development in Los Angeles County, where greywater from the complex’s washing machines is used to water the landscaping plants. Treated greywater can also be used to flush toilets, as in the Mercy Housing Building in Chicago, where 96 apartments flush with greywater.

For home systems, keep in mind that simpler is almost always better. In our experience, the more complicated, high-maintenance systems sometimes fail, while the systems that work best for home use are usually those designed to require minimal care.

Using Greywater Safely

Before using greywater in your yard, there are a few precautions to be aware of. One is that when you use greywater, you’ll want to choose natural soaps that break down in the environment and won’t harm plants. Stay away from any cleaners with bleach or other toxic ingredients. Avoid sodium and boron, which are fine for us, but bad for plants and soil. (See the resources list below for some specific brands of greywater-friendly cleaners.)

It’s a good idea to avoid direct contact with greywater — wash water often contains small amounts of bacteria that come from your clothes or body. Always follow these rules when using greywater at home:
  • You can use greywater on edible plants, but only fruit trees or crops such as corn or raspberries, where the edible part is off the ground. Don’t use it to water root vegetables.
  • Never store greywater for longer than 24 hours.
  • If you reroute your plumbing, install a diverter valve so you can choose when to send water to the greywater system and when it should go into the sewer or septic system.
  • Don’t allow greywater to pool up or run off — make sure it can soak into the ground.
Finally, bear in mind that even simple systems will require some engagement from you, your family and your guests. Label pipes and valves so others know how to operate the system, and be sure others know what kinds of soaps can be used. Check mulch basins regularly to be sure they’re functioning correctly.

Greywater in the Southwest

Greywater codes are gradually changing, but considerable work needs to be done before everyone in the United States can use greywater legally. So far, greywater advocates have been most active in the Southwest.

In California, efforts at greywater reform have been mixed, but there have been some recent improvements. Changes to greywater codes began in Santa Barbara in 1989, but for many years it remained difficult to get permits for greywater systems in California. Most people using greywater ignored the codes, and unpermitted systems became the norm. At one point California hosted an estimated 1.7 million illegal greywater systems. In 2009, California revamped its greywater codes. The new code allows simple laundry-to-landscape systems without a permit, but requires permits and inspections for most greywater systems.

Arizona may have one of the best models for greywater use. “We conducted a study in southern Arizona and found that 13 percent of people were using greywater, all illegally,” says Val Little, director of the Water Conservation Alliance of Southern Arizona. “Since we couldn’t inform them how to do it properly due to the restrictive state code, we worked to create new ‘performance-based’ regulations. Now, if people follow the guidelines, their system is legal.”

In Arizona, there are no fees, permits or inspections for systems that use less than 400 gallons per day and follow the guidelines (larger systems require permits). In the decade since the code change, state-wide tax credits, water district support, free classes and online pamphlets have promoted widespread greywater use, without any reported problems. Texas, New Mexico and Wyoming have since created similar performance-based codes.

Other State Greywater Codes

If you live in the Midwest, South or Northeast, your state most likely either has no specific greywater code, or else greywater is regulated along with septic systems. Legal reuse can be costly, requiring small leach fields or expensive engineered plans.

Here are a few examples of state greywater regulations. (Keep in mind that greywater codes are complex, and updated frequently, so keep your ears open for what’s happening in your state. Find a good list from the Oasis Design Greywater Policy Center.
  • Florida bans outdoor greywater use, but allows indoor use for flushing toilets.
  • In Georgia since the last drought you can legally carry greywater in buckets to plants or build a complex greywater system (with a permit), but you can’t get a permit to build a simple greywater system.
  • Washington’s new code allows some small systems without a permit, but imposes stringent requirements on other systems.
  • Oregon’s proposed code mandates an annual permit fee — a move that is already generating opposition.
If you’re not happy with the greywater codes in your state, contact your legislators about changing them! There are many benefits to be gained from moving toward less restrictive greywater codes. With codes in place supporting safe and simple reuse, greywater could reduce U.S. water use by 600 million gallons per day by creating a “new” source for non-potable uses.

Code change also opens up a new job market — every plumber and landscaper could potentially build simple greywater systems for their customers, and there should be plenty of demand for inexpensive, landscape-direct systems.

Building your own simple system is even more affordable, and as common-sense code changes make it easier to tap into greywater, recycling your water is looking more and more like a smart idea. Get ready to load up your washing machine and watch your garden thrive!

Greywater Resources

Books, Kits and Parts
Oasis Design offers parts and free instructions.
Clean Water Components sells complete kits to build your own greywater system.
Create an Oasis With Greywater by Art Ludwig
Greywater Policy Issues
Greywater Action
Oasis Design Greywater Policy Center
Greywater-Friendly Cleaners
Read the ingredients and look for products that contain no salt or sodium, boron or bleach. For water softeners, avoid sodium-based products. Choose a potassium-based one instead.
Laundry detergent: Oasis or ECOs detergents
Dish and hand soap: Oasis All Purpose Cleaner, Dr. Bronner’s, any natural liquid or bar soap
Body products: Look for low- or no-sodium options. Products from Aubrey Organics are some good choices. Check the ingredients lists of other products at theEnvironmental Working Group’s Skin Deep Cosmetics Database.
Comment

Nicole Caldwell

Nicole Caldwell is a self-taught environmentalist, green-living savant and sustainability educator with more than a decade of professional writing experience. She is also the co-founder of Better Farm and president of betterArts. Nicole’s work has been featured in Mother Earth News, Reader’s Digest, Time Out New York, and many other publications. Her first book, Better: The Everyday Art of Sustainable Living, is due out this July through New Society Publishers.

Revive Your Floor Without Emptying Your Pockets

Better Farm's library floor, foreground, was badly beat up, weathered, dented, and lifeless. Patching knotholes and applying fresh paint, background, gave the floor a new lease on life for less then $75.
Flooring can be an intimidating project to take on. Nice, durable wood may cost you an arm and a leg (as will many eco-friendly alternatives), laminate flooring leaves much to be desired, and a carpet to cover a badly abused, old wood ground is bound to get stained—but more importantly, carpets trap and hold all kinds of bacteria, dirt, allergens, pollens, dust mites, chemicals, and other contaminants.

We've researched all of the above extensively. And while there's certainly a time and place for luxurious and new wood flooring (natural hardwoods are often worth their price tags, as they'll last forever), bamboo flooring, cement floors, recycled laminate flooring, and even carpet, for our needs and budget we found a nice alternative to all of that other stuff.


First, let's go over the issue at hand: Better Farm's library floor. Here are some pictures of the floor back in 2009:
Duct tape used to cover knot holes had all but worn out.
The famous Sadie dog hangs out amidst a floor covered in duct tape, chipped paint, and loose ends.
The ramp's color is totally worn out.
Here's another shot of the ramp, close-up, that I took last week:

The first thing I did was figure out how to patch those knot holes. This wasn't an easy investigation, as most DIY sites were trying to tell me to use a jigsaw to cut circular pieces of wood to fit the holes—a feat I wasn't sure I was going to be able to accomplish in a safe or timely manner. 

Instead, I picked up some metal screen lath (the mesh or metal patch people use to fix drywall holes) and a quart of Bondo. When we ran out of the screen lath, I cut circles out of plastic recyclables and used those. Here's how we patched:
  1. First we took the duct tape off the knothole, sanded away the old adhesive, and thoroughly swept and mopped the floor.
  2. Then we mixed the Bondo solution together to form the super-strong hole-filler.
  3. With an unfolded paper clip (string or anything else you can think of would also work) attached at one end to the screen (already cut to cover the bottom of the hole), we pushed the screen through the knothole, then pulled up on the paper clip so the screen became flush against the bottom of the hole.
  4. Holding the clip  and screen taut against the bottom of the knothole, we applied the bondo then held the clip in place for several minutes while the adhesive began to take hold:
The Bondo begins to harden. Note the top of the straightened paper clip poking out. That piece came off easily with sandpaper.
Then we sanded the whole thing down, washed the floor again, and painted.


Still rustic farmhouse chic, the floor is one cohesive color without holes. We'll be able to touch the paint up as we need to. And the best part? This whole project cost less than $75—a teeny tiny fraction of what a new floor, or new carpeting, would cost. Here's the price breakdown:
  • Two gallons of paint: $50
  • A bag of four rollers: $6
  • Bondo: $6
  • Screen sheath: $6 (or cut your own with found materials for free)
  • Package of sandpaper: $5
Got a great DIY design tip? E-mail it to us at info@betterfarm.org. Many thanks to intern Maylisa Daniels for heading this project!
2 Comments

Nicole Caldwell

Nicole Caldwell is a self-taught environmentalist, green-living savant and sustainability educator with more than a decade of professional writing experience. She is also the co-founder of Better Farm and president of betterArts. Nicole’s work has been featured in Mother Earth News, Reader’s Digest, Time Out New York, and many other publications. Her first book, Better: The Everyday Art of Sustainable Living, is due out this July through New Society Publishers.