DIY Chicken Tractor
/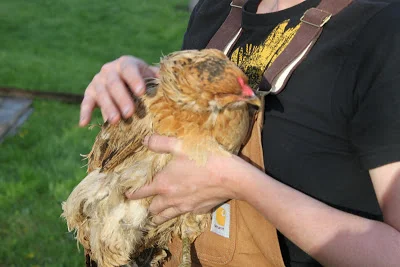
Our friend Jody recently called us up to say he had an injured chicken in need of a home. Turns out this bird had fallen on some hard times and had an injured leg; a weakness the other chickens and roosters turned to their advantage. The 1-year-old hen had been piled on, plucked, and pecked by her brethren; and Jody had kept her in his house in a box for weeks hoping she'd get better.
She did, so Jody put her outside again. Unfortunately, it didn't take long for the recovered leg to go back to bad; and for all those chickens and roosters to turn once again on this hen.
So, it was either the soup pot or Better Farm for this young lady. "Henrietta" joined the pack here last Monday. We scurried to get a coop together for her (sleeping indoors in a cat carrier just wasn't cutting it), deciding on a
model, which allows the bird to fertilize the ground while getting essential nutrients and answering that innate desire to pick and scratch at the grass and ground. Plus, chickens are great receptacles for your compost—they LOVE leftovers! Chicken tractors are also easy to move, so over the course of a month you can fertilize a lot of your garden area. Here's how we did it—and how you can, too.

Supplies
(NOTE: Adjust sizes to accommodate number of birds. This size is appropriate for one to three chickens)
Four 3x2 pieces of plywood
Two 2x2 pieces of plywood
Roll of chicken wire
Staple gun and staples
Four 1 x 1's, cut to whatever length you'd like the outside of your coop to be
Two 1 x 1 x 3's
Circular saw
Screws
Two hinges
Closures for the coop that a raccoon can't figure out (we went with a safety hook & eye)
Wire to thread the chicken wire
Wire cutters
Instructions
On one 4x2 piece of plywood, cut out a square big enough for the chicken to get through but small enough so once inside, the bird can feel secure. This will be the front of the coop.
Screw together the box, with the cut board in front and the 2x2's on the sides. The top piece of wood should be attached with the hinges, and closed with whatever closure you've selected.
To create the outdoor area, screw the long 1x1's together with the 1x1x3's to create a rectangle. The open end of the rectangle can be screwed directly to the coop.
Cut lengths of chicken wire for the sides, front, and top of the coop. Affix with the staple gun, then secure with screws every six inches.
To prevent varmints like raccoons and weasels from burrowing under and getting your chicken, attach a "runner" of chicken wire along the ground next to the sides. Sew the chicken wire together.
If you like, affix wheels to the coop end of the chicken tractor to make for easy transport.
Line the bottom of the coop with newspaper, then cover that with hay.