Better Orchard

The goji berry is just one of the new fruit trees gracing Better Farm's orchard in 2013.
We have in the last several years made a few fruity forays in the gardens at Better Farm with blueberries, raspberries, strawberries, cantaloupes, and watermelon. Last year we upped the ante with two dwarf reliance peaches that can withstand -25° temperatures. This year, we're going all the way with a cacophany of fruit and nut trees that should begin producing in the next several years. We'll be able to can, dry, and of course eat and sell this produce fresh. Here's a rundown of what's going in the ground this year:


Better Farm's main garden. Orchard area will be outside the garden along Cottage Hill Road (area circled in green.)
ORCHARD LIST

  • Banana Plant (2)— The Dwarf Musa Banana is a fast-growing plant that grows 5-6' tall indoors and has big, shapely, leathery-looking leaves. It usually bears tasty, yellow 5" bananas within 2-3 years. No extra care needed. This plant is hardy outdoors in areas that do not encounter frosts. Otherwise, plant should be kept indoors during the winter.
  • Brown Turkey Fig (2)—These figs make for great eating, fresh or dried. The Brown Turkey variety is selected for winter hardiness and fruit quality. The hardiest variety known, it grows in New Hampshire, Northern Wisconsin, Iowa, and South Dakota. This tree must be covered before temperatures drop below 10°. Brown Turkey Figs are grown successfully here in Canandaigua. Plant 10 ft. apart or in tub. 1 1/2 to 2 ft. trees. Shipped spring only. Zones 5-9, self pollinating. 
  • Carpathian Walnut (2)Carpathians produce large crops that are easy to harvest. Trees start to bear from four to seven years after planting. An average crop for a 15-year old tree is about 3 to 4 bushels of shelled nuts. At maturity, the hull opens and the nuts fall to the ground. This planting stock comes from the Carpathian Mountain Highlands in Poland. Beautiful, dark-green tropical foliage. No roots near the surface. Grass grows right up to the trunk. The Carpathian Walnut grows in beautiful symmetrical form with strong sturdy limbs that won’t break from wind or ice. Fast-growing, cool, dense shade. Free from most diseases. Carpathians have survived 25-30° below zero with no dieback or winter injury. Carpathians grow fast. The first year while becoming established, growth is only medium. Once established they make as much as 4-5 ft. of new growth each year. They grow best on deep fertile clay, loam or sandy soils. Carpathian Walnuts Produce Large-Fine-Flavored Nuts Nuts are almost identical to California walnuts. Many are much larger and we think better flavored. The thin shelled nuts crack easily in halves and whole. Kernels have a delicious flavor, free from bitterness with an attractive light color. Zones 5-9. Plant two trees for proper pollination.
  • Chandler Blueberry (1)—Chandler has all of the qualities of what makes an exceptional blueberry. Delicious, sweet flavor makes the Chandler ideal for baking and eating fresh, the long ripening season that provides harvest from mid to late season. Ornamental plant is 4 to 5’ at maturity and hardy to approximately -10 to -15 degrees. Self-pollinating Chandler will also pollinate with your other favorite blueberry varieties. 1 to 1 1/2' vigorous plants. Zones 4-7 (Note: this plant will join our other three flourishing blueberry plants inside the garden.)
  • Dwarf Reliance Peach (2)—Plant breeders at the University of New Hampshire developed this peach tree, which can survive and produce delicious fruit after 25° below zero. Reliance is tops in quality—fruits are medium-to-large, round, with bright-red attractive cheeks splashed over a yellow skin. Reliance has a bright yellow, firm flesh that is honey sweet, fine-flavored and comes free from the pit. The stone will not cling, even in coldest, driest seasons. The pit is smaller than any other peach. Reliance fruit ripens with Golden Jubilee or about mid-August. Zones 4-8. Peaches are self-pollinating. Plant dwarf trees 10’ apart. Mature height 8-10’. 
  •  Goji Berry (1)Goji berries have one of the highest antioxidant values of any whole foods and can be eaten fresh, dried, or frozen. Delicious taste is like a blend of raspberry, cranberry and strawberry. Leaves can be eaten as a vegetable or used to make teas. Purple and white flowers start in May followed by berries in early fall. This vine grows more than 10' tall, but should be cut back to 5' in fall for better fruit production the following year. Self-fertile and drought resistant, but avoid acidic soil. pH should be 6.8 or higher. Plant in full to partial sun. Also known as Wolfberry or Matrimony Vine.
  • Kiwi Collection (2 females, 1 male)—This cold-hardy strain is a big improvement over the fuzzy, brown-skinned Kiwi. This rare kiwi is a much sweeter tasting fruit. Grows much further north than the regular kiwi. Fruits average about 3/4-1 1/2" in diameter. Tastes somewhat like a tangy combination of strawberries and pineapple. Fruit will keep in the refrigerator for up to 4 months. The hardy Kiwi is somewhat similar to the grape vine, only much faster growing. Under ideal growing conditions it will grow up to 5" a dayand reach a height of 8' the very first year! It will quickly climb a trellis or wall. Its thick mass of bright green leaves will soon cover ugly service areas, stumps, even old buildings. Then in late May, lovely white, camellia-like flowers will appear to fill the air with a fragrant lily-of-the-valley scent.
  • Manchurian Apricot (2)In spring, dazzling pink snowflake blossoms pop out even before the leaves. In summer this tree produces an abundance of rich-flavored, red-cheeked apricots for eating fresh, canning and freezing. Self-pollinating but more fruitful when you plant with another variety.
  • Paw Paw Tree (3) The Paw Paw Tree is an ornamental tree that produces sweet, banana-flavored fruit. It grows to 30', has fragrant purple blooms and large, drooping leaves. Fleshy, oblong-shaped fruit makes unique-flavored pastries and breads. Paw Paw Tree fruit grows 3-5" long and weighs up to 8 oz. with 3-7 in a cluster. Sub-zero hardy and insect-free. Plant two trees for pollination.  
Comment

Nicole Caldwell

Nicole Caldwell is a self-taught environmentalist, green-living savant and sustainability educator with more than a decade of professional writing experience. She is also the co-founder of Better Farm and president of betterArts. Nicole’s work has been featured in Mother Earth News, Reader’s Digest, Time Out New York, and many other publications. Her first book, Better: The Everyday Art of Sustainable Living, is due out this July through New Society Publishers.

North Country Arts Council Calendar Items


Spring is coming! The hustle and bustle is kicking off with a bunch of great arts-related events and opportunities listed by the North Country Arts Council in Watertown. Here's a rundown of all the excitement:


THIS THURSDAY  

lucky seven header 
RECHARGING YOUR CREATIVITY
Thursday, March 14
7-8pm, $7 per person
Atrium of Franklin Building
52 Public Square
  
Content: Writer's block, lack of inspiration, creativity slump, and burn out: Artists in every field hit low points in their creative lives. This presentation will discuss the signs of burnout and creative blocks, and suggest a few tricks to jump start your creativity. Participants should bring a notebook or sketchpad and a pencil or pen.

Bio: Hilary Oak is a fiber artist with a background in costumes, masks, mosaics, and theatrical design. She served as the executive director of the St. Lawrence County Arts Council for more than seven years.


--------------------

JOB OPENING
y artsWatertown YMCA is seeking an Art Supervisor who will be responsible for the organization, delivery and quality of the Arts Program.Duties will include but are not limited to: meeting fiscal objectives; recruiting, training and supervising non exempt staff; creating, implementing and managing the arts program; event planning, scheduling of programs and staff; community outreach.The qualified applicant will have related field experience, youth experience, strong organizational skills as well as strong written and oral skills.
  
Contact Shawna Shawna at ymca_sgee@yahoo.com or 755-9622 or apply at any of the Watertown branches.

--------- 
MUSE
muse 2013 poster snipThird Annual Multi-Arts Event
Arts on the Square
Saturday, March 23
7-9pm
  
Every year, this project starts with ideas from a handfull of artists in a particular medium. Then, artists across other disciplines interpret and create base on the original pieces.
  
At MUSE, you will see live dance, music, visual art, spoken word. It's a frenzy of all sorts of cool things. Come check it out!


HANDS ON THE ARTS
Tuesday, April 2, 201
10:00 - Sign Language / Origami
11:00 - Yoga / Sign Language
12:00 - Origami / Cookie Decorating
1:00 - Percussion Play / Yoga
2:00 - Group Piano / Percussion Play
3:00 - Group Piano / Surprise


ARTISAN SALE OPPORTUNITY
ART IN THE PARK is an annual festival taking place in Henderson Harber on July 20, 2013. For information on entering work, contact tleonard2@twcny.rr.com

ARTS ALLSTARS
Teachers and Parents
Local TV Station WWNY and sponsor Timeless Frames have invested in this on-air program for recognizing creative work done by area high school students. The nomination process is easy. Winners share their work and ideas on-air. Contact Craig Thornton for more information.

WOMEN IN THE DIRT
  Brought to you by the American Society of Landscape Architects, a free screening of:
"Women in the Dirt, Landscape Architects Shaping Our World".
  
Thursday, April 18, 6:30pm
Jules Center Amphitheater
Reception follows

--------------
EXPRESS YOURSELF! SLAM POETRY WORKSHOP   jared paul poster LO 
Ages 14-21
March 20, 21
4:30-6:30pm
$40 or $35 for NCAC members
  
Work with internationally known Slam Poet, Jared Paul. A private donor has made this unique opportunity available to youth in our area at an very reasonable price.
  
There are still spaces left! Enlarge poster. More info on Jared Paul.
  
Register here.THE NORTH COUNTRY ARTS COUNCIL IS A NON-PROFIT ORGANIZATION RUN ENTIRELY BY VOLUNTEERS FOR THE PURPOSE OF PROMOTING GROWTH IN AND THROUGH ALL ART FORMS.
  
 IF YOU LIKE THIS SORT OF THING AND WANT TO SEE IT CONTINUE AND GROW, HELP OUT.
CONTACT PRESIDENT MIKE MILLER AT
Comment

Nicole Caldwell

Nicole Caldwell is a self-taught environmentalist, green-living savant and sustainability educator with more than a decade of professional writing experience. She is also the co-founder of Better Farm and president of betterArts. Nicole’s work has been featured in Mother Earth News, Reader’s Digest, Time Out New York, and many other publications. Her first book, Better: The Everyday Art of Sustainable Living, is due out this July through New Society Publishers.

DIY Cornhole Bag-Toss Board


People call it bag toss, cornhole toss, soft shoes, corn bags, bean bags, bean bag toss, bean bag game, hillbilly horseshoes, or just bags. What ever you want to call it, Cornhole is one of the fastest growing backyard games in America today. BetterArts is running the kids' room at this weekend's North Country Goes Green Irish Festival at the Dulles State Office Building in Watertown, so we set about making our very own custom cornhole board for all the excitement. Want one? Here are simple, step-by-step instructions so you can be the star of backyard parties this spring, summer, fall, or whenever.

DIY Cornhole Supply List:
  • 1 - 4' X 8' Piece of Plywood (pre sanded)
  • 4 - 2" X 4" X 8' Studs (2 by 4s make sure they are not warped or twisted)
  • 1 - Pack of Deck Screws ( 3-1/2" stainless steel square tip head)
  • 1 - Pack of Deck Screws (1-1/2" stainless steel square tip head)
  • 4 - 4" X 1/2" Bolts & Lock Nuts (stainless steel with washers)
  • Hammer
  • Jigsaw
  • Circular Saw
  • Drill (with square tip bit that should come with the screws)
  • 2 - Drill Bits (1/4" and 1/2")
  • Pencil
  • String
  • Measuring Tape
  • Fine Sand Paper (80-120 grit)
  • 1 - Bottle of wood glue (optional)
The Fine Print:
Corn Hole Plan Layout


Making The Plywood Cuts:  Start by making sure your plywood is square at the corners. You want to start at one end of the plywood and measure over 24 inches. You must measure each cut separate in order to avoid losing 1/16 of an inch due to the thickness of the circular saw blade. NOTE: Measure only one piece at a time starting with the first piece. Only measure for the next piece after you have cut the previous piece.
Cornhole Board Plywood Layout 
Make The 2" X 4" X 8' Cuts: Start with measuring from one end and make the first cut. Then measure the second cut and repeat the process. You should end up with 4 Pieces 4' long, 4 pieces 21" long, and 4 Pieces 11-1/2" long.
Cornhole Board Leg and Frame Layout

BetterArts Director Scott Smith makes the legs for the cornhole board.
Forming The Legs: Take the four 11-1/2" pieces and measure 1-3/4" from the end and center your mark. Place a deck screw in the center of your mark and tie a pencil to the string with the tip of the pencil at the end of the board. The string should measure approximately 1-3/4" long when tied. Now mark your round cut. Your going to remove both corners with a saw. You can round the edges with sand paper if you want them smooth. Pull out the deck screw and drill a 1/2" hole through each leg.
Cornhole Board Legs


Building the Frame and Deck: Note: You may want to drill out a 1/4" pilot hole before you put the frame together. This will help avoid the studs from splitting. Start with your 2" X 4" X 4' and place a 21" front and back underneath at a 90 degree angle flush with each of the ends. Insert two deck screws approximately 1-1/4" from the end and side as shown in the diagram below. Once you have completed the rectangles, place them a flat surface and mount the 2' X 4' plywood top on the frame. Make sure to start at one corner and make it flush, then insert a 1-1/2" deck screw. Then make the next corner flush with the edge of the 2' X 4' and insert a deck screw.  Once you have aligned the corners continue making the sides and bottoms flush at the edges insert the remaining deck screws.
Corn Hole Board Layout

Cutting the Hole in the Decks: Start at one end of the board and measure 9" from the end to the center of the board at 12". Place a deck screw in the center mark. Take your string and pencil and measure out 3". Keeping the string extended circle around the deck screw. If you have a ruler or paint stir stick you can drill two holes 3" apart. Place the deck screw in one hole and the pencil tip in the second hole and proceed to circle around the deck screw. Drill a hole inside the circle to allow your jigsaw blade to penetrate the deck. Carefully cut out the hole.
Cornhole Board Holes
Handywork of yours truly.

Mounting the Legs: Lay your deck upside down on a flat surface. Place the leg one leg in the corner as shown below. Measure 1" from the end of the leg to the inside end of the board. This will allow a small space for easy swivel. You can drill from the inside of the board through the hole in the leg. Run the drill about a 1/4" into the side stud and check for swivel range on the leg. Once satisfied continue drill through the side stud. Place the 4" bolt from the outside in and put a washer and nut on the inside. Tighten the nut until the leg becomes stiff to move.
Cornhole Board Legs
Image from Cornholesupplies.com.
Cornhole Boards Leg Mount

Finishing Touches: Once you get the legs mounted you can flip the boards upright with the legs in the open position and place them on a flat surface. Measure the back of the boards you will notice it is a bit higher than 12" (hopefully not lower or you'll have to remount the legs). Here is where you fine tune your legs to be as flat as possible to the ground while making the back of the board 12" even across. Take a sander or some sand paper and shave the bottom of the leg until you are satisfied with the height. You can also apply a coat of primer and paint the boards as you wish.


Primed.
Only one thing left to do... sew your cornhole bags. Here are some great instructions from Cornhole How-To:

SEWING YOUR OWN CORNHOLE BAGS
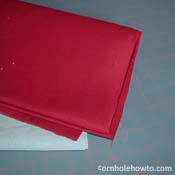
1 tn How to Sew To prevent mass confusion and a potential riot at your cornhole bags’ debut, you will want to have two different colors of fabric in order to keep teams’ progress straight. Themes like college or pro sports are typically popular choices here. Whatever your color scheme of choice, try to pick out sturdy-looking duck cloth that is as blemish-free as possible.

Since the fabric is pretty cheap, get a couple extra inches so you cansquare the cuts up at home for yourself.Give any loose ends a little trim in order to square things up.

4 tn How to Sew
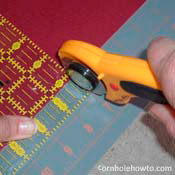
Having been trimmed satisfactorily by either you or the fabric counter, your hunk of duck cloth will probably be a long strip 7” wide by 56” long. Now all you need to do is make the squares for each bag by cutting every 7 inches. Using the right tools can make things much more accurate and often more convenient. The rolling blade, a gridded cutting mat and a plastic cutting guide really make all this trimming simple, but if you don’t have any of these, a good ruler, a pencil, and some sharp scissors will do the trick.
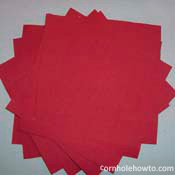
7 tn How to SewBy this point, there should be eight squares of duck cloth, 7 inches by 7 inches, just sitting there on your workspace, practically begging to be sewn up into four bags and stuffed with feed corn. Before plowing ahead, however, this is probably a good time to repeat the previous steps for second team’s color. In the end of this trimming phase, you should have sixteen total squares of duck cloth: eight of one color, eight of another.

Place two squares of the same color together so that their edges line up exactly; since the fabric is identical on both sides, it shouldn’t matter which side is up unless you want to decorate the outside with an iron-on logo. (If you do have an iron-on or something like that, it’s probably wise to put it on now according to manufacturer’s directions. Go ahead and put it on the inside since we will soon be turning the sewn bags inside-out.) Each seam should be 1/2 inch in from the edge, as shown in the picture. If have a fancy sewing machine like my mother-in-law’s, then you can actually set it to double-stitch all at once. Those with the no-frills model will need to sew a side completely, then repeat again on the same side right next to the first seam in order to get the double-stitch. Either way, the punishing abuse that cornhole bags take requires more than a single stitch. Got an itch to triple-stitch? Why not? Whatever your decision, be sure to back-stitch at all the corners to prevent the thread from unraveling.

Sew as indicated above for three of the four sides, but be sure to LEAVE ONE SIDE OPEN. You’ll need a hole for getting the corn into the bag. One smart move might also be to trim the corners a little. This will reduce the amount of excess fabric that gets crammed into the corners once you turn the bag inside-out.
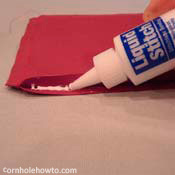
10 tn How to SewImagine your embarassment when, after bragging all afternoon to your buddies about your sewing skills, one of your new cornhole bags bursts a seam. We want to do everything in our power to prevent this awkward event. There are no guarentees, of course, but a little bit of fabric glue along the inside of those seams might help ease your mind on this subject. It probably can’t hurt in any case, but it’s an optional safety precaution that the risk-acceptant can skip.

Finally, turn the bag inside-out. Sharp corners are difficult to acheive given the stiffness of the fabric, but you can improve the look of the corners by pushing on the from the inside with a pencil, pen, etc. You’ll notice that once turned out, the bag is now the regulation 6 inches in width.
12 tn How to Sew 
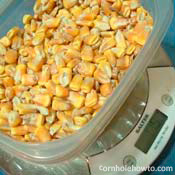
Measure out the corn you’ll need. Each bag should weigh between 14.5 to 16 oz. once filled. The material weighs about .5 oz per bag, so add 15.5 oz feed corn to each bag to make it one pound in total (spoiler alert: at Better Farm, we used dried soybeans instead of corn). As you play, the corn will break up, and your bags will actually lose a bit of weight in the form of dust, so you might want to make it on the heavy end of the acceptable range just to be safe. For this step, you can’t beat a digital baking scale, accurate to 1/8 oz., but if that’s not an option, 2 cups of corn comes pretty close to regulation. If you cannot abide that type of guess-work — good for you!–get the feed store to separate your order in eight individual bags of one pound each at the time of purchase. After all, for the 35 cents you paid for each of those pounds, you deserve some customer service.

Fold the open ends of the filled bag inward to a depth of 1/2 inch to match the rest of the seams you’ve already sewn. A well-placed sewing pin helped to hold the sides closed, and, in order to keep the folds from slipping once under the needle and for overall strength, apply some of the fabric glue to last, soon-to-be-sewn seam.
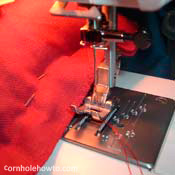
14 tn How to SewPinning the corn bag as shown in the picture helped keep the fabric flat and out of the way of the sewing foot—and will keep the corn from getting in your way. Placing your stitches as close to the edge as possible will give the bags a nice look. Do not forget to double-stitch here, too.

If you decide to buy bags, add a little spice by finding some with logos of your favorite sports team, customized with your initials, etc. You can even get a hold of some that glow in the dark. (Learn more about making your cornhole set night-time friendly in this e-book.)
1 Comment

Nicole Caldwell

Nicole Caldwell is a self-taught environmentalist, green-living savant and sustainability educator with more than a decade of professional writing experience. She is also the co-founder of Better Farm and president of betterArts. Nicole’s work has been featured in Mother Earth News, Reader’s Digest, Time Out New York, and many other publications. Her first book, Better: The Everyday Art of Sustainable Living, is due out this July through New Society Publishers.

First Cut: Better Farm Featured in 'Possible' Documentary


We recently blogged about Possible, Olivier Asselin's documentary film project that goes throughout the Northeast visiting with people working on a more sustainable lifestyle. The filmmaker paid Better Farm a visit in February to see how we do things, and will be returning when the weather's warmer to check out the summertime set-up. The first cut of our role in the documentary is above!

Here's some more background on the project:
Olivier Asselin is a freelance photographer working on a documentary film about transitioning into a more sustainable way of life. For this project, he's been seeking out people throughout New England and Eastern Canada with inspiring and interesting stories of making this transition: people who are "doing it"—and last month he paid a visit to Better Farm.

The “Possible” documentary film project is about telling the stories of individuals and communities who are actively engaged in creating a better, more sustainable future. It’s about showing that normal people are doing real things, things that are within the reach of all of us. The aim of this project is to debunk all of the false barriers people create for themselves when they start thinking about transitioning to a more sustainable way of life: I don’t have the money… not enough space… not enough time… I don’t know how… it will never work…

By showing real-life examples, people of all ages, of different economic backgrounds, in rural or urban settings, living in all kinds of climates or settings, it will become obvious that no matter who you are, no matter where you live, you can do something.

"I'm not looking at anything specific," he says, "just a variety of ideas, solutions, initiatives—big or small—that have the ability to inspire."

Olivier grew up in Canada, but spent the last seven years living and working in Africa, mainly for humanitarian and development organizations. He recently discovered permaculture, but also an impressive network of people worldwide who are already doing amazing things. "For the first time in a very long time," he says, "I’m starting to see real solutions, real alternatives. I don’t believe there’s a miracle cure to the imminent crises the world is facing, but there are things each of us can do to start adapting to tomorrow’s realities."

Learn more about Olivier's project here: www.possible.org. To find out more about how you can get on the proverbial Better Farm bus, visit www.betterfarm.org. 
Comment

Nicole Caldwell

Nicole Caldwell is a self-taught environmentalist, green-living savant and sustainability educator with more than a decade of professional writing experience. She is also the co-founder of Better Farm and president of betterArts. Nicole’s work has been featured in Mother Earth News, Reader’s Digest, Time Out New York, and many other publications. Her first book, Better: The Everyday Art of Sustainable Living, is due out this July through New Society Publishers.

DIY Toiletries


Sponges that grow on trees, toothpaste, and deodorant—all made by you. Here are a few recipes for making your own, all-natural cleaning and refreshing products.
 
Loofa Sponge
snipshot_6iuqdbi6dma.jpg 
Did you know a loofa sponge actually grows on a viny plant like a squash? How amazing. Here's how you can grow your own shower sponge in your backyard.

This annual requires a long growing season of frost free weather. But for those of you in colder climates it is possible to start seedlings indoors and then transplant them outside allowing you to grow your own sponges. The vine can grow to great lengths producing beautiful, yellow flowers all summer. Once the frost kills the vine (or the plant is fully mature), you can pick the fruit and peel the outer skin.
snipshot_6ijcsex2n01.jpg
snipshot_6im07fvu47h.jpg
Then comes the process of “milking” the sponge- squeezing it repeatedly from the middle towards the ends in an attempt to remove the fleshy substance inside. Plenty of seeds will come out as well.

snipshot_6i1227dlgtsi(2).jpg

Toothpaste
From The Old School
Making toothpaste at home with baking soda seems like a no brainer, until you actually do it and the result is gag-worthy at best. To navigate this battle of ease versus taste, we road-tested the top toothpaste recipes out there, and discovered a perfect potion that’s head and shoulders above the rest. Pepperminty goodness awaits.

Materials
  • 6 tsp baking soda (sodium bicarbonate)
  • 1 tsp stevia powder
  • 4 tsp vegetable glycerin or 2 tbsp organic coconut oil
  • 10 to 20 drops peppermint essential oil
  • measuring spoons
  • mixing bowl
  • airtight opaque container
Measure out and place ingredients into a small jar. Stir until it looks like toothpaste. Add a dime-size amount to your toothbrush and scrub away.

Deodorant
Here's a great deodorant recipe from Oh Dear Drea: 
The whole process takes all of two minutes. Feel free to use this recipe and this recipe as reference points. 

1/4 cup baking soda
1/4 cup Arrowroot Powder, 1 lb. or Bob's Red Mill makes some too.
6 tablespoons coconut oil
15 drops Eucalyptus Oil (or any essential oil)

Mix baking soda and arrowroot powder in a bowl. Add coconut and eucalyptus oil. Mix well. Scoop into jar. Keep in a cool-dry place or in fridge. The texture of the deodorant varies on the temperature of its environment.
Comment

Nicole Caldwell

Nicole Caldwell is a self-taught environmentalist, green-living savant and sustainability educator with more than a decade of professional writing experience. She is also the co-founder of Better Farm and president of betterArts. Nicole’s work has been featured in Mother Earth News, Reader’s Digest, Time Out New York, and many other publications. Her first book, Better: The Everyday Art of Sustainable Living, is due out this July through New Society Publishers.

DIY Hanging Gutter Garden

Originally published at Goods Home Design.
Why Bother with a Gutter Garden?
Gutter gardens are a great way to take advantage of the vertical spaces around your home to grow flowers, edibles and create a stylish space divider or privacy screen without spending too much money.

Materials
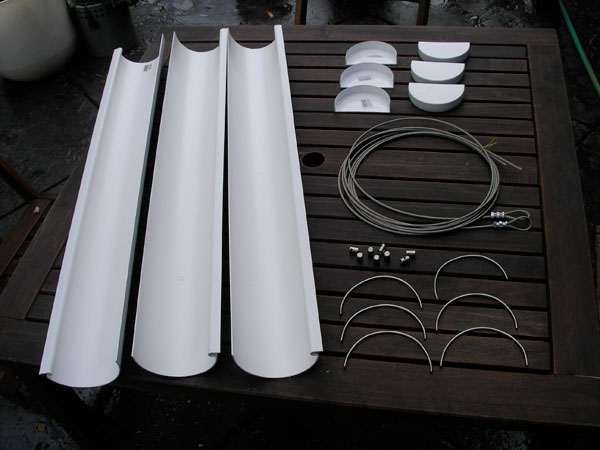
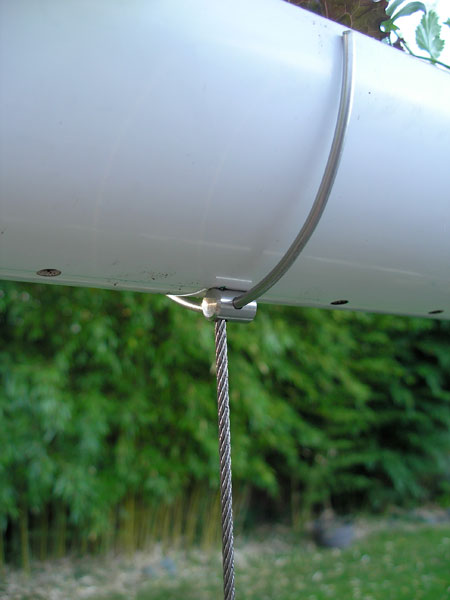
1 – 8′ PVC white rain gutter cut into 3 32″ sections
6 – PVC white gutter end caps
2 – 1/8″diameter steel cables cut to desired length
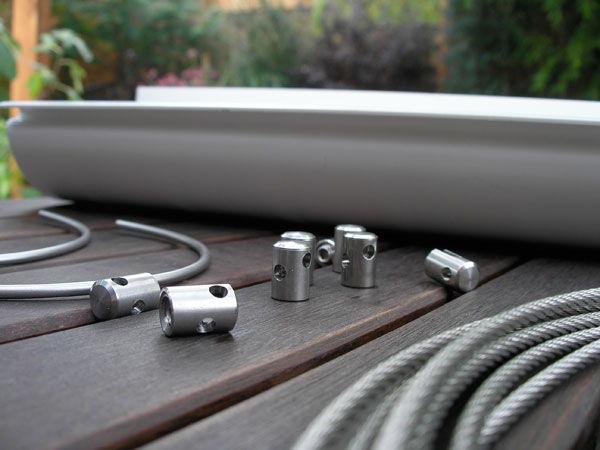
6 – Feeney Cross Clamps (see image below)
6 – 1/8″ diameter Feeney steel rods
2 – Galvanized eye hooks
Potting soil and Plants
Tools
Cordless Drill with drill bit set
Hand saw or hack saw
T-square or straight edge
Tape measure
Permanent marker
Level
Eye protection


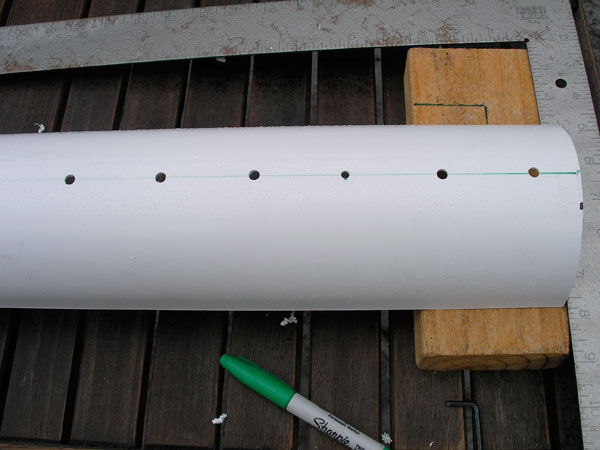
1. Determine the center of your gutters and draw a reference line (otherwise your gutter won’t hang right).
2. Mark and drill the holes for the steel cable rods. Find a drill bit the same diameter as the cable to minimize the wiggle room.
3. Space drill holes a few sizes larger to make sure you get good drainage (plant roots hate sitting in water for long periods of time).

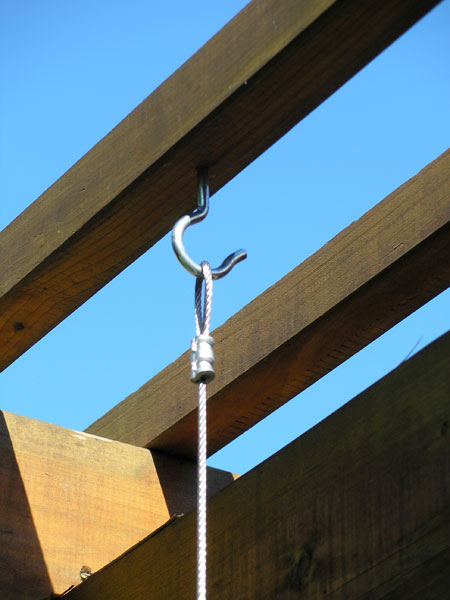
1. Locate a spot that gets at least 4 hours of sun. I placed mine on the cross beams of a pergola I built a couple of years ago.
2. Drill pilot holes (a hole slightly smaller in diameter than the screw diameter) to make screwing in the eye hook a lot easier. Make sure the holes are the same distance as the steel cable so they hang straight down.
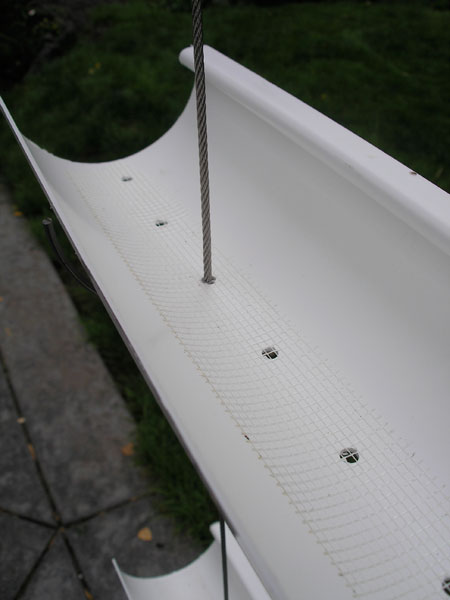
3. Slide the gutters through the holes and secure them with the cross clamps at your desired heights. You’ll notice I placed mesh tape (normally used for drywall joints), left over from another project, over the drainage holes to keep the soil from seeping. However, I think the holes are small enough, this step is not necessary. I did it out of habit.
4. Secure the gutter with the cross clamps and half circle steel rods.


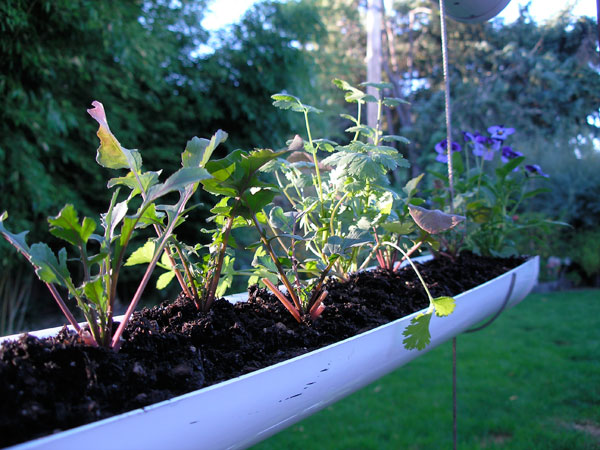
Now you’re ready to fill it with organic potting soil and plant them with your choice of shallow-rooted plants.
Comment

Nicole Caldwell

Nicole Caldwell is a self-taught environmentalist, green-living savant and sustainability educator with more than a decade of professional writing experience. She is also the co-founder of Better Farm and president of betterArts. Nicole’s work has been featured in Mother Earth News, Reader’s Digest, Time Out New York, and many other publications. Her first book, Better: The Everyday Art of Sustainable Living, is due out this July through New Society Publishers.

Pre-Spring Houseplant Care

With spring planting just around the corner, we used this week to shake the dust from our houseplants with some transplanting into larger containers, trimming leaves back, and waking up some bulbs. In this blog we'll give you some simple DIY fertilizer recipes for your houseplants, and a quick run-down of what's going on inside at Better Farm.

DIY Plant Steroids
Here are some simple homemade fertilizer recipes for your houseplants:
  • Give houseplants your leftover, cold coffee. This works particularly well for ivy plants.
  • Once a month, you can water your houseplants with a mixture of: 1 tablespoon Epsom Salts, 1 tsp. baking powder, 1 tsp. salt, 1/2 tsp. household ammonia, and 1 gallon of water.
  • Another method is to collect eggshells after baking and place them in a glass jar covered with water. Don't put the lid on tight. Let the eggshells sit for about a month and keep adding additional egg shells as you acquire them. Add more water if necessary. When you are ready to fertilize, dilute it (1 cup egg shell solution to 1 gallon plain water) and use it to water all of your plants. Or, mix finely crushed, rinsed eggshells into your potting soil to give your houseplants a good boost. The eggshells are a good substitute for bonemeal.
  • If you have a fish tank, when you change the water in the tank, use the water you take out to water your plants.
  • Once a month, pour room-temperature beer onto your plants.
  • A wonderful plant food is regular green tea. Dilute the tea with two gallons of water. You can use this every time you water.
  • Another homemade plant food recipe featuring beer is: 1 cup beer, 1 cup epsom salts, 1/2 cup ammonia, and 2 cups water. Use 1/2 oz. on each plant every two weeks. Great for all houseplants, especially orchids.
  • One last recipe is: 1 cup used coffee grounds, egg shells from 2 eggs (process in coffee grinder), 1/16 oz. ammonia, 1 cup water, 1/8 tsp. Epson salts. Stir together until well mixed. You can spoon this mixture around the base of most flowering plants, except for African Violets. Don't mix it into the soil, just let is sit on top if the soil. Apply this mixture monthly.
Bulbs
Bulbs are watered, edged in moss, and kept in a sunny location with much anticipation. This bulb was a Christmas gift from the Cohens in Ridgewood, N.J.
Bulbs given to us last fall from neighbor Al Streeter were stored in the basement all winter. Now four pots of bulbs are fully hydrated and enjoying sunnier days. Stay tuned for pics in the coming weeks!
 Air Purifiers and Vines
Leaves on this air purifier are trained up the hanger and will eventually run throughout the kitchen.

This Neon Pothos is a new addition (thanks to Amberlee Clement for bringing us several plants!) that will climb the library walls.
This pot is bursting with various kinds of ivy that will travel along library walls.
These jade and cactus plants are clippings from larger plants.
...another angle of the jade and cactus.
A succulent given to us by Jaci Collins
Teeming cactus plants

Hens and chicks.
Another jade plant.

A freshly re-potted plant that has been growing in leaps and bounds

Here's what we do during our pre-spring houseplant clean-up:
  • Overcrowded plants get bigger vessels in which to grow
  • Dusty leaves are wiped off
  • Fresh compost and soil is added to pots in need
  • Water from our aquaponics is used to give the plants a high dose of vitamins and minerals
  • Dead leaves are trimmed
  • Some plants are cut and those trimmings planted to establish new growth
1 Comment

Nicole Caldwell

Nicole Caldwell is a self-taught environmentalist, green-living savant and sustainability educator with more than a decade of professional writing experience. She is also the co-founder of Better Farm and president of betterArts. Nicole’s work has been featured in Mother Earth News, Reader’s Digest, Time Out New York, and many other publications. Her first book, Better: The Everyday Art of Sustainable Living, is due out this July through New Society Publishers.

Barn Wood Carpentry

Master Bath hook rack and shelf unit made with old barn wood.
Old barn wood is one of the most fun and aesthetically pleasing mediums to work with; as imperfections become assets and applications are almost infinite. When we cut holes in the barn across the street for windows two years ago and swapped out older doors for new, we stashed the wood in a shed for later use. Well, the future is now. Circular and table saws provided all the cuts necessary to make the following rustic pieces:


Sliding barn-style door used for master bath.
Dining alcove wall (done several years ago, utilizing different barn wood).

Master Bath hook rack and shelf unit made with old barn wood.
Built-in bathroom shelf.
Kitchen phone shelf.
Got a great upcycling idea you'd like to share? E-mail us at info@betterfarm.org.
Comment

Nicole Caldwell

Nicole Caldwell is a self-taught environmentalist, green-living savant and sustainability educator with more than a decade of professional writing experience. She is also the co-founder of Better Farm and president of betterArts. Nicole’s work has been featured in Mother Earth News, Reader’s Digest, Time Out New York, and many other publications. Her first book, Better: The Everyday Art of Sustainable Living, is due out this July through New Society Publishers.

BetterArts to Host Kids' Room at Irishfest

Leprechaun House Image from Alphamom.
BetterArts has partnered with the 28th Annual North Country Goes Green Irish Festival in Watertown March 15-17, and will be hosting this year's Children's Room to provide arts 'n' crafts and games to kids of all ages.

The three-day event, which draws thousands of people to the Dulles State Office Building where festivities are held, features a parade, entertainment, activities, and food all weekend long. BetterArts will host children's events Saturday and Sunday. The festival opens up at 5:30 p.m. Friday, March 15 with a pageant, beard-growing contest, and evening entertainment featuring The Prodigals.

Entertainment is slated from 11 a.m.-midnight on Saturday and 1-5 p.m. Sunday on two floors of the Dulles State Office Building. The parade is scheduled at 1 p.m. Sunday, beginning on Flower Avenue East and ending at the state office building. For the full schedule of events, click here.

This year's children's room will feature the following activities hosted by betterArts:
  • Games: Ring Toss, Pin the Hat on the Leprechaun, Bean Bag Toss, Fishing Game, Corn Hole
  • Arts & Crafts: Egg-Carton Caterpillars, Coloring, Build-Your-Own Leprechaun
  • Face Painting
  • Instrument Making: Kazoos, Tambourines
  • Jewelry Making
  • Seed Planting Decorate Your Own Plant Pot, Learn About Compost, Plant Seeds to Take Home
WPBS will also be providing a story reading at 2:15 p.m. Sunday.

Tickets will be available on-site and are as follows: $6 admission Friday & Saturday, younger than 12 is free. Sunday is family day with $6 admission for family and $2 individual admission. The Dulles State Office Building is located at 217 Washington St., Watertown.

Proceeds from the Irish Festival will go to “Project Children North” which brings kids from Ireland for 6 weeks in the summer. Children stay with local host families and get the opportunity to experience the United States The proceeds from the festival also goes to scholarships and other charities such as Wounded Warrior, USO, Credo Foundation, Urban Mission and food pantries within the tri-county area.
Comment

Nicole Caldwell

Nicole Caldwell is a self-taught environmentalist, green-living savant and sustainability educator with more than a decade of professional writing experience. She is also the co-founder of Better Farm and president of betterArts. Nicole’s work has been featured in Mother Earth News, Reader’s Digest, Time Out New York, and many other publications. Her first book, Better: The Everyday Art of Sustainable Living, is due out this July through New Society Publishers.

Spring Prep

Spring is barreling at us full-speed-ahead, thank goodness!

It's time to get the gardens, raised beds, and compost prepped for next week, when we'll begin planting in Better Farm's greenhouse.

There are a lot of moving parts involved with keeping several gardens going, so it helps around here to keep a careful to-do list in order to make sure everything gets taken care of. From seed selection to dirt prep to planting, here's what we'll be busy with in the next few weeks.


All the Moving Parts
Our garden map has been a huge help keeping ideas organized for seed selection, companion planting pairs, and placement. This year we'll also be keeping track of how much food in pounds we produce; and the cost-effectiveness of keeping backyard birds for mini-tilling, egg production, and garden fertilization. Here are the other pieces to the puzzle:

Pasteurization of Compost
We blogged earlier in the week about the importance of pasteurizing any compost you plan to start seeds in, in order to prevent a harmful phenomenon called "damping off" and the sprouting of any errant seeds from your compost heap.

Seed Selection
This week we ordered our seeds, which will arrive in the next 4 to 6 days. Here's what we've got to plant:

Herb Beds 
Amaranth, Arugula, Asparagus, Chia, Chives, Cilantro, Cumin, Dill, Garlic, Lemon Balm, Lettuce, Marjoram, Mint, Mustard Greens, Oregano, Rosemary, Sage, Spinach, Swiss Chard

Main Garden
Artichoke, Asparagus Bean, Beets, Black Beans, Bok Choy, Broccoli, Brussel Sprouts, Cabbage, Cannelini Beans, Cauliflower, Carrot, Celery, Chick Peas, Corn, Cucumber, Edamame, Hubbard Squash, Kale, Kidney Beans, Leek , Lentils, Onion, Peanuts, Peas, Peppers, Potatoes, Radishes, Squash, Sweet Potatoes, Tomatoes, Watermelons

Mandala Garden
Artichoke, Cantaloupe, Eggplant, Lavender, Marigolds, Mulberry Trees, Nasturtiums, Okra, Pumpkin, Rhubarb

Aquaponics
Lettuce, Spinach, Various Herbs

Sprouts
Alfalfa, Broccoli, Chia

Grounds Prep
With a mulch garden outside, four big raised herb beds, and an aquaponics setup, there's a lot of ground to cover and enrich. As soon as some of this snow gets going, the chicken tractors will begin their migrations throughout the gardens so the birds can get things good and turned over between now and June. More hay will also be added to the rows (along with the compost heap that's been working itself over all winter.

The herb beds will be raked out (we've been mulching with wood chips and hay throughout the winter) to allow space for garlic, leeks, chives, mint, and asparagus to re-assert themselves.

The aquaponics pea gravel will need to be cleaned, the filters changed, and a new round of greens planted.

Scheduling
Next week we'll get a big chunk of our seeds into potting soil and out to the greenhouse. Peas will go directly into the ground in mid-March, and (weather permitting), direct-plant seeds will go into the garden in late May and early June. Potatoes will go into dirt in April.

If you are interested in volunteering in Better Farm's gardens once or on an ongoing basis, please contact us at info@betterfarm.org.
Comment

Nicole Caldwell

Nicole Caldwell is a self-taught environmentalist, green-living savant and sustainability educator with more than a decade of professional writing experience. She is also the co-founder of Better Farm and president of betterArts. Nicole’s work has been featured in Mother Earth News, Reader’s Digest, Time Out New York, and many other publications. Her first book, Better: The Everyday Art of Sustainable Living, is due out this July through New Society Publishers.

Green Thumb: Pasteurize Your Compost

We've run into some issues in the last few years when compost being used as po

tting soil

for new seeds has

led to

all kinds of erran

t seedlings sprouting

(we're looking at you, cherry tomatoes!). The compost has harbored seeds of all kinds that were thrown out, only to hang around until spring when we try to grow other seeds out of the

newly formed dirt.

While this may be welcome in some instances, in others i

t's important that your compost not sprout unwanted weeds or plants you

d

on

't intend to take care of

.

We've al

so learned that

"damping-off" (a horticultural condition caused by pathogens killing or weakening seed

s and seedlings)

can zap your seedlings before they have a fighting chan

ce to grow. 

These issues can be solved in one fell

swoop by paste

urizing your compost before

using it for p

otting soil

.

A

bout "Damping

-

Off"

Most prevalent in wet and cool conditions,

damping-off

happens when pathogens kill or weaken seeds and seedlings.All symptoms result in the death of at least some seedlings in any given population. Groups of seedlings may die in roughly circular patches, the seedlings sometimes having stem lesions at ground level. Stems of seedlings may also become thin and tough ("wire-stem") resulting in reduced seedling vigor. Leaf spotting sometimes accompanies other symptoms, as does a grey mold growth on stems and leaves. Roots sometimes rot completely or back to just discolored stumps.

Seeds that are infected with damping off will not germinate and plant stems shrivel causing seedlings to topple over and die. If you have waited an unusually long time for a particular seed to germinate, brush the soil away and carefully take a peak. If it is dark and mushy it has damping off and the only thing left to do is start over, this time with clean potting soil.

This problem happens everywhere things grow, no matter where you live and there is absolutely no remedy once plants and seeds are infected. The answer is prevention.

Damping off can be prevented or controlled in several different ways. Sowing seeds in a sterilized growing medium can be effective, although fungal spores may still be introduced to the medium, either on the seeds themselves or after sowing (in water or on the wind). Maintaining drier conditions with better air circulation helps prevent the spread of the disease, although it can also prevent or slow down germination. Spraying or drenching the soil with a recommended anti-fungal treatment (such as

copper oxychloride

) also helps suppress the disease. Homemade solutions (including ones made from

chamomile tea

or

garlic

) are used by some gardeners for this purpose.

Pasteurizing Compost

Note: the following

tips were gleaned from

Aradacee.

Many people choose the safest route to prevent hitchhiking see

ds and damping-off by

buying a pre-sterilized package of potting soil, if you have a large amount of pots and flats to fill, this could be expensive. By taking a couple of extra steps before you begin, you can use your own rich, organic compost.

Some people "bake

"

their soil in their oven to kill micro-organisms. But this process of sterilization kills everything, even the healthy organisms that you have worked so hard to create.

The answer is simple: Instead of sterilizing compost and garden soil, pasteurize it. While sterilizing kills virtually all surface-dwelling microorganisms, when you pasteurize your potting mixture, it is only heated to a temperature that kills harmful organisms and leaves beneficial organisms alone.

How-To

To pasteurize, take a large aluminum-baking pan and cover it with three to four inches of potting soil, insert a meat thermometer in the center and place in a preheated oven, at 200°F., once the center reads 160°F., bake for 30 minutes. Allow mixture to cool thoroughly before using

.

Comment

Nicole Caldwell

Nicole Caldwell is a self-taught environmentalist, green-living savant and sustainability educator with more than a decade of professional writing experience. She is also the co-founder of Better Farm and president of betterArts. Nicole’s work has been featured in Mother Earth News, Reader’s Digest, Time Out New York, and many other publications. Her first book, Better: The Everyday Art of Sustainable Living, is due out this July through New Society Publishers.

Turn Porcupine Quills into Beads

By

Nicole Caldwell

Originally published at

Mother Earth News

quill beads

Porcupine beads adorn traditional Yurok Tribe jewelry. Photo/Nicole Caldwell

This week an old friend is visiting from his home in Klamath, California. Arnie, a Yurok Indian, is well-versed in the traditions of his ancestors and knows much about fishing, edible wild plants, and various Native American crafts. While here, he made use of a dead porcupine from the yard, teaching me how to turn the quills into beads that can be incorporated into homemade earrings, necklaces, bracelets, or other arts 'n' crafts projects.

While many of us living a rural lifestyle have horror stories of dogs being quilled by porcupines, these spiky protuberances can also be plucked from roadkill—or, if you've got a brave heart, you can throw a blanket or towel over a living porcupine. The quills will stick to the cloth. Always remove quills carefully! The backward-facing barbs will pierce your skin easily and stay there.

Once you have a collection of quills, turn them into beads by following these simple instructions.

Trim the Quills

Clip each end of every quill with scissors. Take care to ensure the clipped ends land in a trash can so your pet — or your child — doesn't get quilled after your arts and crafts session is over. Cats especially love to eat quills! With both ends cut, the quill should resemble a tube-shaped or bugle bead.

Wash and Dry Your Beads-to-Be

Porcupine quills have a very soft, delicate interior. Make sure you don't do anything that will damage them. After clipping the ends, wash the quills in warm water with a mild, grease-fighting soap. If they are especially dirty, leave them to soak. Then rinse them off and lay them out to dry.

Dye the Beads

Quills soak up color easily, so any dye recipe you'd like to use is sure to work great. If you've never made homemade dye before, here's a simple recipe:

  • One cup blackberries

  • Two cups water to start (add more as needed)

  • One teaspoon lemon

  • Two teaspoons vinegar

Combine ingredients, bring to boil, add quills to solution, and boil for 30 minutes over low heat. Add water as needed. Remove from heat and rinse quills well in cold water. Vinegar is needed to help set the color and the lemon juice works as a natural softener. Some other wild ingredients to try for other color variations include wild plum bark, blueberries, and dandelion greens.

Bead Storage

Keep your beads in a small, lidded container or baggy. If you choose to mix your quills with beads, they work well with seed beads in a wide range of sizes, from a tiny size 15 to a larger size 5.

Comment

Nicole Caldwell

Nicole Caldwell is a self-taught environmentalist, green-living savant and sustainability educator with more than a decade of professional writing experience. She is also the co-founder of Better Farm and president of betterArts. Nicole’s work has been featured in Mother Earth News, Reader’s Digest, Time Out New York, and many other publications. Her first book, Better: The Everyday Art of Sustainable Living, is due out this July through New Society Publishers.

Masterful Bath

Editor's note: This blog will cover the general outline of a bathroom renovation. Stay tuned to future blogs that will get into specifics for things like reviving claw tubs, installing sinks, updating toilets, and detailing with barn wood.

This fall and winter were spent with a downstairs bathroom renovation that split the old bath off the kitchen in two, moved the laundry area to another part of the first floor, and gave the master bedroom a master bath.

The concept was easy: provide Better Farm's present-and-future-directors with a small master suite, consolidate the downstairs bath, make a cohesive laundry area close to dry racks and clothesline... and do it all in a (mostly) sustainable way featuring reused/reclaimed materials, communal/DIY labor, and continue our mission to expand the space here without sacrificing our ideals.

First step was to take the existing first-floor bathroom and divide it in two. This wasn't so difficult, since the room was already obviously sectioned into a laundry area and bath/sink/shower area. We moved the existing door over about three feet and built a wall between the laundry and bath areas:

Moving the downstairs bath entranceway in order to put half that original bath in the master bedroom.
Next, we took the existing bedroom wall:
The master bedroom wall destined to disappear.
...brought it forward a few feet, and added a doorway:
New wall with doorway.
New walls and eco-friendly insulation were put in, walls and wiring were put in, and leftover flooring from our upstairs bathroom project was added.

Next up was to seek out fixtures and appliances. I scored a claw-footed tub off Craigslist from a dilapidated duplex in Watertown. With the help of some friendly volunteers, we got that tub out of the house, sanded down, and repainted:
Claw tub gets a makeover.
Freshly sanded and painted
For the toilet, we're reusing the existing toilet that was in Steve's bedroom originally. The sink was a hand-me-down from a neighbor (only needed a good scrubbing and two new handles):
Glam shot: vintage sink with designer dog.
We also added a small, built-in shelf utilizing old barn wood cut out of the Art Barn when we added new windows:


We trimmed out an old beam I opted to leave exposed with more old barn wood, and I found a great, old lamp at an antiques shop in New Jersey. An afternoon was spent reappropriating old barn doors into a sliding-track, barn-style bathroom door (tracks and pulley wheels are antiques, bought locally). Deer antlers from my friend Sunny, a Buddhist figurine and peacock feathers from the library, an old vase my pops brought back from Mexico, and various knicknacks (and jewelry) completed the look.

 And, at long last...
View from the master bedroom.
Inside the bathroom.


Fixtures from Elizabethan Classics.


Got a great design idea you'd like to share? E-mail us at info@betterfarm.org.