Save Your Own Tomato Seeds

Saving seeds is a great way to ensure a steady supply of heirloom fruits and vegetables in your home garden. All you have to do is collect seeds from your best plant, dry them out, and store them until you're ready for growing season.

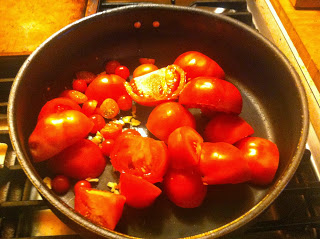
One of our favorite heirloom produce items is the tomato; and each year, we have a bunch of different fruits to choose from that we'd love to duplicate. This autumn, we're selecting some of the best-looking tomatoes and extricating the seeds so that we can grow the plants indoors in a new hydroponics setup (more about that to come!).


Here are some very easy-to-follow instructions for harvesting your own tomato seeds, gleaned from Garden Web:

You may have brought home a particularly delicious tomato from the supermarket, or gotten an heirloom tomato from a Farmer's Market, or grown one in your own garden that is so wonderful you want to save the seeds from it and grow them next year. Nothing ever tastes quite as good as a home-grown tomato!

So, how do you save the seeds? The method is easy to do....it's a little gloppy, and it's a little funky, but you'll be able to save seeds in a manner that will lesson the occurence of tomato disease while giving you plenty of seeds to germinate, and with left-overs to share or trade. This seed saving process is a process of fermentation.


Select to save seeds from a tomato that has a flavor that you love....if you're a home gardener and saving seeds from tomatoes that are growing in your garden choose tomatoes from the very healthiest-looking plants.

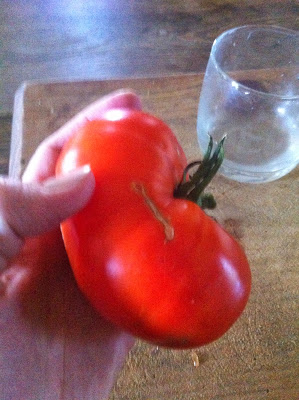
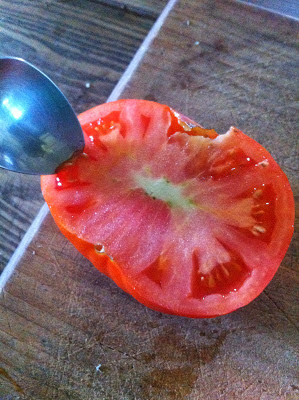
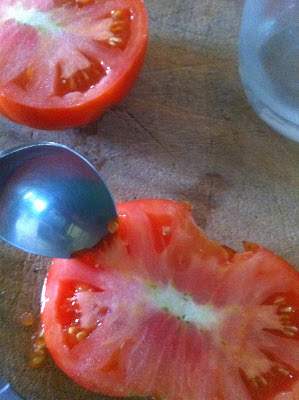
Take your chosen tomato and slice it in half across the middle (its "equator"). With a spoon or your well-washed fingers scoop out the seeds and their gelatinous "goo" into a clean cup or container. Add a couple of tablespoons of water to the seeds.


Cover the container with a piece of plastic-wrap and then poke the plastic-wrap with a paring knife or pen point to put a small hole in it...this is to allow for air-transpiration. (A little fresh air needs to get in and out of the cup to help foster fermentation.)


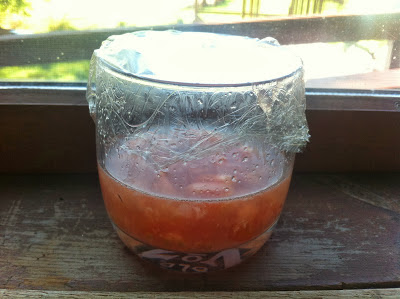
Place the container of seeds in a warm location; a sunny windowsill or the top of the refrigerator are both excellent sites to place the container of seeds. Now Mother Nature will take over and begin to ferment the seed and water mixture. This takes about two or three days. Each night remove the plastic-wrap, stir the seed and water mixture, and then replace the plastic-wrap, if you use a new sheet of plastic-wrap then don't forget to put a small hole in it for air-transpiration. The top of the liquid will look "scummy" when the fermentation process has seperated the "goo" from the seeds. It also helps destroy many of the possible tomato diseases that can be harbored by seeds.

Take the container of fermented seeds to the sink and with a spoon carefully remove the scummy surface. Then pour the container's contents into a fine kitchen sieve and rinse the seeds with water several times...stir them while they're in the sieve to assure that all surfaces are thoroughly rinsed. Give a few sharp taps to the sieve to help remove as much loose water as possible from the seeds.
Line an open plate with a piece of waxed paper or a large automatic-drip coffee filter. Place the rinsed seeds onto the wax paper or coffee filter and spread them about so they are in a single layer. Place the plate in a safe location where the seeds can dry for a few days. Stir the seeds a few times during the drying process to assure that all their surfaces are evenly dry. Spread them out again into a single layer after each time you've stirred them. Tomato seeds are thick and can take up to a week to dry thoroughly. If you're having a rainy week that drying time may lengthen by a few days.


How do I know when the seeds are dry?
Dried seeds move quickly and easily across a plate, they do not stick to each other.


How do I store them?
I like paper packets or some folks like plastic. Whichever envelope style you choose is a matter of personal preferance. If you choose to store your seeds in plastic the seeds must be BONE DRY....otherwise any moisture in the seeds will be transferred to all seeds inside the plastic packet, it will foster mildew and rotting and the seeds will be ruined.


How do I label them?
Tomatoes are generally self-pollinated so there is rarely a chance of cross-breeding. If you save and trade your seeds you might wish to describe your trade offering as "open-pollinated" tomato seeds. That way the trader knows that Mother Nature was solely involved in the fertilization of the flower which produced the tomato that you have saved seeds from.


Onto the packet write the tomato variety name (if you know it) or a very good description if you don't, add the term "open-pollinated" if you're sharing or trading your tomato seeds, and also add the current year to the packet description.


And that's that! Do enjoy saving tomato seeds and growing your own tomatoes at home from them. Home-saved tomato seeds are a wonderful gift to tuck into a holiday card for when you want to add a "little something extra", or to share with friends and neighbors.

—Trudi Davidoff
Comment

Nicole Caldwell

Nicole Caldwell is a self-taught environmentalist, green-living savant and sustainability educator with more than a decade of professional writing experience. She is also the co-founder of Better Farm and president of betterArts. Nicole’s work has been featured in Mother Earth News, Reader’s Digest, Time Out New York, and many other publications. Her first book, Better: The Everyday Art of Sustainable Living, is due out this July through New Society Publishers.

The Rapunzels: A Fairy Tale About Birds

A year and two months after taking 20 "spent hens" under our proverbial wing, we're taking a look back at the lives of our rescue chickens.

It was February of 2012, right around Valentine's Day, when we decided to pursue a rescue of 20 "spent" laying hens from a local egg farm. Since it was a bit of a love story that involved some damsels in distress, we thought we'd name all the rescue birds Rapunzel. The egg farm in question was all too happy to part with the "spent" birds. You see in the commercial egg business, it doesn't make sense to house chickens that are past their peek production. Here are the facts on that:

Read More

Will Farm Bill Turn Control of Organic Industry Over to USDA?

By

Nicole Caldwell for JuJu Good News

A new debate springing up in the organic community

has some concerned

that the commodification of the “organic” label could turn the entire industry over to the USDA—and a small number of big-money companies.

Advertising campaigns funded by “

checkoff programs

” (commodity research and promotion programs) are overseen by the United States Department of Agriculture and run by organizations established to promote certain foods (i.e. beef, soybeans, pork, milk, and eggs); and commission research to produce and market said food. Classic marketing campaigns with checkoff programs include: “Beef. It’s What’s for Dinner.” “Pork. The Other White Meat.” and of course, “Got Milk?” For every sale, the checkoff program makes money. Each head of cattle sold, for example, represents $1 is collected for the beef checkoff program.

So does organic food need its own checkoff program?

The controversial

farm bill

being debated by Congress includes language that would allow USDA to create a checkoff program for organic products. For other commodities, farmers pay into the fund but large food companies are largely in control of decisions on how to spend the money. Many organic farmers are therefore leery of an arrangement in which their dollars are controlled by giant food-processing companies.

Comment

Nicole Caldwell

Nicole Caldwell is a self-taught environmentalist, green-living savant and sustainability educator with more than a decade of professional writing experience. She is also the co-founder of Better Farm and president of betterArts. Nicole’s work has been featured in Mother Earth News, Reader’s Digest, Time Out New York, and many other publications. Her first book, Better: The Everyday Art of Sustainable Living, is due out this July through New Society Publishers.

Necessary Details: Thorough Inspection of Fraud and Damaged Assets

Asset investigation is one of the greatest parts of the modern, DIY culture that has been normally introduced for the safety of residential houses and commercial offices. This kind of specialized investigation will help you to determine easily the exact cause of the damaged assets of houses or corporate offices. Only proper investigation can help you to get back your lost asset or proper compensation for your damaged assets. This kind of investigation is also conducted by insurance companies at the time of occurrence of nay any big fire incidents which have led to the destruction of large number of assets.

The compensation amount is mainly released by the insurance companies on the basis of the proper damage calculation which can be only determined by means of effective and thoroughly asset inspection. In case of nay kinds of frauds, the

fraud investigator

conducts thorough professional investigation in order to determine the actual culprits. This kind of investigation is also similar to that of the asset investigation but only the compensation method is quite different from each other. These investigators are highly efficient and skilled for conducting effective fraud detecting investigation, so that their clients’ objectives can be served.

Asset and fraud investigation both are sometimes conducted by the same investigating professionals in case both the incidents are related with each other. Asset investigation involves the definite compensation of the loss or damaged assets but the fraud investigation might or might not involve compensation. Therefore, asset investigation is quite safe but the fraud investigation is not. There are some business concerns who separately maintain a separate department for the thorough inspection of the company assets. Therefore, in order to know more about this concept, you need to take the help of internet and have to make necessary online research. You can refer to different kinds or websites for collecting valuable information.

Gain Full Knowledge of Online-Based, Small Business Phones' Utilities

Nowadays the modern, technology-based

small business phone

is considered as an essential part of DIY culture. This upgraded culture has led to the discovery of amazing, technically skilled communication equipment that has created a great revelation in the commercial industry.

The improved phone system has facilitated the flexible and convenient modes of communication with overseas clients and branch offices. The DIY culture normally speaks about the introduction of this technically improved equipment, which adds a range of flexibility in the operation of different communication oriented equipment. This kind of improvement has also led to the development, prosperity and expansion of different business concerns.

This kind of advanced phone communication system has also upgraded the

conferencing system

of different commercial concerns. Now, the conduction of conference meetings and business discussions are highly possible with the help of newly developed communication facility which has taken birth from DIY culture. Those business concerns which have multiple offices in different locations of the world can utilize the modern video conferencing communication system for conducting uninterrupted conferencing sessions.

This kind of improved technology has highly facilitated especially to the small business concerns as the modern communication system is quite cost-effective and flexible in nature.

Moreover, DIY culture has led to the creation of such an innovative and improved communication technology which has ultimately resulted into the success and prospect of different commercial industries. The small business phone can help the concerns to held important business meetings at any point f timer from anywhere just with the help of internet connectivity. Therefore, in order to collect more and more info about the same, you can make thorough online research for finding more intricate details. Get into different online links or websites for learning the utilities and functionalities of the modern technology based communication system of business concerns or organizations

.

Comment

Nicole Caldwell

Nicole Caldwell is a self-taught environmentalist, green-living savant and sustainability educator with more than a decade of professional writing experience. She is also the co-founder of Better Farm and president of betterArts. Nicole’s work has been featured in Mother Earth News, Reader’s Digest, Time Out New York, and many other publications. Her first book, Better: The Everyday Art of Sustainable Living, is due out this July through New Society Publishers.

An Apple a Day...

It's a great year for apples. Whether you've got a tree or two in your yard, enjoy picking your own, or just love to load up at farmers' markets, we're coming up on a strong season of pies, fresh-pressed cider, turnovers, and any other apple-related dishes you can dream up.

After a tricky season last year when droughts caused a marked decrease in fruit production, apples have made a comeback with places like the local

Burrville Cider Mill bringing back gallon jugs of cider

and a marked drop in consumer cost for the fruit that did Adam and Eve in.

So however you go about acquiring this most wonderful fruit, consider between bites creating a delicious batch of apple sauce, pressing your own cider, or just utilizing one of the below recipes for a treat that's, well, sweet like apple pie on a Sunday afternoon.

Not for the faint of heart, here's a tutorial on constructing your very own cider press:

http://www.instructables.com/id/Small-Homebuilt-Cider-Press/

And for the rest of you, here are some great recipes being broadcast throughout the Internet in recent days:

Canned Apple Pie Filling

From Canning Homemade

Great as a gift, or for storing until you want a fresh-baked pie this winter!

10 pounds tart apples - peeled, cored and sliced (~20 cups sliced)

5 1/2 cups sugar

1 1/2 cup Clearjel

1 T. cinnamon

2-1/2 cups cold water (2 1/2 qts water if you omit apple juice)

5 cups apple juice

1 tsp. nutmeg

3/4 cup bottled lemon juice

Preparation -

For fresh apples, place 6 cups at a time into 1 gallon of boiling water and boil one minute when it comes back to a boil. Drain but keep fruit covered in a bowl.

In a stockpot, mix the sugar, Clearjel, cinnamon, nutmeg together. Add the water and apple juice, stir to mix well. Bring to a boil and cook until thick and bubbly, stirring frequently. Remove from heat. Add the lemon juice. Fold apples into mixture.

Pack the apples into hot, sterilized quart size canning jars. Best way to fill is in layers. Using the funnel ladle one large scoop and using the spatula press the apples down in the jar to remove the bubbles. Continue filling using this technique so that you work your way up the jar with as little air bubbles as possible. Fill the jars to 1" headspace. (Because of expansion you can go to 2")

Wipe the rims and place the hot lid/rings on the jars. Process in a water bath canner for 25 minutes at a full rolling boil. Wait 5 minutes, remove and place on dishtowel overnight undisturbed. The next day remove rings and clean jars and label with recipe name and date. Store in a cool, dry, and dark place.  This recipe will make 6 - 7 quarts.

Note:

For a great variation substitute brown sugar for the regular sugar and apple cider for the apple juice. This will make an amazing Caramel Apple Pie filling! 

If you need Clear Jel you can order it from the

SB Canning Store

!

BEST Vegan Apple Pie

From

My Vegan Son

IMG_0509

Ingredients:

Pie crust

(

make your own

or check out the “Wholly Wholesome” organic, traditional pie crust)

Filling:

  • 4 large organic apple

  • 1 tsp. ground cinnamon

  • 1/2 tsp. nutmeg

  • 1/2 c. sugar

  • juice of one lime

  • 2 Tbs. flour

Pie Top:

  • 1 stick of butter or vegan replacement (~1/2 c.)

  • 3/4 cup flour

  • (1/3) cup sugar

Preheat your oven to 350F. Wash, peel, and chop your apples. Place them in a bowl. Add the cinnamon, nutmeg, sugar, flour, and lime juice. Mix well. Pour the apples on the pie crust.

In a separate bowl place the buttery stick, the flour, and the sugar. Using your hands, combine the ingredients until they form a dough. Make one big dough ball and break into four smaller dough balls. Each dough ball should cover about 1/4 of the pie. Using your hands, flatten the dough balls as if you were making tortillas and start covering up the pie until it is completely covered.

IMG_0516
IMG_0518

Bake for about 45 minutes or until slightly golden (see picture).

IMG_0614

Let it cool before you dig in

IMG_0524

*Note: Always bake the pie on top of a pizza pan in case of pie drippings. 

Cranberry and Apple Crumble

From 

Spoonful

Cranberry and Apple Crumble

This sweet-tart crumble is best served warm, topped with whipped cream or vanilla ice cream (or vegan alternative). To be sure you're using the freshest berries, you'll want to choose fruit that has bounce in it. Or you can put it to the water test. Small pockets of air trapped in fresh cranberries make them bounce—and float in water.

Ingredients

  • 1/2 cup flour

  • 1/4 cup plus 2 tablespoons sugar

  • 1/4 cup packed brown sugar

  • 1/4 cup chilled butter, cut into small pieces

  • 6 cups peeled and sliced (about 1/2 inch thick) apples (we like Braeburn or Granny Smith)

  • 1 cup fresh or frozen cranberries

  • 1/3 cup fresh orange juice

  • 1 tablespoon cornstarch

Directions

  1. Heat the oven to 375°. Combine the flour, G cup of the sugar, the brown sugar, and the butter in a bowl. Mix the ingredients with your fingertips to create pea-size crumbs. (Alternatively, pulse the mixture in a food processor 10 times or so.)

  2. Combine the apple slices and cranberries in a large bowl. Mix the juice, remaining 2 tablespoons of sugar, and cornstarch in a small bowl. Pour the mixture over the fruit and toss well.

  3. Spoon the fruit into a 2-quart baking dish and sprinkle on the flour mixture. Bake the crumble until bubbly and golden brown, about 40 minutes. Serves 6 to 8.

Comment

Nicole Caldwell

Nicole Caldwell is a self-taught environmentalist, green-living savant and sustainability educator with more than a decade of professional writing experience. She is also the co-founder of Better Farm and president of betterArts. Nicole’s work has been featured in Mother Earth News, Reader’s Digest, Time Out New York, and many other publications. Her first book, Better: The Everyday Art of Sustainable Living, is due out this July through New Society Publishers.

'Food Safety' Act Hurts Small Farms

By Nicole Caldwell for JujuGood News

With the Food and Drug Administration on the verge of finally implementing the 2011 Food Safety Modernization Act, warning flags are being raised that certain elements of proposed regulations would put the kaibash on the Good Food Movement once and for all.

Continued on next page

Comment

Nicole Caldwell

Nicole Caldwell is a self-taught environmentalist, green-living savant and sustainability educator with more than a decade of professional writing experience. She is also the co-founder of Better Farm and president of betterArts. Nicole’s work has been featured in Mother Earth News, Reader’s Digest, Time Out New York, and many other publications. Her first book, Better: The Everyday Art of Sustainable Living, is due out this July through New Society Publishers.

Show Cold Season Who's Boss

We're coming into the time of year when runny noses, sneezes, and chest congestion are the norm and summer days are a thing of the past. While experts agree that

colds can't be cured

, they can certainly be shortened.

Click here for lots of amazing information about how colds fundamentally work

.

Studies suggest the majority of colds are "caught" not through the air, but by touching something (light switch, surfaces) and then touching the face. Keep that in mind, and wash your hands accordingly!  Also be sure, as always, to get plenty of sleep and keep your body fit with regular exercise. If you do end up with a bad case of the sniffles, here are our favorite immune-boosting recipes for scaring away all the germs of Autumn.

The Power of Water

From

Mother Earth News

When you come down with a cold or the flu, your respiratory tract works hard to expel the invading viruses along a veritable “Slip ’n Slide” of mucus. Rather than drying those mucus secretions with an over-the-counter antihistamine, it’s better to accelerate the healing process by thinning them, thus making it easier to expel them.

The best way to thin mucus secretions is to add water to your system by drinking warm liquids, especially herbal teas and soup broth. If you have access to a steam shower, use it. If not, bring a quart-size pot of water to a boil, remove it from the stove and place your face a comfortable distance from the steam, then cover your head with a towel. Inhale through your nose if you’re stuffy, or through your mouth for chest congestion.

You can augment the power of steam by adding a handful of decongesting, antimicrobial herbs to the boiled water, then covering the pot and allowing them to steep for 10 to 15 minutes. Great herbs fort his are eucalyptus, thyme, rosemary and peppermint.

Homemade Decongestant

by Annette McEndarfer

, as posted at

Titus 2 Homemaker

This homemade decongestant is good for breaking up chest congestion so you can clear it out. Anyone old enough to eat honey can take it.

Ingredients

  • 1 c. honey

  • 1 c. lemon juice

  • 5-7 radishes

  • 1 sm. red onion

  • 6 garlic cloves (If my cloves are super-small, I use a couple more.)

Instructions

  1. Wash, peel, and trim the vegetables as appropriate, and cut the onion into 2-4 chunks.

  2. Dump everything into the blender and blend until smooth.

  3. Strain.

  4. Refrigerate between uses, for up to a week or so.

  5. TO USE:

  6. Adults take 2 Tbsp. once a day, or more as needed/desired.

  7. Children take 1 Tbsp. once a day, or more as needed/desired.

  8. Should begin expelling within 24 hours. (We have typically noticed it kicking in within the first couple hours.)

Tomato Tea

This gem was

passed along to us from a neighbor

. We—and everyone else we've since recommended the recipe to—swear by it.

Instructions

  1. Heat up a mug of tomato juice (with or without a bouillon cube) to boiling.

  2. Add 1 fat clove of crushed garlic.

  3. Stir.

  4. Drink two a day (morning and late afternoon) for 10 days.

This concoction will supposedly start to work within three to five days. Can't stand tomato juice? Just use broth or water with bouillon in it. 

Three Words: Apple Cider Vinegar

From

Yahoo

A shot of apple cider vinegar will cut through your congestion. It does taste awful, but the benefits of swigging down a shot of vinegar are amazing. Vinegar kills bacteria, and cuts through the congestion helping you to breathe better. Do not over do it, just a small amount works wonders. Repeat this process every six to eight hours, not before, it will give you an upset stomach if you drink too much of it.

Comment

Nicole Caldwell

Nicole Caldwell is a self-taught environmentalist, green-living savant and sustainability educator with more than a decade of professional writing experience. She is also the co-founder of Better Farm and president of betterArts. Nicole’s work has been featured in Mother Earth News, Reader’s Digest, Time Out New York, and many other publications. Her first book, Better: The Everyday Art of Sustainable Living, is due out this July through New Society Publishers.

Spreading the Better Word

We're getting the word out about sustainable agriculture, organic food, and small-scale farming—and our reach is continuing to grow, with new media outlets scooping up our reporting on a daily basis.

As the popularity of

Better Farm

's mission grows, so too do the amount of visitors to our blog. Our DIY sections, educational information, and ever-growing cast of contributing authors have cast a wide net in the sustainability community, and word's leaked out.

So this year I started contributing blogs and homesteading blurbs to

Mother Earth News

. You can follow those pieces over at

www.motherearthnews.com

(just plug my name into their search engine).

Last week, I additionally started posting short blurbs about organic food and farming over at

JuJu Good News

, a new website focused on nutrition and food-centric issues. I'll be doing five short news blurbs a week, as well as one longer, feature piece a week. You can follow my posts at JuJu Good News by

clicking here

.

And it's not just me—former students in our education program have hit the pavement to contribute education and outreach in their own communities. This summer's

Fermentation Master Jacob Firman

went home in August,

bought a dish rack and some rags so his family could avoid running the dishwasher, and helped his mom hook up a rainwater barrel for irrigation. He also set his family up with a compost tumbler, and is now back at Oberlin where he's going to work with the student body to instate a compost system in the cafeteria and set up aquaponics in some student housing facilities. 

And

Kathryn Mollica

is back in New Jersey finishing up her last semester of school and working at Whole Foods; where she's been asked to teach classes on sustainability based on her work at Better Farm this summer. The list goes on—if you've got an update on how you're spreading the "better word", please get in touch!

Anyone who would like to contribute to our blog with a guest post about sustainability issues or green living can contact us at info@betterfarm.org. Oh—and be sure to tell your friends about year-round opportunities to become part of

Better Farm's Sustainability Education Program

(which, ahem, is

now listed by as a premier

educational program among major universities like Cornell, Columbia, and Boston

!).

Comment

Nicole Caldwell

Nicole Caldwell is a self-taught environmentalist, green-living savant and sustainability educator with more than a decade of professional writing experience. She is also the co-founder of Better Farm and president of betterArts. Nicole’s work has been featured in Mother Earth News, Reader’s Digest, Time Out New York, and many other publications. Her first book, Better: The Everyday Art of Sustainable Living, is due out this July through New Society Publishers.

DIY Three-Tier Compost Bin

Don't be fooled by all the greenwashing! Composting is the simplest, most natural thing in the world; and it doesn't require tumblers or bins that can cost you hundreds of dollars. With a few wood pallets, a drill, and outdoor decking screws, you can have a three-tier compost bin in less than 15 minutes that will last for years and provide you with a rotating supply of gorgeous, black dirt.


How a Three-Tier Compost Bin Works
All your dead leaves, grass clippings, twigs, hay, and kitchen food scraps (yes, even meat scraps and bones are fine, as you'll be working on a one-year system with your dirt)  get tossed into the first section of your compost bin until it's a full, big pile. When that bin is full, you shovel it all into the second bin (top-to-bottom). Then you go back to filling the first section of your compost bin. When it fills up again, you move everything from compartment 2 to 3, and from 1 to 2. Then you start over. When all three compartments are full (this should take the average household a full year or even longer), the third bin should be ready to be shoveled out into your garden.

How it works is that over time, the materials in each bin will be decomposing. The process is sped up by your twice-yearly aeration (manually shoveling the pile into the next bin), rainwater falling from overhead, and the natural aeration that will occur by oxygen reaching your pile from the nice big spaces between the wood of the pallets. Also, because you're leaving a bare earth floor, worms and other bugs have easy access to your compost heap.

Click here for tons of really great compost information.

If you're worried about backyard pests like raccoons or coyotes, be sure to install a hinged door on the front three sections of your compost bin. And of course, if you live in suburbs or the city, you may be subject to zoning or community board laws that would require a closed compost container such as a tumbler. For the rest of you, here's how to have your own three-tier compost bin in fewer than 15 minutes and for just the cost of screws.

What You'll Need:
  • Pallets (12 feet of pallets for back wall, four 4-foot pallets for the walls. Check with your local hardware store, contractors, big box stores, or your local transfer station. Free pallets are in abundance!)
  • Galvanized Decking Screws (longer is better)
  • Optional: Three "front doors" for your compost sections with hinges (each door should measure 4x4)
Directions:
  1. Screw the far left wall into the back wall with screws every six inches or so, driven from back to front.
  2. Repeat with the second wall (if pallet is wide enough, screw it into both sections of back wall. If not, you may need some additional pieces of wood to create a solid back to screw into. We were fortunate enough to find a very long pallet to have one continuous back wall). Continue until you have four walls and one solid back wall. Refer to photo at top of this post. 
Better Farm offers private and group instruction on composting basics and many other sustainability topics. Email info@betterfarm.org for further information or to schedule a visit. 
1 Comment

Nicole Caldwell

Nicole Caldwell is a self-taught environmentalist, green-living savant and sustainability educator with more than a decade of professional writing experience. She is also the co-founder of Better Farm and president of betterArts. Nicole’s work has been featured in Mother Earth News, Reader’s Digest, Time Out New York, and many other publications. Her first book, Better: The Everyday Art of Sustainable Living, is due out this July through New Society Publishers.

Menu for Sept. 26 Farm-To-Table Fundraiser

New York State wines paired with an organic menu will  make up

Better Farm's First Annual Farm-to-Table Fundraiser Dinner Party

at 6 p.m. Thursday, Sept. 26. The dinner, which includes four courses, hors d'oeuvres, and locally paired wines, is only $22 per person. Space is limited, so please email info@betterfarm.org to reserve a seat (payments can be made via Paypal). Our menu is as follows:

Hors D'oeuvres

Select local cheeses

Fruit compotes

Breaded Zucchini Medallions

Local breads and crackers

Local Wines

First Course

Russian Kale and Buttercrunch Lettuce Salad

Pickled Beets, multi-colored string beans, shaved cheese (vegan available), homemade dressing

Second Course

Butternut Squash Soup

With roast pumpkin, leeks, sesame seed, truffle oil

Main Dish

Bacon-Wrapped, Wild-Caught Goose

or

Swiss Chard-Wrapped, Vegetarian Dolmades

Sides

Roasted Vegetables

Cherry Tomatoes, Carrots, Cabbage, Squash with Pesto Glaze

Vegetable Casserole

Beans, Artichoke Hearts, Broccoli

Dessert

Apple Pie

Teas: Lemon Balm, Mint

Comment

Nicole Caldwell

Nicole Caldwell is a self-taught environmentalist, green-living savant and sustainability educator with more than a decade of professional writing experience. She is also the co-founder of Better Farm and president of betterArts. Nicole’s work has been featured in Mother Earth News, Reader’s Digest, Time Out New York, and many other publications. Her first book, Better: The Everyday Art of Sustainable Living, is due out this July through New Society Publishers.

Farm-Fresh Greens all Winter Long

With all these greens coming in, preserving will ensure a steady supply throughout the winter.
There's nothing like walking outside at Better Farm to pick beautiful, leafy greens for salads, smoothies, main dishes, and delicious sides. We're big consumers of kale, Swiss chard, lettuce, arugula, mustard greens, and spinach—and we're awfully spoiled by all the fresh, organic produce we've got from April through November. So, we're hesitant to give that up during winter months. Thankfully, there are plenty of ways to ensure a steady supply of super greens throughout November, December, and beyond. Below are some simple methods for keeping a cache of greens suitable for stir fries, smoothies, soups, casseroles, and much much more.


FREEZING: Kale, Spinach, Collard Greens, and Swiss Chard
If you like using any of these super greens in soups, smoothies, casseroles, or stir fries, the good news is that they're extremely easy to blanch and store in the freezer. This is by far the best method for preserving your dark, leafy greens. Here's all you have to do:
  1. Thoroughly clean the greens.
  2. Chop into small pieces. Remove stems and stalks.
  3. Toss into boiling water, leave for three minutes.
  4. Immediately drain the greens and toss into a bowl of ice water. Leave for three minutes.
  5. Drain again and pat dry or use salad spinner.
  6. Put greens into freezer bags. Remove air by using a drinking straw with most of the bag sealed.
DEHYDRATING GREENS
If you're a fan of, say, sprinkling seaweed flakes over rice, you might enjoy dehydrated greens. We find they lose some flavor this way, but it can't hurt to add a nutritional boost to any dish you're preparing. All you have to do (information found at Doris and Jilly Cook): Steam your greens just until they’re wilted. Transfer them to dehydrator trays and dry at a low temperature (say, 110ºF) just until they’re crispy (approximately two hours). Cut them up and add to a spice jar. This is a particularly great technique if you have family members who are loathe to eat greens and you're looking for a way to sneak health food into their meals. The flakes can even be ground into powder to make them completely imperceptible.

A Few Lines About Lettuce
Lettuce is basically impossible to freeze, but is extremely easy to grow all winter long indoors with a fish tank and grow light. Click here for more information on aquaponics. If you've got a good stream of lettuce growing, follow these tips from Pinch My Salt to keep your harvested lettuce crispy for up to two weeks:
  1. Fill a sink with cold water, separate all the leaves of lettuce, place them in the water and swirl them around. If the lettuce is a bit limp, let it soak in the water for 30 minutes and it will miraculously come back to life.
  2. Drain the water, turn on the faucet, and briefly rinse each piece of lettuce as you remove it from sink and place in the basket of your salad spinner. If you use organic lettuce, just give each piece a quick once-over to check for clinging bugs and dirt. As you put the lettuce in the spinner, you can tear the leaves in half if they are large (such as full-size romaine).
  3. When the spinner is full but not tightly packed, spin the lettuce until dry.
  4. Spread two paper towels (still connected) on the counter and pile the dry lettuce in the middle. Wrap the paper towels around the lettuce and slide into a gallon-size zippered plastic bag. Squeeze the air out and close the bag.
  5. The lettuce can now be stored in the fridge and should stay fresh for at least a couple of weeks. You can take out what you need whenever you want to make a salad or sandwich and then just reseal the bag. The plastic bags can also be reused!
Comment

Nicole Caldwell

Nicole Caldwell is a self-taught environmentalist, green-living savant and sustainability educator with more than a decade of professional writing experience. She is also the co-founder of Better Farm and president of betterArts. Nicole’s work has been featured in Mother Earth News, Reader’s Digest, Time Out New York, and many other publications. Her first book, Better: The Everyday Art of Sustainable Living, is due out this July through New Society Publishers.

Better Farm's Bats Make a Comeback

In spite of continued reports that bat populations throughout the Northeast continue to dwindle, it appears the bats at

Better Farm

are making a comeback.

The sharp decline in bat population is due largely to a bat fungus, called "White-Nose Syndrome". The fungus was first detected in New York State in 2006 and is thought to have originated in Europe, where bats seem to have immunity to it,

according to many articles on the topic

. The fungus appears as powdery white on a bat’s face, wings and skin, typically appearing as a white ring around the nose. It causes the bat to wake up in the middle of winter hibernation and therefore use up its reserve energy and die.

Since 2006, the fungus has

spread to 20 states

, mostly in the eastern United States. An estimated 6 million bats have been lost in North America so far due to the fungus, with some agencies asking that bat species once considered common now be considered endangered.

But why all the fuss? Simple: Bats are important predators of agricultural pests. One estimate suggests that North American bats help avoid more than $3.7 billion in lost crops and pesticide costs every year — and the number may be as high as

$53 billion a year

.

Bats also are predators of night flying insects such as moths and mosquitoes which I'm sure we can all appreciate—especially if you live in the North Country!

One of the residents chased a bat out of the Art Barn several weeks ago, which we all took as a great sign some bats had come back to the farm. Then a few days ago, one of the dogs here took interest in something on the wraparound deck. When I walked over to the spot, I saw a bunch of what appeared to be mouse droppings:

Seemed strange for there to be mouse droppings collected in one outdoors spot. Then I looked up and saw our two bathouses, which have been unoccupied since 2008:

Some basic searches online showed that what I mistook as mouse droppings were actually bat droppings—proof-positive the bats have returned to take up lodging at Better Farm.

Comment

Nicole Caldwell

Nicole Caldwell is a self-taught environmentalist, green-living savant and sustainability educator with more than a decade of professional writing experience. She is also the co-founder of Better Farm and president of betterArts. Nicole’s work has been featured in Mother Earth News, Reader’s Digest, Time Out New York, and many other publications. Her first book, Better: The Everyday Art of Sustainable Living, is due out this July through New Society Publishers.